このトピックでは、Vueアプリケーション(ASP.NET Core)にWebデザイナコンポーネントを組み込む方法について説明します。Reactテンプレートを使用して、ReactフロントエンドアプリケーションをVue.jsフロントエンドアプリケーションに置き換えます。Vueアアプリケーションサーバーを実行するには、NodeJSとVue CLIが必要です。Vue CLIをインストールするにはコマンドプロンプトで次のコマンドを入力してインストールします。
npm install -g @vue/cli
-
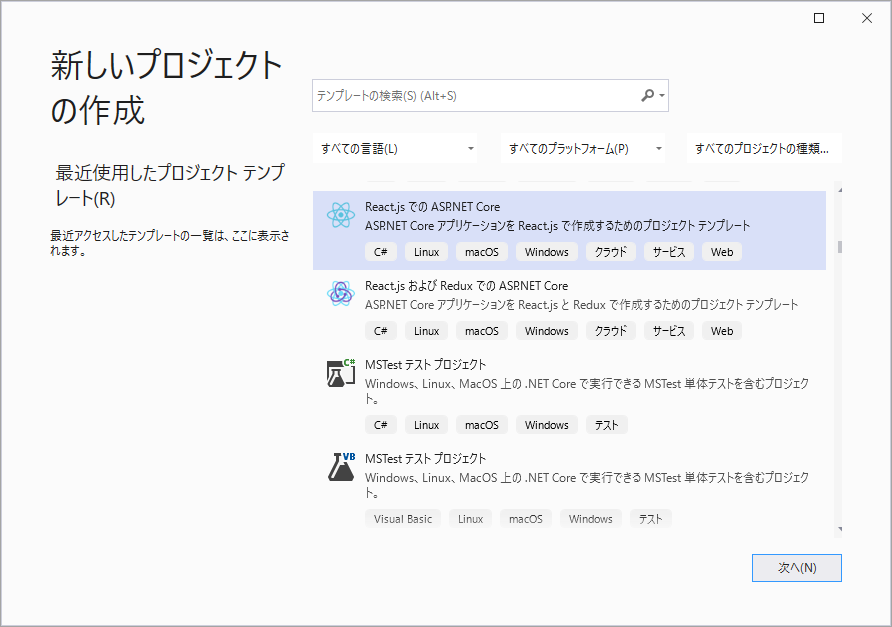
Visual Studio 2022を開き、「React.js でのASP.NET Core」テンプレートを選択して、新しいプロジェクトを追加します。

-
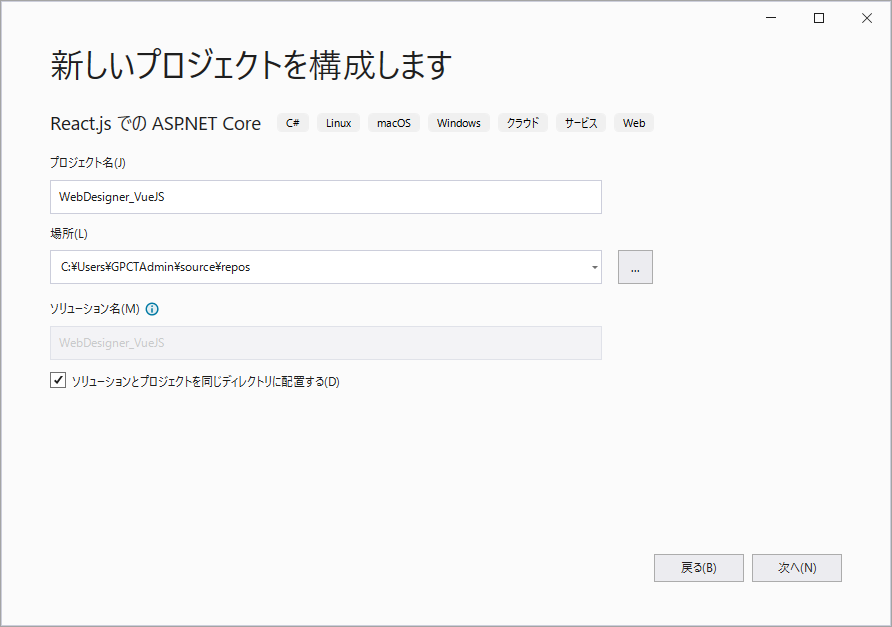
プロジェクト名を入力し、[次へ]をクリックします。

-
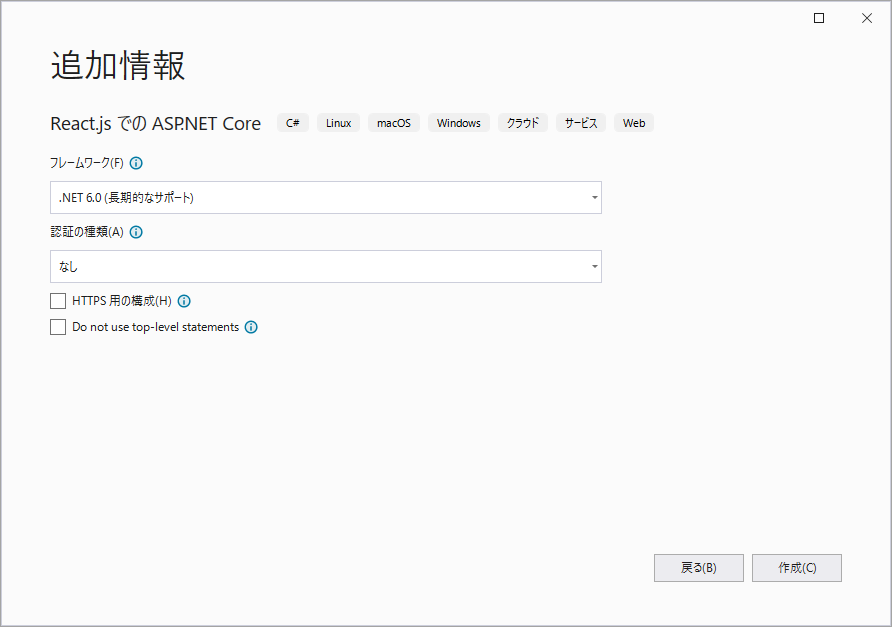
フレームワークとして「.NET 6.0(長期的なサポート)」を選択し、「HTTPS 用の構成」のチェックボックスを外します。

- [ソリューションエクスプローラー]で、ソリューションを右クリックし、[NuGet パッケージの管理]を選択します。
-
次のパッケージをプロジェクトに追加します。
GrapeCity.ActiveReports.Aspnetcore.Designer.ja
GrapeCity.ActiveReports.Aspnetcore.Viewer.ja -
プロジェクトフォルダ内に[resources]フォルダを作成します。 [resources] フォルダに、ビューワに表示するレポートを保存できます。Webデザイナで作成したレポートは、この場所に保存されます。
-
Program.csファイルを開き、次のように変更します。
Program.cs コードのコピーusing GrapeCity.ActiveReports.Aspnetcore.Viewer; using GrapeCity.ActiveReports.Aspnetcore.Designer; using System.Reflection; // リソース(レポート、テーマ、画像)の場所 var ResourcesRootDirectory = new DirectoryInfo(".\\resources\\"); var builder = WebApplication.CreateBuilder(args); // コンテナにサービスを追加します。 builder.Services.AddControllersWithViews(); builder.Services .AddReporting() .AddDesigner() .AddMvc(options => options.EnableEndpointRouting = false) .AddJsonOptions(options => options.JsonSerializerOptions.PropertyNamingPolicy = null); var app = builder.Build(); // HTTP要求パイプラインを構成します。 if (!app.Environment.IsDevelopment()) { // HSTSの既定値は30日です。本番シナリオでは変更することをお勧めします。詳細については、「https://aka.ms/aspnetcore-hsts」を参照してください。 app.UseHsts(); } app.UseReporting(config => config.UseFileStore(ResourcesRootDirectory)); app.UseDesigner(config => config.UseFileStore(ResourcesRootDirectory, false)); app.UseStaticFiles(); app.UseRouting(); app.MapControllerRoute( name: "default", pattern: "{controller}/{action=Index}/{id?}"); app.MapFallbackToFile("index.html"); ; app.Run();
-
アプリケーションのルートに「Web構成ファイル」を追加し、その内容を次のコードに置き換えます。
web.config コードのコピー<configuration> <system.webServer> <security> <requestFiltering allowDoubleEscaping="true"/> </security> </system.webServer> </configuration>Vue.jsフロントエンドを構成する
-
既存のClientAppフォルダを削除します。
-
コマンドプロンプトでプロジェクトルートを開き、次のコマンドを実行します。
(Vue CLIでは、プロジェクト名に大文字は使用できません)。vue create client-app -
Vue CLIがプロジェクトの生成を終了したら、client-appフォルダの名前をClientAppに変更します。
上記の3つの手順で、ReactフロントエンドアプリケーションをVue.jsフロントエンドアプリケーションに完全に置き換えました。
-
ClientAppフォルダを展開します。
-
package.jsonファイルを開き、「dependencies」の下にActiveReportsのビューワおよびデザイナの次のパッケージを追加します。
"@grapecity/ar-designer": "^16.x.x",

        "@grapecity/ar-viewer": "^16.x.x",

"ncp": "^2.0.0" - package.jsonファイルのscriptsセクションを次の内容に置き換えます。
package.json コードのコピー"scripts": { "deploy-bundles": "ncp ./node_modules/@grapecity/ar-viewer/dist ../wwwroot && ncp ./node_modules/@grapecity/ar-designer/dist ../wwwroot", "serve": "npm run deploy-bundles && vue-cli-service serve", "build": "npm run deploy-bundles && vue-cli-service build", "lint": "vue-cli-service lint" },
-
コマンドプロンプトでClientAppフォルダを開き、次のコマンドを実行してnpmパッケージをインストールします。
npm installWebデザイナとjsViewerに関するファイルとフォルダは、現在のディレクトリにダウンロードされます。".\node_modules\@grapecity\ar-designer\dist"、".\node_modules\@grapecity\ar-viewer\dist"
-
デザイナに関する次のファイル/フォルダをコピーし、ClientApp\srcフォルダに貼り付けます。
-
web-designer.css
-
web-designer.js
-
vendor フォルダ
-
jsViewer.min.css
-
jsViewer.min.js
-
custom-locale.json
-
-
ClientApp\srcフォルダ内のApp.vueファイルを開き、そのコードを次のコードに置き換えます。
App.vue コードのコピー<template> <div id="ar-web-designer" class="ar-web-designer"> <span class="ar-web-designer__loader"><b>ActiveReports Webデザイナ</b></span> </div> </template> <script> var viewer = null; export default { name: 'App', mounted() { /*global GrapeCity*/ /*eslint no-undef: "error"*/ GrapeCity.ActiveReports.Designer.create('#ar-web-designer', { appBar: { openButton: { visible: true } }, editor: { showGrid: false }, data: { dataSets: { canModify: true }, dataSources: { canModify: true } }, preview: { openViewer: (options) => { if (viewer) { viewer.openReport(options.documentInfo.id); return; } viewer = GrapeCity.ActiveReports.JSViewer.create({ element: '#' + options.element, renderFormat: 'svg', reportService: { url: 'api/reporting', }, reportID: options.documentInfo.id, settings: { zoomType: 'FitPage', }, }); } } }); }, unmounted() { viewer.destroy(); } } </script> -
ClientApp\publicフォルダ内のindex.htmlファイルを開き、その内容を次のように変更します。
index.html コードのコピー<!DOCTYPE html> <html lang="en"> <head> <meta charset="utf-8"> <meta http-equiv="X-UA-Compatible" content="IE=edge"> <meta name="viewport" content="width=device-width,initial-scale=1.0"> <style> body, html { width: 100%; height: 100%; margin: 0; padding: 0 } @@keyframes arwd-loader { from { color: #fff } to { color: #205f78 } } .ar-web-designer { width: 100%; height: 100% } .ar-web-designer__loader { display: flex; width: 100%; height: 100%; background-color: #205f78; color: #fff; font-size: 18px; animation-name: arwd-loader; animation-duration: .62s; animation-timing-function: ease-in-out; animation-iteration-count: infinite; animation-direction: alternate; justify-content: center; align-items: center } </style> <link rel="icon" href="<%= BASE_URL %>favicon.ico"> <link rel="stylesheet" href="assets/vendor/css/fonts-googleapis.css" type="text/css" /> <link rel="stylesheet" href="assets/jsViewer.min.css" /> <link rel="stylesheet" href="assets/web-designer.css" /> <title>WebDesigner VueJS</title> </head> <body> <script src="assets/jsViewer.min.js"></script> <script src="assets/web-designer.js"></script> <div id="app"></div> <!-- built files will be auto injected --> </body> </html>
-
ClientApp\vue.config.jsファイルを開き、開発サーバーの設定を含めるように更新します。
vue.config.js コードのコピーconst { defineConfig } = require('@vue/cli-service') module.exports = defineConfig({ devServer: { proxy: { '/api/*': { target: 'http://localhost:5069', secure: false }, }, port: 44422, https: false, headers: { 'Connection': 'Keep-Alive', }, }, transpileDependencies: true })
-
.csprojファイルのSpaProxyLaunchCommandを次のように更新します。
.csproj コードのコピー<SpaProxyLaunchCommand>npm run serve</SpaProxyLaunchCommand>
-
[ビルド] > [ソリューションのビルド]をクリックして、ソリューションをビルドします。F5を押して実行します。