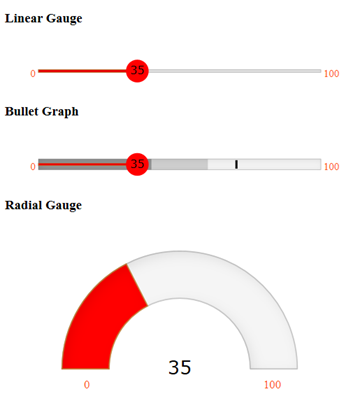
The Gauge control allows to customize its appearance using CSS. You can create your own custom CSS and then apply it to the Gauge control using CssClass property.
The example uses CssClass property to apply custom cascading styling sheets in the Gauge control. In this example, we customize the default CSS rules to make the following customizations to the Gauge control.
- Change the font-size, opacity and color of the gauges.
- Change the font-size, font-weight, font-family and color of the gauges.
- Change the color and stroke of the gauge pointer.
- Set the minimum and maximum values of the displayed text.
The following image shows how the Gauge control appears after using a custom CSS class.

Add Custom Stylesheet
Create a new ASP.NET MVC application. Once you have created the application, a Content folder is created in the Solution Explorer after adding the view to the application. To add a custom style sheet in your application, follow these steps:
- In the Solution Explorer, right-click the Content folder.
- From the context menu, select Add | Style Sheet. The Specify Name for Item dialog appears.
- Set name of the style sheet (for example: app.css) and click OK.
- Replace the default code of app.css file with the code given below.
app.css コードのコピー<style> .gauge .wj-gauge .wj-min, .gauge .wj-gauge .wj-max { font-size: 15px; opacity: .9; fill: orangered; } .radialgauge .wj-gauge .wj-min, .radialgauge .wj-gauge .wj-max { font-size: 10px; opacity: .9; fill: orangered; } .wj-pointer path { fill: #ff0000; stroke: #cd853f; } .wj-gauge .wj-value { font-size: 100%; font-weight: 500; font-family: Verdana, sans-serif; fill: black !important; } </style> <br /><br /> - In the Views folder, open a view, say Styling.cshtml, to add the following code for applying custom CSS.
Styling.cshtml コードのコピー<div class="gauge" style="min-width:500px; width:33.33%"> <h3>Linear Gauge</h3> <br /><br /> @(Html.C1().LinearGauge().Id("secondGauge") .HasShadow(false).Value(35).Min(0).Max(100).Step(5).IsReadOnly(false) .ShowText(ShowText.All).Face(face => face.Thickness(0.25)) .Pointer(pointer => pointer.Thickness(0.25) .Color(System.Drawing.Color.Red))) </div> <br /> <div class="gauge"> <h3>Bullet Graph</h3> <br /><br /> @(Html.C1().BulletGraph() .Min(0).Max(100).Good(60).Bad(40) .Value(35).Target(70).ShowText(ShowText.All) .IsReadOnly(false).Step(1).Width(500) .IsAnimated(true) .Pointer(pointer => pointer.Thickness(0.25).Color(System.Drawing.Color.Red))) </div> <br /> <h3>Radial Gauge</h3> <br /><br /> <div class="radialgauge"> @(Html.C1().RadialGauge() .Value(35) .Width(500) .Height(200) .Min(0).Max(100) .ShowText(ShowText.All) .AutoScale(true)) </div>