このセクションでは、MVC Web フォームに FlexGrid コントロールを追加し、コントロールにデータを挿入する方法について説明します。以下の例は、FlexGridコントロールにローカルモデルのバインドを示しています。FlexGridでリモート連結については、「リモートデータ連結」を参照してください。
このトピックは3つの手順で構成されます。
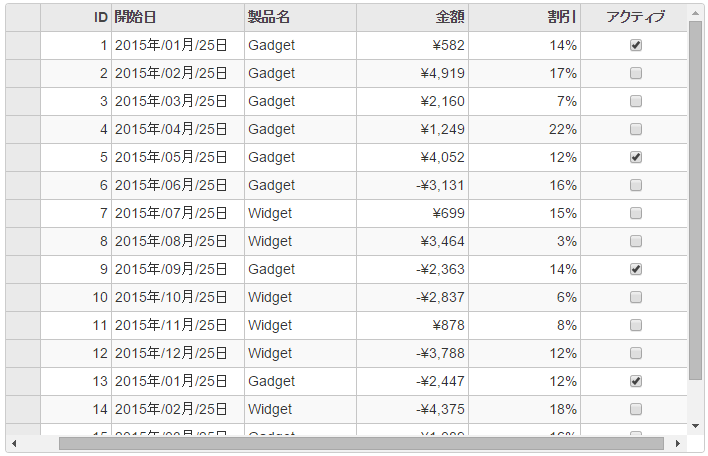
次の図は、上記の手順を実行した後の FlexGrid を示しています。

手順 1:FlexGrid のデータソースの作成
- [モデル]フォルダに新しいクラスを追加します(例:
FlexGridDataSource.cs)。新しいモデルの追加方法については、「コントロールの追加」を参照してください。 - 次のコードを新しいモデルに追加して、FlexGrid コントロールのデータソースになるクラスを定義します。
Sale.cs コードのコピーusing System; using System.Collections.Generic; using System.Linq; using System.Web; using C1.Web.Mvc; using C1.Web.Mvc.Serializition; using <ApplicationName>.Models; namespace <ApplicationName>.Models { public class Sale { public int ID { get; set; } public DateTime 開始日 { get; set; } public DateTime 終了日 { get; set; } public string 国名 { get; set; } public string 製品名 { get; set; } public string 色 { get; set; } public double 金額 { get; set; } public double 金額2 { get; set; } public double 割引 { get; set; } public bool アクティブ { get; set; } public MonthData[] 傾向 { get; set; } public int ランク { get; set; } /// <summary> /// データを取得 /// </summary> /// <param name="total"></param> /// <returns></returns> public static IEnumerable<Sale> GetData(int total) { var countries = new[] { "米国", "イギリス", "カナダ", "日本", "中国", "フランス", "ドイツ", "イタリア", "韓国", "オーストラリア" }; var products = new[] { "Widget", "Gadget", "Doohickey" }; var colors = new[] { "黒色", "白色", "赤色", "緑色", "青い色" }; var rand = new Random(0); var dt = DateTime.Now; var list = Enumerable.Range(0, total).Select(i => { var country = countries[rand.Next(0, countries.Length - 1)]; var product = products[rand.Next(0, products.Length - 1)]; var color = colors[rand.Next(0, colors.Length - 1)]; var date = new DateTime(dt.Year, i % 12 + 1, 25, i % 24, i % 60, i % 60); return new Sale { ID = i + 1, 開始日 = date, 終了日 = date, 国名 = country, 製品名 = product, 色 = color, 金額 = rand.NextDouble() * 10000 - 5000, 金額2 = rand.NextDouble() * 10000 - 5000, 割引 = rand.NextDouble() / 4, アクティブ = (i % 4 == 0), 傾向 = Enumerable.Range(0, 12).Select(x => new MonthData { Month = x + 1, Data = rand.Next(0, 100) }).ToArray(), ランク = rand.Next(1, 6) }; }); return list; } } public class MonthData { public int Month { get; set; } public double Data { get; set; } } }
手順 2:FlexGrid コントロールの追加
FlexGrid コントロールを初期化するには、次の手順を実行します。
新しいコントローラーの追加
- ソリューションエクスプローラーで、[コントローラー]フォルダを右クリックします。
- コンテキストメニューから、[追加]→[コントローラー]を選択します。[コントローラーの追加]ダイアログが表示されます。
-
[コントローラーの追加] ダイアログで、次の手順を実行します。
- コントローラーの名前を設定します(例:
Default1Controller)。 - [MVC 5 コントローラー -空]テンプレートを選択します。
- [追加]をクリックします。
- コントローラーの名前を設定します(例:
- 次に示すように MVC 参照を追加します。
C# コードのコピーusing System.Collections; using System.Globalization; using System.Linq; using System.Web.Mvc; using C1.Web.Mvc; using <ApplicationName>.Models; using System.Collections.Generic; using System;
- メソッド Index() を次のメソッドに置き換えます。
QuickStartController.cs
C# コードのコピーpublic ActionResult Index() { return View(Sale.GetData(15)); }
ビューの追加
- ソリューションエクスプローラーで、[コントローラー]フォルダを展開し、コントローラー(例:
Default1Controller)をダブルクリックして開きます。 - メソッド
Index()内にカーソルを置きます。 - 右クリックし、[ビューの追加]を選択します。[ビューの追加]ダイアログが表示されます。
- [ビューの追加]ダイアログで、ビュー名が Index で、ビューエンジンが Razor(CSHTML)であることを確認します。
- [追加]をクリックします。コントローラーにビューが追加されました。
- ソリューションエクスプローラーで、
Index.cshtmlをダブルクリックします。 -
Views\Index.cshtml ファイルのデフォルトのコードを次のコードに置き換えて、FlexGrid コントロールを初期化します。
HTML コードのコピー@using TagFlexGrid.Models @using C1.Web.Mvc.Grid @model IEnumerable<Sale> <c1-flex-grid auto-generate-columns="false" height="500px" width="800px" class="grid" is-read-only="true" allow-add-new="true" allow-sorting="true" selection-mode="@((SelectionMode.Cell))" > <c1-items-source source-collection="@Model"></c1-items-source> <c1-flex-grid-column binding="ID"></c1-flex-grid-column> <c1-flex-grid-column binding="開始日" format="yyyy年/MM月/dd日"></c1-flex-grid-column> <c1-flex-grid-column binding="製品名"></c1-flex-grid-column> <c1-flex-grid-column binding="金額" format="c"></c1-flex-grid-column> <c1-flex-grid-column binding="割引" format="p0"></c1-flex-grid-column> <c1-flex-grid-column binding="アクティブ"></c1-flex-grid-column> </c1-flex-grid>
手順 3:プロジェクトのビルドおよび実行
- [ビルド]→[ソリューションのビルド]をクリックして、プロジェクトをビルドします。
- [F5]キーを押してプロジェクトを実行します。
関連トピック