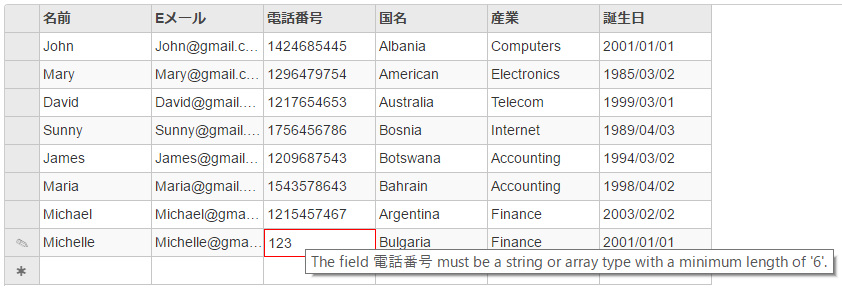
FlexGridは、控えめな検証をサポートしており、クライアント側検証によってFlexGridの行に入力されたデータを検証することができます。控えめな検証は、大量の検証コードを書かずにシンプルなクライアント側検証を実装し、正しい属性を追加してスクリプトファイルをインクルードするだけで、ユーザーエクスペリエンスを向上させることができます。
任意のコントロールを検証する検証やクライアント側の検証を使用する一般的な検証シナリオでは、JavaScriptコードが生成されて、WebブラウザでHTMLとしてレンダリングされます。一方、控えめな検証では、クライアント側の検証を処理するためにレンダリングされるインラインJavaScriptは生成されません。その代わりに、HTML5 data-*属性をクライアント側検証に使用します。控えめな検証のサポートは、jQueryに依存します。
以下の手順を実装する前に、ComponentOneテンプレートまたはVisual Studioテンプレートを使用して、新しいMVCアプリケーションを作成する必要があります。
このトピックは3つの手順で構成されます。

手順1:FlexGridの検証とデータソースの作成
モデル - UserInfo.cs(検証を含む)
| Razor |
コードのコピー
|
|---|---|
using System.ComponentModel.DataAnnotations; namespace UnobtrusiveValidation.Models { public class UserInfo { [Required] [RegularExpression(pattern: "^[a-zA-Z0-9]{4,10}$", ErrorMessage = "The username must be alphanumeric and contains 4 to 10 characters.")] public string Name { get; set; } [Required] [EmailAddress] public string Email { get; set; } [Required] [MinLength(6)] [MaxLength(16)] public string Phone { get; set; } [Required] public string Country { get; set; } [Required] public string Industry { get; set; } [Required] public DateTime Birthdate { get; set; } } } |
|
モデル - UserData.cs (データを含む)
| Razor |
コードのコピー
|
|---|---|
public class UserData { public static List<UserInfo> Users { get { return new List<UserInfo>() { new UserInfo(){ Name="John", Email="John@gmail.com", Phone="1424685445", Country="Albania", Industry="Computers", Birthdate= DateTime.Parse("2001/1/1")}, new UserInfo(){ Name="Mary", Email="Mary@gmail.com", Phone="1296479754", Country="American", Industry="Electronics", Birthdate= DateTime.Parse("1985/3/2")}, new UserInfo(){ Name="David", Email="David@gmail.com", Phone="1217654653", Country="Australia", Industry="Telecom", Birthdate= DateTime.Parse("1999/3/1")}, new UserInfo(){ Name="Sunny", Email="Sunny@gmail.com", Phone="1756456786", Country="Bosnia", Industry="Internet", Birthdate= DateTime.Parse("1989/4/3")}, new UserInfo(){ Name="James", Email="James@gmail.com", Phone="1209687543", Country="Botswana", Industry="Accounting", Birthdate= DateTime.Parse("1994/3/2")}, new UserInfo(){ Name="Maria", Email="Maria@gmail.com", Phone="1543578643", Country="Bahrain", Industry="Accounting", Birthdate= DateTime.Parse("1998/4/2")}, new UserInfo(){ Name="Michael", Email="Michael@gmail.com", Phone="1215457467", Country="Argentina", Industry="Finance", Birthdate= DateTime.Parse("2003/2/2")}, new UserInfo(){ Name="Michelle", Email="Michelle@gmail.com", Phone="1534357546", Country="Bulgaria", Industry="Finance", Birthdate= DateTime.Parse("2001/1/1")} }; } } } |
|
手順2:FlexGridコントロールの追加
UnobtrusiveValidationController.cs
| Razor |
コードのコピー
|
|---|---|
public class IndexController : Controller { private static List<UserInfo> users = UserData.Users; public IActionResult Index() { return View(users); } } |
|
View - Index.cshtml
| Razor |
コードのコピー
|
|---|---|
@using ValidationFlexGrid.Models @model List<UserInfo> @section Scripts { @{await Html.RenderPartialAsync("_ValidationScriptsPartial");} } <br /> <c1-flex-grid id="flexGrid" auto-generate-columns="false" allow-add-new="true" allow-delete="true" height="400px"> <c1-flex-grid-column binding="Name"></c1-flex-grid-column> <c1-flex-grid-column binding="Email"></c1-flex-grid-column> <c1-flex-grid-column binding="Phone"></c1-flex-grid-column> <c1-flex-grid-column binding="Country"></c1-flex-grid-column> <c1-flex-grid-column binding="Industry"></c1-flex-grid-column> <c1-flex-grid-column binding="Birthdate"></c1-flex-grid-column> <c1-items-source source-collection="Model"> </c1-items-source> </c1-flex-grid> |
|
手順3:プロジェクトのビルドおよび実行
- [ビルド]→[ソリューションのビルド]をクリックして、プロジェクトをビルドします。
- [F5]キーを押してプロジェクトを実行します。
制限
- FlexGridの控えめな検証は、チェックボックスのbooleanデータをサポートしません。クリックすると、編集が直ちに終了するからです。
- FlexGridの控えめな検証は、読み取りアクションからモデルメタデータを取得できないため、読み取りアクションURLへの連結はサポートしません。
- FlexGridの控えめな検証は、編集中は実際の値を取得できないため、データマップ列はサポートしません。
- FlexGridの控えめな検証は、「onPrepareCellForEdit」がトリガされないため、セルテンプレートをサポートしません。