Without the controls and designers that make configuration easy, designing applications in DataConnectors may at times require some extra effort. With the scaffolding feature for DataConnectors, creating applications with DataConnector becomes easier, as it generates relevant model classes based on the source entities, while also creating the DbContext class. This is a walk-through for getting started with the scaffolders.
Create a Console App
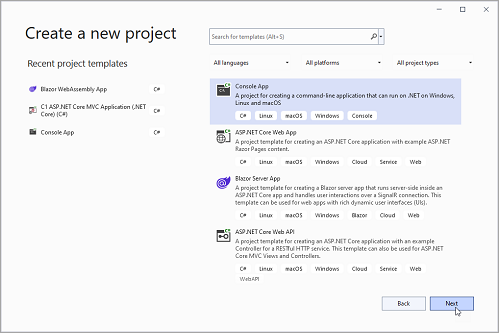
- In Visual Studio, select Create a new project from the Get started pane.
- In the Create a new project dialog,
select Console App,
then click Next.

- In the Configure your new project dialog, fill for the new project the fields:
- Project name
- Location
- In the Additional information dialog,
select the target framework from the Framework dropdown (if it is not already selected),
then click Create.
Add the NuGet packages
- In the Solution Explorer, right click Dependencies and select Manage NuGet Packages.
- In NuGet Package Manager, select nuget.org as the Package source.
- Search and select the following packages:
- C1.EntityFrameworkCore.Salesforce
- Microsoft.EntityFrameworkCore.Tools (version 3.1.0 or 6.0.0)
Note: If the scaffolding used is for 2020 v3 or prior versions,
select C1.EntityFrameworkCore.Salesforce & Microsoft.EntityFrameworkCore.Tools (version 2.1.0).
Initialize the Scaffolder
To implement Scaffolding using ADO.NET provider in Visual Studio, navigate to View -> Other Windows -> Package Manager Console.
To generate .cs files that represent the entity framework model for all the tables in the Salesforce datasource, run scaffolding command line with the following syntax (similar commands can be used to implement scaffolding in other DataConnectors as well):
| PowerShell |
コードのコピー
|
|---|---|
Scaffold-DbContext "Username=****;Password=****;Security Token=****;OAuth Client Id=****; OAuth Client Secret=****; OAuth Token Endpoint=https://ap17.salesforce.com/services/oauth2/token; Url=https://ap17.salesforce.com/services/data/v42.0" C1.EntityFrameworkCore.Salesforce |
|
To generate a single table (here "Account"), add the -Tables modifier, followed by the name of the table, like in the code below:
| PowerShell |
コードのコピー
|
|---|---|
Scaffold-DbContext "Username=****;Password=****;Security Token=****;OAuth Client Id=****; OAuth Client Secret=****; OAuth Token Endpoint=https://ap17.salesforce.com/services/oauth2/token; Url=https://ap17.salesforce.com/services/data/v42.0" C1.EntityFrameworkCore.Salesforce -OutputDir "GeneratedCode" -Tables Account |
|
For multiple tables (here "Account" and "Order"), add their names separated by comma, like in the code below:
| PowerShell |
コードのコピー
|
|---|---|
Scaffold-DbContext "Username=****;Password=****;Security Token=****;OAuth Client Id=****; OAuth Client Secret=****; OAuth Token Endpoint=https://ap17.salesforce.com/services/oauth2/token; Url=https://ap17.salesforce.com/services/data/v42.0" C1.EntityFrameworkCore.Salesforce -OutputDir "GeneratedCode" -Tables Account, Order |
|