The ADO.NET provider for Dynamics 365 Sales provides a wide range of features that enable connectivity to Dynamics 365 Sales from .Net applications. The documentation will help you understand the C1.AdoNet.D365S namespace, which includes all the available classes that can be used to connect and retrieve data from a Dynamics 365 Sales service.
DataConnectors are mostly used in combination with other ComponentOne components, such as DataEngine and FlexPivot. For a better understanding of this application, please see Dynamics 365 Sales Sample live demo. The procedure below describes how to use the DataConnector in a console application within Visual Studio.
How to create a new Console Application
The ADO.NET provider for D365S can be used in any application. In this guide, a console application is created:
- Open Visual Studio.
- In the Get started pane, select Create a new project.
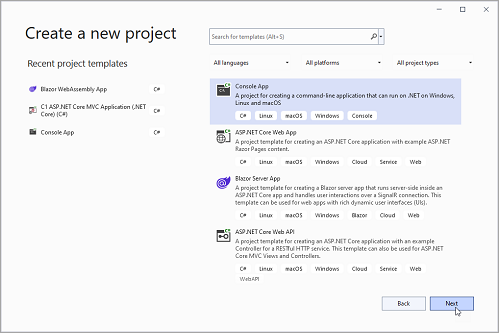
- In the Create a new project window, select Console Application and click Next, as in the screenshot below:

- In the Configure your new project window,write the project's name choose location to save the project then click Create.
How to add the NuGet packages
To use the ADO.NET provider for D365S in an application, the respective NuGet package should be added:
- From the Project menu, select Manage NuGet Packages.
- In the NuGet Package Manager, click the Package source drop down and select nuget.org
- In the left pane of the Browse tab, select C1.AdoNet.D365S
- In the right pane of the Browse tab, click Install to add the reference to the package.
How to use ADO.Net provider for D365S to retrieve data
Quick example
C1D365SConnection implements the ADO.NET DbConnection similar to standard ADO.NET connection object. Thus retrieving data can be as easy as the following few lines, which print some data from the Northwind data service, by using C1D365SDataAdapter to retrieve a single result set of all the data that matches a query (for other connection options, click here).
| C# |
コードのコピー
|
|---|---|
static void CountTableRows() { var adapter = new C1.AdoNet.D365S.C1D365SDataAdapter( connectionString: "Url = {url};" + "OAuth Client Id = {clientId};" + "OAuth Client Secret = {clientSecret};" + "OAuth Token Endpoint = {tokenEnpoint};" + "OAuth Extend Properties = {extendProperties}", commandText: "SELECT * FROM accounts LIMIT 10"); var table = new System.Data.DataTable(); adapter.Fill(table); Console.WriteLine("Fetched {0} rows.", table.Rows.Count); } |
|
The above code is only for quick script-like usage. Real applications require more structured approaches. However, the high-level steps are similar:
- Create a connector.
- Use the connector to fill an in-memory table.
- Render the table's contents.
Detailed structured example
This example expands the above steps into reusable methods within a class.
- Prepare the general structure of the code:
C# コードのコピーusing C1.AdoNet.D365S; using System.Data; using System.Text; public static class D365SGettingStarted { public static void Run() { // データソースと取得するデータを指定します。 // 指定されたソース用に新しいアダプターを準備し、それを再利用して指定されたデータを取得します。 // 取得したデータを出力します。 } }
- Add inside the class the following method, which prepares the needed C1 AdoNet D365S objects:
C# コードのコピー// 渡された接続文字列で提供されるデータを取得する準備ができている新しいアダプターを返します。 static C1D365SDataAdapter MakeAdapterForConString(string conString) { var connection = new C1D365SConnection(conString); var command = new C1D365SCommand(connection); return new C1D365SDataAdapter(command); }
- Add inside the class the following extension method, which fills a table with the data:
C# コードのコピー// 渡された SELECT ステートメントのデータを取得し、新しいデータテーブルで返します。 static DataTable FetchTableForSql(this C1D365SDataAdapter adapter, string sql) { adapter.SelectCommand.CommandText = sql; var table = new DataTable(); adapter.Fill(table); return table; }
- Add inside the class the following extension method, which appends the table to a string builder:
C# コードのコピー// 渡されたデータテーブル行の出力をビルダーに追加します。 static StringBuilder AppendRowsOfTable(this StringBuilder builder, DataTable table) { foreach (DataRow row in table.Rows) { builder.AppendJoin(" - ", row.ItemArray).AppendLine(); } return builder.AppendLine(); }
- Call the above methods in order, by filling the entry method Run with the following code:
C# コードのコピー// データ ソースと取得するデータを指定します。 string crmConString = "Url = {url};" + "OAuth Client Id = {clientId};" + "OAuth Client Secret = {clientSecret};" + "OAuth Token Endpoint = {tokenEnpoint};" + "OAuth Extend Properties = {extendProperties}"; string revenueSql = "SELECT accountid, openrevenue FROM accounts WHERE (openrevenue > 500000)"; string versionSql = "SELECT accountid, name, versionnumber FROM accounts WHERE (versionnumber > 132000000)"; // 指定されたソース用に新しいアダプターを準備し、それを再利用して指定されたデータを取得します。 using C1D365SDataAdapter adapter = MakeAdapterForConString(crmConString); using DataTable revenueTable = adapter.FetchTableForSql(revenueSql); using DataTable versionTable = adapter.FetchTableForSql(versionSql); // 取得したデータを出力します。 var builder = new StringBuilder(); builder.AppendLine() .AppendLine("Printing for revenue:") .AppendRowsOfTable(revenueTable) .AppendLine("Printing for version:") .AppendRowsOfTable(versionTable) .AppendLine("End of printing."); Console.Write(builder);
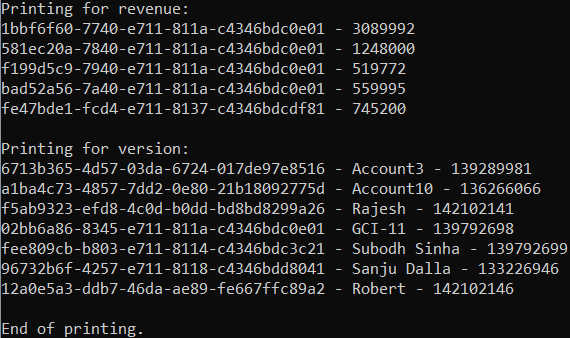
Running the console application should produce an output like this one:
