このクイックスタートでは、Expression Editorコントロールを作成し、オブジェクトに連結するプロセスの手順を説明し、式を作成してフィールドで演算を実行する方法を示します。
Expression Editorコントロールを備えたアプリケーションを作成する手順は、次のとおりです。
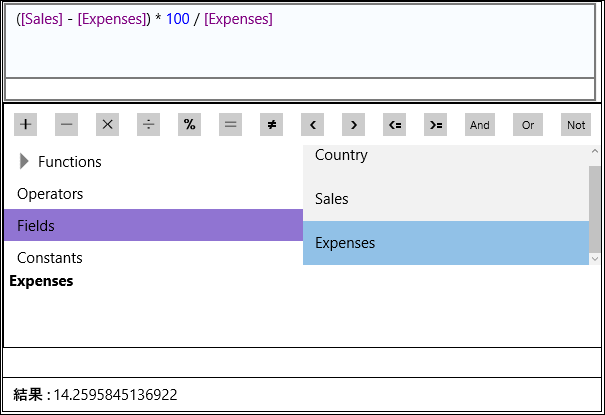
次の図に、さまざまな国の売上と経費を表すクラスのインスタンスに連結された式エディタコントロールを示します。
先頭に戻る
手順 1:アプリケーションへのExpression Editorコンポーネントの追加
- ユニバーサル Windows アプリケーションを作成し、MainPage.xaml を開きます。
- コンポーネント C1ExpressionEditor と C1ExpressionEditorPanel をページに追加します。Xaml コードは次のようになります。
<c1:C1ExpressionEditor x:Name="ExpressionEditor"
                       Width="{Binding ActualWidth, ElementName=ExpressionPanel}"
                       HorizontalAlignment="Left"
                       VerticalAlignment="Top"
                       MinHeight="100" />
<c1:C1ExpressionEditorPanel x:Name="ExpressionPanel"
                            HorizontalAlignment="Left"
                            Height="300"
                            Width="599" />
先頭に戻る
手順 2:コンポーネントの連結
次のコードスニペットでは、C1ExpressionEditorPanel クラスが公開する ExpressionEditor プロパティを使用してコンポーネント C1ExpressionEditor と C1ExpressionEditorPanel を連結します。
<c1:C1ExpressionEditor x:Name="ExpressionEditor"
                       Width="{Binding ActualWidth, ElementName=ExpressionPanel}"
                       HorizontalAlignment="Left"
                       VerticalAlignment="Top"
                       MinHeight="100" />
<c1:C1ExpressionEditorPanel x:Name="ExpressionPanel"
                            ExpressionEditor="{Binding ElementName=ExpressionEditor}"
                            HorizontalAlignment="Left"
                            Height="300"
                            Width="599" />
先頭に戻る
手順 3:結果パネルとエラーパネルの追加
- 結果パネルを作成するために、C1ExpressionEditorPanel ブロックの後に StackPanel と 2 つの TextBlock を追加します。
- エラーパネルを作成するために、StackPanel の後に TextBlock を追加します。
次のコードスニペットは、結果パネルとエラーパネルのマークアップを示します。
<StackPanel Orientation="Horizontal" Grid.Row="3" Margin="9,36,-9,-27">
    <TextBlock Text="結果 : " FontWeight="Bold"/>
    <TextBlock x:Name="Result" Text="" />
</StackPanel>
<TextBlock x:Name="Errors"
           Grid.Row="3"
           Foreground="Red"
           TextWrapping="Wrap"
           HorizontalAlignment="Left"
           VerticalAlignment="Top"
           MinHeight="25" />
先頭に戻る
手順 4:ExpressionChanged イベントのサブスクライブと処理
- C1ExpressionEditor の ExpressionChanged イベントをサブスクライブします。
ExpressionEditor.ExpressionChanged += ExpressionEditor_ExpressionChanged;
- ExpressionChanged イベントを処理して、入力された式の結果を次のように表示します。
private void ExpressionEditor_ExpressionChanged(object sender, EventArgs e)
{
    C1ExpressionEditor edit = sender as C1ExpressionEditor;

    if (!edit.IsValid)
    {
        Result.Text = "";
        Errors.Text = "";
    }
    else
    {
        Result.Text = edit.Evaluate()?.ToString();
        Errors.Text = "";
    }
}
先頭に戻る
手順 5:オブジェクトへのExpression Editorの連結
Expression Editorは、演算の実行対象となるデータを表すクラスのインスタンスに連結できます。それには、C1ExpressionEditor クラスが公開する DataSource オブジェクトを使用します。
次のコードスニペットは、Expression Editorのオブジェクトをクラスのオブジェクトに連結する方法を示します。
// オブジェクトバインディング
ExpressionEditor.DataSource = new DataItem("フランス", 1210009, 1059000);
この例のExpression Editorは、1 つの国の 1 つの会社の売上データと経費データを表すクラスのインスタンスに連結します。
// オブジェクトバインディング用のデータ
public class DataItem
{
    public DataItem(string country, int sales, int expenses)
    {
        Country = country;
        Sales = sales;
        Expenses = expenses;
    }

    public string Country { get; set; }
    public int Sales { get; set; }
    public int Expenses { get; set; }

}
先頭に戻る
手順 6:プロジェクトのビルドおよび実行
- [ビルド]→[ソリューションのビルド]をクリックして、プロジェクトをビルドします。
- [F5]キーを押してプロジェクトを実行します。
いくつかの国の売上と経費の数値を表すクラスのオブジェクトに連結されたExpression Editorコントロールを表示するユニバーサル Windows アプリケーションを正しく作成できました。
有効な式を入力します。たとえば、ある国の小売店の利益率の合計を計算します。国の販売と経費のデータは、オブジェクトから提供されます。
先頭に戻る