C1Document を作成するプロセスの例を示すために、簡単なアセンブリドキュメントユーティリティを実装するために必要な手順について説明します。
まず、新しいプロジェクトを作成し、C1.Xaml アセンブリと C1.Xaml.RichTextBox アセンブリへの参照を追加します。次に、ページのコンストラクタを次のように編集します。
C# コードの書き方
| C# |
コードのコピー
|
|---|---|
using C1.Xaml; using C1.Xaml.RichTextBox; using C1.Xaml.RichTextBox.Documents; using System.Reflection; using System.Text; using Windows.UI; using Windows.UI.Text; // Blank Page 項目テンプレートは、http://msdn.microsoft.com/ja-jp/library/windows/apps/xaml/hh768232.aspx で文書化されています。 namespace RTBTestsDoc { /// <summary> /// 自身で使用したり、Frame 内で移動先になることができる空のページ。 /// </summary> public sealed partial class MainPage : Page { // C1Document ドキュメントを表示する C1RichTextBox C1RichTextBox _rtb; public MainPage() { this.InitializeComponent(); // C1RichTextBox を作成してページに追加します _rtb = new C1RichTextBox(); LayoutRoot.Children.Add(_rtb); // ドキュメントを作成して C1RichTextBox に表示します _rtb.Document = DocumentAssembly(typeof(C1RichTextBox).GetTypeInfo().Assembly); _rtb.IsReadOnly = true; } |
|
このコードは、C1RichTextBox を作成し、その C1RichTextBox.Document プロパティに DocumentAssembly メソッドの呼び出しの結果を割り当てます。次に、ユーザーがレポートを変更できないようにコントロールを読み取り専用にします。
DocumentAssembly メソッドは、Assembly を引数として受け取り、アセンブリドキュメントを含む C1Document を構築します。実装は次のとおりです。
C# コードの書き方
| C# |
コードのコピー
|
|---|---|
C1Document DocumentAssembly(Assembly asm)
        {
            // ドキュメントを作成します
            C1Document doc = new C1Document();
            doc.FontFamily = new FontFamily("Tahoma");
            //Heading1 H = new Heading1("Assembly\r\n" + asm.FullName.Split(',')[0]);
            // アセンブリ
            Heading1 p = new Heading1();
            p.Inlines.Add(new C1Run() { Text = "Assembly\r\n" + asm.FullName.Split(',')[0] });
            doc.Blocks.Add(p);

            // タイプ
            foreach (Type t in asm.ExportedTypes)
                DocumentType(doc, t);

            // Done
            return doc;
        }
|
|
このメソッドは、最初に新しい C1Document オブジェクトを作成し、その C1TextElement.FontFamily プロパティを設定します。これは、ドキュメントに追加されるすべてのテキスト要素のデフォルト値になります。
次に、このメソッドは、アセンブリ名を含む Heading1 段落を新しいドキュメントの Blocks コレクションに追加します。ブロックは、ドキュメントに縦方向に並べられる段落、リスト項目などの要素から成ります。ブロックは、HTML の "div" 要素に似ています。ドキュメント要素には、代わりに Inlines コレクションが含まれる場合もあります。これらのコレクションには、HTML の "span" 要素のように、横方向に並べられる要素が含まれます。
Heading1 クラスは C1Paragraph を継承し、書式設定を追加します。ここでは、通常の段落と見出し1〜4に対応するこのようなクラスをいくつかプロジェクトに追加します。
Normal 段落は、コンストラクタでコンテンツ文字列を受け取る C1Paragraph です。
C# コードの書き方
| C# |
コードのコピー
|
|---|---|
class Normal : C1Paragraph
        {
            public Normal()
            {
               // this.Inlines.Add(new C1Run() { Text = text });
                this.Padding = new Thickness(30, 0, 0, 0);
                this.Margin = new Thickness(0);
            }
        }
|
|
Heading 段落は、Normal を拡張してテキストを太字にします。
C# コードの書き方
| C# |
コードのコピー
|
|---|---|
class Heading : Normal
        {
            public Heading()
            {
                this.FontWeight = FontWeights.Bold;
            }
        }
|
|
Heading1 から Heading4 は、Heading を拡張してフォントサイズ、パディング、境界、および色を指定します。
C# コードの書き方
| C# |
コードのコピー
|
|---|---|
class Heading1 : Heading
        {
            public Heading1()
            {
                this.Background = new SolidColorBrush(Colors.Yellow);
                this.FontSize = 24;
                this.Padding = new Thickness(0, 10, 0, 10);
                this.BorderBrush = new SolidColorBrush(Colors.Black);
                this.BorderThickness = new Thickness(3, 1, 1, 0);
            }
        }
        class Heading2 : Heading
        {
            public Heading2()
            {
                this.FontSize = 18;
                this.FontStyle = FontStyle.Italic ;
                this.Background = new SolidColorBrush(Colors.Yellow);
                this.Padding = new Thickness(10, 5, 0, 5);
                this.BorderBrush = new SolidColorBrush(Colors.Black);
                this.BorderThickness = new Thickness(3, 1, 1, 1);
            }
        }
        class Heading3 : Heading
        {
            public Heading3()
            {
                this.FontSize = 14;
                this.Background = new SolidColorBrush(Colors.LightGray);
                this.Padding = new Thickness(20, 3, 0, 0);
            }
        }
        class Heading4 : Heading
        {
            public Heading4()
            {
                this.FontSize = 14;
                this.Padding = new Thickness(30, 0, 0, 0);
            }
        }
|
|
これでドキュメント内の各段落タイプに対応するクラスを設定したので、次にコンテンツを追加します。最初のコードブロックで DocumentType メソッドを使用したことを思い出してください。次にそのメソッドの実装を示します。
C# コードの書き方
| C# |
コードのコピー
|
|---|---|
void DocumentType(C1Document doc, Type t)
        {

            // タイプ
            Heading2 h2 = new Heading2();
            h2.Inlines.Add(new C1Run() { Text = "Class " + t.Name });
            doc.Blocks.Add(h2);

            // プロパティ
            Heading3 h3 = new Heading3();
            h3.Inlines.Add(new C1Run() { Text = "Properties" });
            doc.Blocks.Add(h3);
            foreach (PropertyInfo pi in t.GetRuntimeProperties())
            {
                if (pi.DeclaringType == t)
                    DocumentProperty(doc, pi);
            }

            // メソッド
            h3 = new Heading3();
            h3.Inlines.Add(new C1Run() { Text = "Methods" });
            doc.Blocks.Add(h3);
            foreach (MethodInfo mi in t.GetRuntimeMethods())
            {
                if (mi.DeclaringType == t)
                    DocumentMethod(doc, mi);
            }

            // イベント
            h3 = new Heading3();
            h3.Inlines.Add(new C1Run() { Text = "Events" });
            doc.Blocks.Add(h3);
            foreach (EventInfo ei in t.GetRuntimeEvents())
            {
                if (ei.DeclaringType == t)
                    DocumentEvent(doc, ei);
            }
        }
|
|
このメソッドは、クラス名を含む Heading2 段落を追加し、次にリフレクションを使用してすべてのパブリックプロパティ、イベント、およびメソッドを列挙します。これらのメソッドのコードは簡単です。
C# コードの書き方
| C# |
コードのコピー
|
|---|---|
void DocumentProperty(C1Document doc, PropertyInfo pi)
        {
            if (pi.PropertyType.IsGenericParameter)
                return;

            Heading4 h4 = new Heading4();
            h4.Inlines.Add(new C1Run() { Text = pi.Name });
            doc.Blocks.Add(h4);

            var text = string.Format("public {0} {1} {{ {2}{3} }}",
              pi.PropertyType.Name,
              pi.Name,
              pi.CanRead ? "get; " : string.Empty,
              pi.CanWrite ? "set; " : string.Empty);
            Normal n = new Normal();
            n.Inlines.Add(new C1Run() { Text = text });
            doc.Blocks.Add(n);
        }
|
|
このメソッドは、プロパティ名を含む Heading4 段落を追加し、次にプロパティタイプ、名前、およびアクセサを含む Normal テキストを追加します。
イベントとプロパティを記述するために使用するメソッドは似ています。
C# コードの書き方
| C# |
コードのコピー
|
|---|---|
 void DocumentMethod(C1Document doc, MethodInfo mi)
        {
            if (mi.IsSpecialName)
                return;

            Heading4 h4 = new Heading4();
            h4.Inlines.Add(new C1Run() { Text = mi.Name });
            doc.Blocks.Add(h4);
            var parms = new StringBuilder();
            foreach (var parm in mi.GetParameters())
            {
                if (parms.Length > 0)
                    parms.Append(", ");
                parms.AppendFormat("{0} {1}", parm.ParameterType.Name, parm.Name);
            }
            var text = string.Format("public {0} {1}({2})",
              mi.ReturnType.Name,
              mi.Name,
              parms.ToString());

            Normal n = new Normal();
            n.Inlines.Add(new C1Run() { Text = text });
            doc.Blocks.Add(n);
        }

        void DocumentEvent(C1Document doc, EventInfo ei)
        {
            Heading4 h4 = new Heading4();
            h4.Inlines.Add(new C1Run() { Text = ei.Name });
            doc.Blocks.Add(h4);

            var text = string.Format("public {0} {1}",
              ei.EventHandlerType.Name,
              ei.Name);

            Normal n = new Normal();
            n.Inlines.Add(new C1Run() { Text = text });
            doc.Blocks.Add(n);
        }
    }
}
|
|
ここでプロジェクトを実行すると、次の図のようになります。
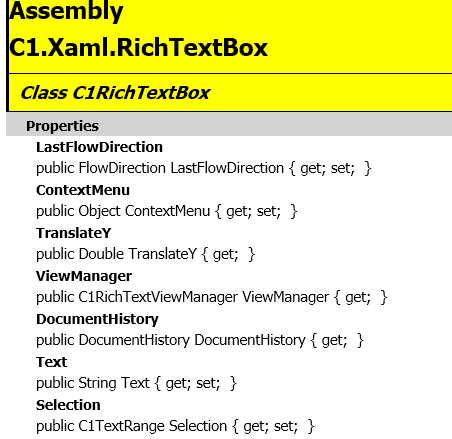
結果のドキュメントは、他と同様に C1RichTextBox で表示および編集できます。C1RichTextBox の C1RichTextBox.Html プロパティを使用して、これを HTML にエクスポートしたり、クリップボードを使用して Microsoft Word、Excel などのアプリケーションにコピーすることもできます。
同じテクニックを使用して、データベースから取得したデータに基づくレポートを作成することもできます。書式設定されたテキストに加えて、C1Document オブジェクトモデルは以下の機能をサポートします。
- リスト
リストは、C1List のオブジェクトをドキュメントに追加して作成します。C1List オブジェクトには、C1ListItem のオブジェクトを含む C1List.ListItems プロパティがあります。このオブジェクトもブロックです。 - ハイパーリンク
ハイパーリンクは、C1Hyperlink のオブジェクトをドキュメントに追加して作成します。C1Hyperlink オブジェクトは、ラン(通常はテキストを含む C1Run 要素)のコレクションを含む C1Span.Inlines プロパティと、このハイパーリンクがクリックされたときに実行するアクションを決定する NavigateUri を持ちます。 - イメージ
イメージなどの FrameworkElement のオブジェクトは、ドキュメントに C1BlockUIContainer オブジェクトを追加することによって作成します。C1BlockUIContainer オブジェクトには C1BlockUIContainer.Child プロパティがあり、これは任意の FrameworkElement オブジェクトに設定できます。
すべてのオブジェクトを HTML にエクスポートできるわけではありません。イメージは、その処理方法が HTML フィルタで定義されている特別なケースです。