Word ドキュメントでテキストフローを使用できます。Word for UWP を使用して、ドキュメントの段やページにテキストをフロー挿入できます。
次のコードでは、WordUtils という名前のクラスを使用します。このクラスは、システムの次の場所にある製品サンプル内に置かれています。
Documents\ComponentOne Samples\UWP\WordSample
これらのクラスを上記の場所からアプリケーションで使用できます。
次のコードは、Word for UWP でテキストフロー機能を使用する方法を示します。
 ' 長い文字列をリソースファイルからロードします
Dim text As String = Strings.ResourceNotFound

Using sr = New StreamReader(GetType(BasicTextPage).GetTypeInfo()
     .Assembly.GetManifestResourceStream("WordSamples.Resources.flow.txt"))
        text = sr.ReadToEnd()
End Using
text = text.Replace(vbTab, "   ")

' Word ドキュメントを作成します
word.Info.Title = "テキストフロー"

' 表
Dim rows As Integer = 4
Dim cols As Integer = 2
Dim table As New RtfTable(rows, cols)
word.Add(table)
table.Rows(0).Cells(0).SetMerged(1, 2)

For row As Integer = 0 To rows - 1
        If row = 0 Then
                table.Rows(row).Height = 50
        End If
        For col As Integer = 0 To cols - 1
                'RtfParagraph paragraph = new RtfParagraph();
                'paragraph.Alignment = RtfHorizontalAlignment.Undefined;
                'paragraph.Content.Add(new RtfString(string.Format("table cell {0}:{1}.", row, col)));
                'table.Rows[row].Cells[col].Content.Add(paragraph);
                table.Rows(row).Cells(col).Content.Add(New RtfString(String.Format("table cell {0}:{1}.", row, col)))
                If row = 0 AndAlso col = 0 Then
                        table.Rows(row).Cells(col).Alignment = ContentAlignment.MiddleCenter
                        table.Rows(row).Cells(col).BackFilling = Colors.LightPink
                Else
                        table.Rows(row).Cells(col).BackFilling = Colors.LightYellow
                End If
                table.Rows(row).Cells(col).BottomBorderWidth = 2
                table.Rows(row).Cells(col).TopBorderWidth = 2
                table.Rows(row).Cells(col).LeftBorderWidth = 2
                table.Rows(row).Cells(col).RightBorderWidth = 2
        Next
Next

Return

' タイトルを追加します
Dim titleFont As New Font("Tahoma", 24, RtfFontStyle.Bold)
Dim bodyFont As New Font("Tahoma", 9)
Dim rcPage As Rect = WordUtils.PageRectangle(word)
Dim rc As Rect = WordUtils.RenderParagraph(word, word.Info.Title, titleFont, rcPage, rcPage, False)
rc.Y += titleFont.Size + 6
rc.Height = rcPage.Height - rc.Y

' テキストに対して段を 2 つ作成します
Dim rcLeft As Rect = rc
rcLeft.Width = rcPage.Width / 2 - 12
rcLeft.Height = 300
rcLeft.Y = (rcPage.Y + rcPage.Height - rcLeft.Height) / 2
Dim rcRight As Rect = rcLeft
rcRight.X = rcPage.Right - rcRight.Width

' 左の段から開始します
rc = rcLeft

' 文字列を複数の段とページにまたがってレンダリングします
While True
        ' 四角形に収まるだけの文字列をレンダリングします
        rc = WordUtils.Inflate(rc, -3, -3)
        'int nextChar = word.DrawString(text, bodyFont, Colors.Black, rc);
        word.DrawString(text, bodyFont, Colors.Black, rc)
        rc = WordUtils.Inflate(rc, +3, +3)
        word.DrawRectangle(Colors.LightGray, rc)

        ' 完了したら終了します
        'if (nextChar >= text.Length)
        If True Then
                Exit While
        End If

        ' レンダリングされた部分を削除します
        'text = text.Substring(nextChar);

        ' 右側の四角形に切り替えます
        If rc.Left = rcLeft.Left Then
                rc = rcRight
        Else
                ' 次のページの左側の四角形に切り替えます
                word.PageBreak()
                rc = rcLeft
        End If
End While
// 長い文字列をリソースファイルからロードします
string text = Strings.ResourceNotFound;

using(var sr = new StreamReader(typeof(BasicTextPage).GetTypeInfo()
    .Assembly.GetManifestResourceStream("WordSamples.Resources.flow.txt"))) {
  text = sr.ReadToEnd();
}
text = text.Replace("\t", "   ");

// Word ドキュメントを作成します
word.Info.Title = "テキストフロー";

// 表
int rows = 4;
int cols = 2;
RtfTable table = new RtfTable(rows, cols);
word.Add(table);
table.Rows[0].Cells[0].SetMerged(1, 2);

for (int row = 0; row < rows; row++) {
  if (row == 0) {
    table.Rows[row].Height = 50;
  }
  for (int col = 0; col < cols; col++) {
    //RtfParagraph paragraph = new RtfParagraph();
    //paragraph.Alignment = RtfHorizontalAlignment.Undefined;
    //paragraph.Content.Add(new RtfString(string.Format("table cell {0}:{1}.", row, col)));
    //table.Rows[row].Cells[col].Content.Add(paragraph);
    table.Rows[row].Cells[col].Content.Add(new RtfString(string.Format("table cell {0}:{1}.", row, col)));
    if (row == 0 && col == 0) {
      table.Rows[row].Cells[col].Alignment = ContentAlignment.MiddleCenter;
      table.Rows[row].Cells[col].BackFilling = Colors.LightPink;
    } else {
      table.Rows[row].Cells[col].BackFilling = Colors.LightYellow;
    }
    table.Rows[row].Cells[col].BottomBorderWidth = 2;
    table.Rows[row].Cells[col].TopBorderWidth = 2;
    table.Rows[row].Cells[col].LeftBorderWidth = 2;
    table.Rows[row].Cells[col].RightBorderWidth = 2;
  }
}

return;

// タイトルを追加します
Font titleFont = new Font("Tahoma", 24, RtfFontStyle.Bold);
Font bodyFont = new Font("Tahoma", 9);
Rect rcPage = WordUtils.PageRectangle(word);
Rect rc = WordUtils.RenderParagraph(word, word.Info.Title, titleFont, rcPage, rcPage, false);
rc.Y += titleFont.Size + 6;
rc.Height = rcPage.Height - rc.Y;

// テキストに対して段を 2 つ作成します
Rect rcLeft = rc;
rcLeft.Width = rcPage.Width / 2 - 12;
rcLeft.Height = 300;
rcLeft.Y = (rcPage.Y + rcPage.Height - rcLeft.Height) / 2;
Rect rcRight = rcLeft;
rcRight.X = rcPage.Right - rcRight.Width;

// 左の段から開始します
rc = rcLeft;

// 文字列を複数の段とページにまたがってレンダリングします
for (;;) {
  // 四角形に収まるだけの文字列をレンダリングします
  rc = WordUtils.Inflate(rc, -3, -3);
  //int nextChar = word.DrawString(text, bodyFont, Colors.Black, rc);
  word.DrawString(text, bodyFont, Colors.Black, rc);
  rc = WordUtils.Inflate(rc, +3, +3);
  word.DrawRectangle(Colors.LightGray, rc);

  // 完了したら終了します
  //if (nextChar >= text.Length)
  {
    break;
  }

  // レンダリングされた部分を削除します
  //text = text.Substring(nextChar);

  // 右側の四角形に切り替えます
  if (rc.Left == rcLeft.Left) {
    rc = rcRight;
  } else // 次のページの左側の四角形に切り替えます
  {
    word.PageBreak();
    rc = rcLeft;
  }
}
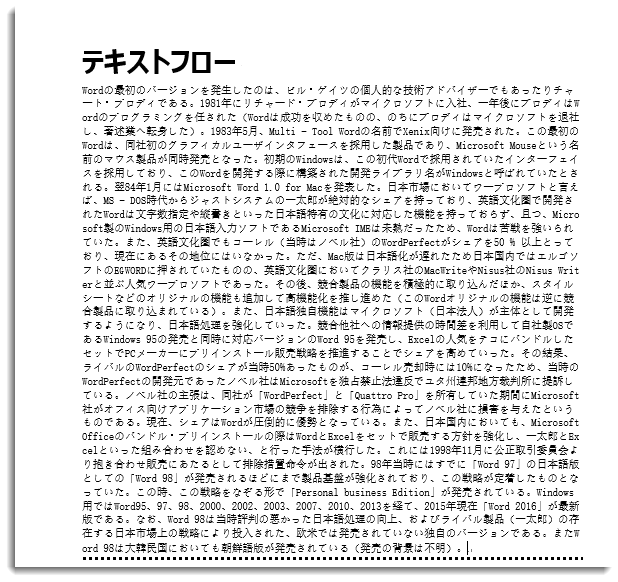
上記のコードの出力は、次の図のようになります。