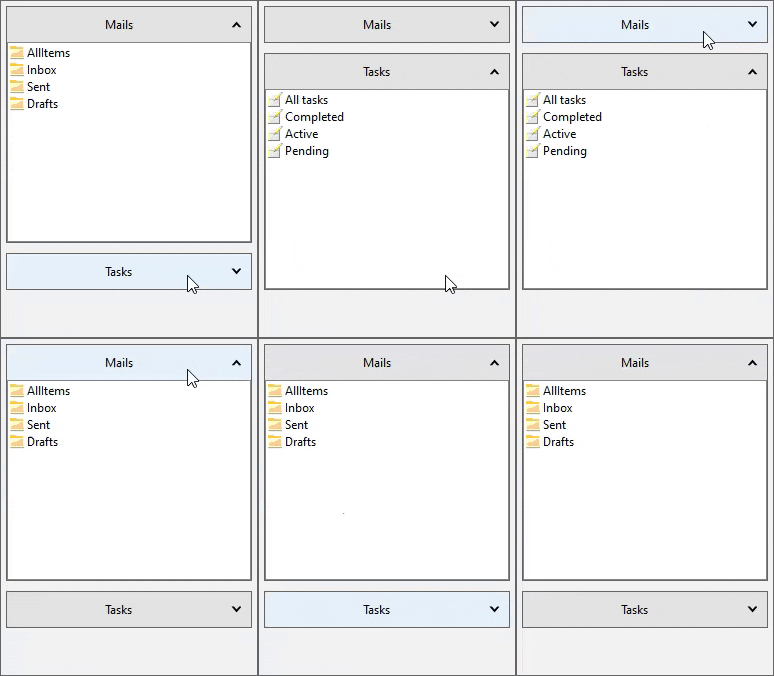
The following quick start guides the user how to create a simple application using Accordion. In this quick start, you'll create a new project in Visual Studio, add the Accordion control to your application, add pages to it and then add content to content area of the pages.

Set Up the Application
- Create a new Windows Forms App.
- Configure your project and set the Framework to .NET 6.0.
- Install C1.Win.Accordion package using NuGet Package Manager. The C1Accordion control gets added to the Toolbox once the package gets installed.
- Drag and drop the Accordion control from the Toolbox onto the form.
Add and Configure Accordion Page
- Click the Accordion smart tag to open C1Accordion Tasks panel and select Edit Pages. Alternatively, you can navigate to the Pages property in the Properties window and click the ellipsis button next to it.
This opens the C1AccordionPage Collection Editor with a page. - In the C1AccordionPage Collection Editor, set the Name and HeaderText properties of the default page. In this example, we set the Name as mailPage and HeaderText as Mail.
- Click Add button to add another Page to the Accordion control and set its Name and HeaderText properties. Here, we set the Name as tasksPage and HeaderText as Task.
- Click OK to close the editor.
Add Controls to the Content Area
- Switch to the code view and create controls to be shown in the pages. In this example, we created two ListViews and added items in them using the following code.
C# コードのコピーprivate void InitTasksList() { //ListView を作成します。 tasksListView = new ListView(); //ドッキングして埋めます。 tasksListView.Dock = DockStyle.Fill; //アイテムをリストとして表示したいので、ビューをリストに設定します。 tasksListView.View = View.List; //ImageList を割り当て、アイテムの画像を表示するために使用されます。 tasksListView.SmallImageList = imgList; //リストビューにアイテムを追加します。 tasksListView.Items.Add("All tasks", "task"); tasksListView.Items.Add("Completed", "task"); tasksListView.Items.Add("Active", "task"); tasksListView.Items.Add("Pending", "task"); } private void InitMaiList() { //ListView を作成します。 mailListView = new ListView(); //ドッキングして埋めます。 mailListView.Dock = DockStyle.Fill; //アイテムをリストとして表示したいので、ビューをリストに設定します。 mailListView.View = View.List; //ImageList を割り当て、アイテムの画像を表示するために使用されます。 mailListView.SmallImageList = imgList; //リストビューにアイテムを追加します。 mailListView.Items.Add("AllItems", "folder"); mailListView.Items.Add("Inbox", "folder"); mailListView.Items.Add("Sent", "folder"); mailListView.Items.Add("Drafts", "folder"); }
- Add the controls to the content panel of the AccordionPage. Here, we are adding the two ListViews in the two pages to display different options along with images. These images are accessible from the Images folder in the application.
C# コードのコピーListView mailListView; ListView tasksListView; ImageList imgList; public Form1() { InitializeComponent(); //ImageList を作成します。 imgList = new ImageList(); //カスタム キーで画像を追加します。 imgList.Images.Add("folder", Resources.Folder); imgList.Images.Add("task", Resources.Journal_48); //メール ページの ListView コントロールを初期化します。 InitMaiList(); //タスク ページの ListView コントロールを初期化します。 InitTasksList(); var mailPage = c1Accordion1.Pages[0]; var taskPage = c1Accordion1.Pages[1]; mailPage.ContentHeight = taskPage.ContentHeight = 200; //AccordionPage のコンテンツ領域にコントロールを追加します。 mailPage.Controls.Add(mailListView); taskPage.Controls.Add(tasksListView); }