このトピックでは、C1OutBar コントロールのページのタイトル領域をカスタマイズする方法を学びます。3つの C1OutPage を含む C1OutBar を作成し、いくつかのプロパティを設定して、各タイトルにカスタム色をペイントするコードをプロジェクトに追加します。
以下の手順を実行します。
- C1OutBar コントロールをフォームに追加します。
- 3つの C1OutPage コンポーネントを C1OutBarコントロールに追加します(「C1OutBar への C1OutPage の追加 」を参照)。
- 以下の各プロパティを設定します。
- c1OutBar1の VisualStyle プロパティを Classicに設定します。必要な場合、Customを選択することもできます。他の視覚スタイルはカスタムタイトルの描画に機能しません。
- c1OutPage1の OwnerDraw プロパティを True に設定します。
- c1OutPage2の OwnerDraw プロパティを True に設定します。
- c1OutPage3の OwnerDraw プロパティを True に設定します。
- プロパティウィンドウで、ドロップダウンリストから c1OutBar1を選択し、〈イベント〉ボタンをクリックした後、DrawPage イベントをダブルクリックして、DrawPage イベントハンドラをプロジェクトに追加します。
- 次の名前空間をプロジェクトにインポートします。
Visual Basic コードの書き方
Visual Basic コードのコピーImports C1.Win.C1Command
C# コードの書き方
C# コードのコピーusing C1.Win.C1Command
- 次のコードをDrawPage イベントハンドラに追加します。
Visual Basic コードの書き方
Visual Basic コードのコピー‘e.page パラメータはページを判定します。 IIf e.Page Is c1OutPage1 Then e.Graphics.FillRectangle(Brushes.Gold, e.Bounds) e.Graphics.DrawString("I", c1OutBar1.Font, Brushes.Black, New PointF(e.Bounds.Right - 40, e.Bounds.Top + 2)) ElseIf e.Page Is c1OutPage2 Then e.Graphics.FillRectangle(Brushes.Silver, e.Bounds) e.Graphics.DrawString("II", c1OutBar1.Font, Brushes.White, New PointF(e.Bounds.Right - 40, e.Bounds.Top + 2)) ElseIf e.Page Is c1OutPage3 Then e.Graphics.FillRectangle(Brushes.Plum, e.Bounds) e.Graphics.DrawString("III", c1OutBar1.Font, Brushes.Yellow, New PointF(e.Bounds.Right - 40, e.Bounds.Top + 2)) End IfC# コードの書き方
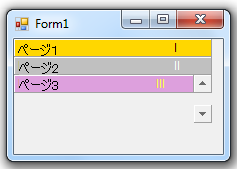
C# コードのコピー//e.page パラメータはページを判定します。 If (e.Page == c1OutPage1) { e.Graphics.FillRectangle(Brushes.Gold, e.Bounds) e.Graphics.DrawString("I", c1OutBar1.Font, Brushes.Black, new PointF(e.Bounds.Right - 40, e.Bounds.Top + 2)) } else if (e.Page == c1OutPage2) { e.Graphics.FillRectangle(Brushes.Silver, e.Bounds) e.Graphics.DrawString("II", c1OutBar1.Font, Brushes.White, new PointF(e.Bounds.Right -40, e.Bounds.Top + 2)) } else if (e.Page == c1OutPage3) { e.Graphics.FillRectangle(Brushes.Plum, e.Bounds) .Graphics.DrawString("III", c1OutBar1.Font, Brushes.Yellow, new PointF(e.Bounds.Right - 40, e.Bounds.Top + 2)) } - [F5]を押して、プロジェクトを実行します。タイトルがカスタマイズされていることを確認します。完成品は次のように表示されます。
関連トピック