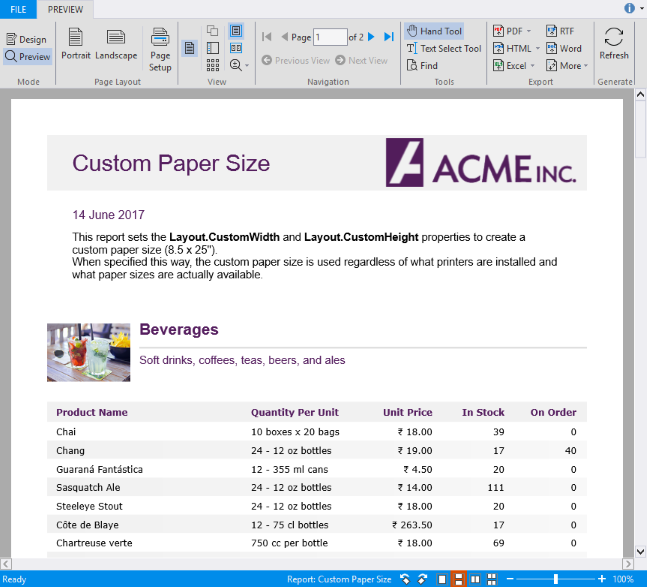
This topic uses "Custom Paper Size" report to demonstrate how you can specify custom size of paper for a report.
C1FlexReportでは、用紙のサイズと方向は、PaperSize プロパティと Orientation プロパティを使用して指定できます。ただし、選択した用紙サイズを現在のプリンタで使用できるかどうかがレンダリング前にチェックされ、選択した設定が無効な場合は、デフォルトの用紙サイズに変更されます。
If you want to specify a certain paper size and use it regardless of the printers available, set the PaperSize property to Custom, and set the Layout.CustomWidth and Layout.CustomHeight properties to the page dimensions (in twips). In this report, the CustomWidth is set to 12240 and CustomHeight to 36000 to create a custom paper size (8.5 x 25 inches). Perform the following steps to see how this can be done.
To create a report with custom paper size
- Step 1: Create a report
- Step 2: Connect the report to a data source
- Step 3: Specify custom paper size
- Step 4: View the report
Step 1: Create a report
- Open the C1FlexReportDesigner and go to FILE|New.
- Click New Report drop down from the Reports tab and select Empty Report to create a report.
Step 2: Connect the report to a data source
- Switch to the Data tab, right-click the Main data source and choose Edit to open and the Data Sources Wizard and start editing.
- Select OLEDB Data Provider from the Data provider drop-down and click the ellipsis button next to the Connection string textbox to select the C1NWind.mdb file.
- Specify the following Sql statement in the Sql statement tab:
SELECT Categories.*, Products.*
FROM Categories INNER JOIN Products
ON Categories.CategoryID = Products.CategoryID
Step 3: Specify custom paper size
- Click Groups in Home tab and add a group named CategoryName.
- In the Groups wizard, set the following properties for the CategoryName group:
Property Value GroupBy CategoryName Keep Together KeepWholeGroup Sort Ascending ShowGroupFooter True ShowGroupHeader True OutlineLabel =CategoryName
- Click OK to close the Groups wizard.
- Right-click CategoryName_Header group and select Add SubSection from the context menu.
- Add two SubSections to the group header.
- In CategoryName_Header/<B> subsection, add one ImageField and two TextFields and set the following properties:
Property Value Image.Picture Picture Image.PictureAlign Scale Image.PictureScale Scale TextField1.Text =CategoryName TextField2.Text =Description
- In CategoryName_Header/<C> subsection, add five TextFields, Product Name, Quantity Per Unit, Unit Price, In Stock, On Order.
- In the Details section, add five TextFields corresponding to the TextFields in CategoryName_Header/<C>, and set the following properties:
Property Value TextField8.Text =ProductName TextField9.Text =QuantityPerUnit TextField10.Text =UnitPrice TextField11.Text =UnitsInStock TextField12.Text =UnitsOnOrder
- Select the report from the drop-down list above the Properties window.
- Go to Layout and expand the property node to view all available properties.
- Set the following properties to set the custom paper size to 8.5 x 25inches.
Property Value CustomHeight 36000 CustomWidth 12240 Width 10800 MarginBottom 720 MarginLeft 720 MarginRight 720 MarginTop 720 When specified this way, the custom paper size is used regardless of what printers are installed and what paper sizes are actually available.
Step 4: View the report
Preview the report with according to the set custom paper size.
メモ: レポートの完全なサンプルについては、ComponentOne Samples\Winforms\C1FlexReport\CS\FlexCommonTasks フォルダにある FlexCommonTasks.flxr レポート定義ファイルの「Custom Paper Size」レポートを参照してください。使用するデータベース C1NWind.mdb も、ComponentOne Samples フォルダにあります。