This section walks you through the process for achieving data binding in GanttView for .NET 6 framework.
-
Add Task to the GanttView control and set its properties.
C# コードのコピー//タスクを追加し、プロパティを設定します。 var task1 = c1GanttView1.Tasks[1]; task1.ConstraintDate = new System.DateTime(2012, 6, 22, 0, 0, 0, 0); task1.ConstraintType = C1.Win.GanttView.ConstraintType.StartNoEarlierThan; task1.Duration = 3; task1.ID = 656460240; task1.Mode = C1.Win.GanttView.TaskMode.Automatic; task1.Name = "Pursue a hare"; task1.Start = new System.DateTime(2015, 4, 1, 0, 0, 0, 0); var task2 = c1GanttView1.Tasks[2]; task2.ConstraintDate = new System.DateTime(2012, 6, 26, 0, 0, 0, 0); task2.ConstraintType = C1.Win.GanttView.ConstraintType.StartNoEarlierThan; task2.Duration = 12; task2.DurationUnits = C1.Win.GanttView.DurationUnits.Minutes; task2.ID = 132267904; task2.Mode = C1.Win.GanttView.TaskMode.Automatic; task2.Name = "Hit the hare"; task2.Start = new System.DateTime(2015, 4, 4, 0, 0, 0, 0); var task3 = c1GanttView1.Tasks[4]; task3.ConstraintDate = new System.DateTime(2012, 6, 28, 0, 0, 0, 0); task3.ConstraintType = C1.Win.GanttView.ConstraintType.StartNoEarlierThan; task3.Duration = 2; task3.ID = 1639616200; task3.Mode = C1.Win.GanttView.TaskMode.Automatic; task3.Name = "Skin that hare"; task3.Start = new System.DateTime(2015, 4, 6, 9, 12, 0, 0); var task4 = c1GanttView1.Tasks[6]; task4.ConstraintDate = new System.DateTime(2012, 6, 29, 0, 0, 0, 0); task4.ConstraintType = C1.Win.GanttView.ConstraintType.StartNoEarlierThan; task4.Duration = 3; task4.ID = 1784420689; task4.Mode = C1.Win.GanttView.TaskMode.Automatic; task4.Name = "Cook the hare"; task4.Start = new System.DateTime(2015, 4, 8, 9, 12, 0, 0); var task5 = c1GanttView1.Tasks[7]; task5.ConstraintDate = new System.DateTime(2012, 6, 30, 0, 0, 0, 0); task5.ConstraintType = C1.Win.GanttView.ConstraintType.StartNoEarlierThan; task5.Duration = 1; task5.ID = 1296539678; task5.Mode = C1.Win.GanttView.TaskMode.Automatic; task5.Name = "Eat the hare"; task5.Start = new System.DateTime(2015, 4, 13, 9, 12, 0, 0);
-
Add Resources to the C1GanttView.
C# コードのコピー//リソースを追加します。 Resource resource1 = new C1.Win.GanttView.Resource(); Resource resource2 = new C1.Win.GanttView.Resource(); Resource resource3 = new C1.Win.GanttView.Resource(); Resource resource4 = new C1.Win.GanttView.Resource(); resource1.Cost = new decimal(new int[] { 20000, 0, 0, 131072}); resource1.ID = 457479171; resource1.Name = "Adam Miller"; resource2.Cost = new decimal(new int[] { 50000, 0, 0, 131072}); resource2.ID = 574928631; resource2.Name = "Ruth Radelet"; resource3.Cost = new decimal(new int[] { 25000, 0, 0, 131072}); resource3.ID = 1258408175; resource3.Name = "Johnny Jewel"; resource4.Cost = new decimal(new int[] { 40000, 0, 0, 131072}); resource4.ID = 187715318; resource4.Name = "Nat Walker"; this.c1GanttView1.Resources.Add(resource1); this.c1GanttView1.Resources.Add(resource2); this.c1GanttView1.Resources.Add(resource3); this.c1GanttView1.Resources.Add(resource4);
-
Assign resources to the specific task. The added resources can be assigned to a specific task by creating a resource reference.
C# コードのコピー//リソースの参照を追加します。 ResourceRef resourceRef1 = new C1.Win.GanttView.ResourceRef(); ResourceRef resourceRef2 = new C1.Win.GanttView.ResourceRef(); ResourceRef resourceRef3 = new C1.Win.GanttView.ResourceRef(); ResourceRef resourceRef4 = new C1.Win.GanttView.ResourceRef(); ResourceRef resourceRef5 = new C1.Win.GanttView.ResourceRef(); ResourceRef resourceRef6 = new C1.Win.GanttView.ResourceRef(); ResourceRef resourceRef7 = new C1.Win.GanttView.ResourceRef(); resourceRef1.Amount = 1; resourceRef1.ResourceID = 457479171; resourceRef2.ResourceID = 1258408175; task1.ResourceRefs.Add(resourceRef1); task1.ResourceRefs.Add(resourceRef2); resourceRef3.Amount = 1; resourceRef3.ResourceID = 187715318; task2.ResourceRefs.Add(resourceRef3); resourceRef4.Amount = 1; resourceRef4.ResourceID = 187715318; resourceRef5.Amount = 1; resourceRef5.ResourceID = 1258408175; task3.ResourceRefs.Add(resourceRef4); task3.ResourceRefs.Add(resourceRef5); resourceRef6.Amount = 1; resourceRef6.ResourceID = 574928631; task4.ResourceRefs.Add(resourceRef6); resourceRef7.Amount = 1; resourceRef7.ResourceID = 457479171; task5.ResourceRefs.Add(resourceRef7);
-
Add Predecessors to the tasks.
C# コードのコピー//先行タスクを追加します。 Predecessor predecessor1 = new C1.Win.GanttView.Predecessor(); Predecessor predecessor2 = new C1.Win.GanttView.Predecessor(); Predecessor predecessor3 = new C1.Win.GanttView.Predecessor(); Predecessor predecessor4 = new C1.Win.GanttView.Predecessor(); predecessor1.PredecessorTaskID = 656460240; task2.Predecessors.Add(predecessor1); predecessor2.PredecessorTaskID = 132267904; task3.Predecessors.Add(predecessor2); predecessor3.PredecessorTaskID = 1639616200; task4.Predecessors.Add(predecessor3); predecessor4.PredecessorTaskID = 1784420689; task5.Predecessors.Add(predecessor4);
-
Configure the GanttView Control. Add the following code to configure the grid.
C# コードのコピーgv.Dock = DockStyle.Fill; gv.BackColor = Color.LavenderBlush; gv.FixedFont = new Font("Microsoft Sans serif", 9, FontStyle.Bold);
This quick start will guide you through the steps of creating a simple GanttView application in .NET 4.5.2 Framework by supplying the data manually through the designer.
Follow the steps below to get started.

Set Up the Application
- Create a new Windows Forms application (.NET Framework 4.5.2).
- Configure the project to target the correct framework and set the appropriate properties.
- Drag and drop the GanttView control from the Visual Studio toolbox onto the box.
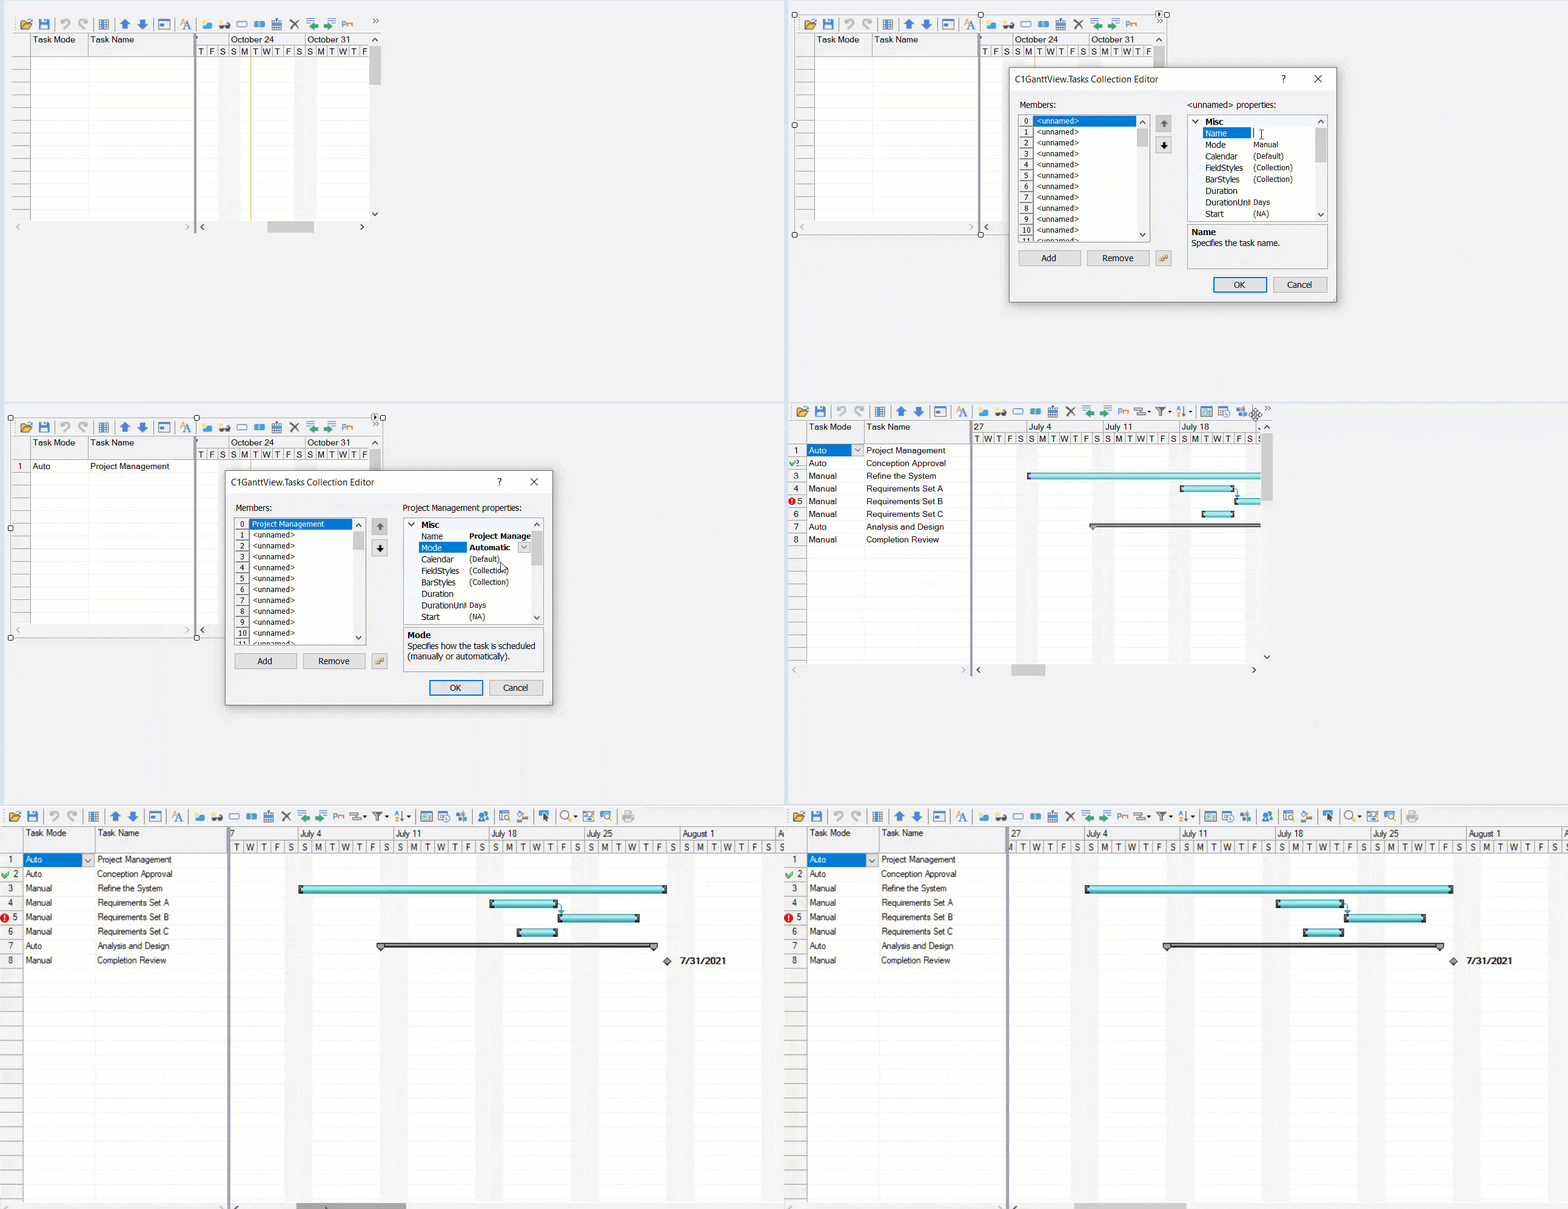
Observe: C1GanttView control appears on the form.
Bind GanttView to a Data Source
- Right-click on the control, and select Edit Tasks from the context menu. The Task Collection Editor appears.
- To add the first task manually, select the first member from the Members list, and set its properties such as Name, Start, Finish, Mode, and so on from the Properties window of the Task Collection Editor.
Let's say we add the first task to the list and set its Name to Project Management, Mode to Automatic, and Days to 30. This adds a task to your project. - Repeat Step 2 to add more tasks to the list in the same way. You can set the properties for different tasks accordingly.
- Click OK to save and close the Task Collection Editor.
Configure the GanttView control
- Right-click on the GanttView control and select properties.
- Set the ScheduleFrom property to ProjectStartDate and enter a suitable start date next to the StartDate property.
Customizing Task Bars
You can modify the style of the taskbars for automatic and manual tasks.
To modify the bar styles at design time, follow the steps below:
- Right-click on the C1GanttView control, and select Edit Bar Styles from the context menu.
- Click on the Add button to add a bar style to the collection.
- Set the BarType to AutoTask.
- Set the BarShape to ThickBar.
- Set the BarColor to LightSkyBlue.
- Click Add to add a bar style to the collection.
- Set the BarType to ManualTask.
- Set the BarShape to ThickBar.
- Set the BarColor to PaleGreen.
- Click OK to save and close the BarStyles Collection Editor.
This adds a new BarStyle to your project.
You have successfully created a simple GanttView application in .NET 4.5.2 framework. In this topic, you have added a C1GanttView control to your windows form, added tasks, customized some properties of the GanttView control, and manipulated the control at the design time.