RulesManager allows you to perform different actions to manage the rules. These actions include creating, applying and deleting rules as discussed below.
Create Rules
Using the Rule class, you can create a variety of conditional formatting rules to the RulesManager, such as highlight cell, data bar, color scale, and icon set rules. These are some of the most commonly used rules when it comes to conditional formatting. Let us learn how to create these rules programmatically in the sections below.
Highlight cell rule
To create the highlight cell rule programmatically, use the following code. This example uses the same data source which is configured in Quick Start.
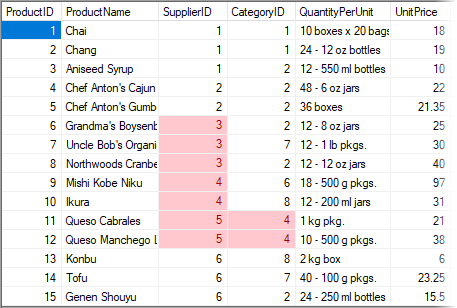
In the following example, the highlight cell rule is defined in RulesManager using the Name, Expression and Style properties of the Rule class. This rule applies to the "SupplierID" and "CategoryID" columns where the cells with values between 3 and 5 are highlighted with a solid colored background and font color using BackColor and ForeColor properties of the ItemStyle class respectively.

| C# |
コードのコピー
|
|---|---|
// HighlightCellsルールを作成します public void CreateApplyHighlightCellsRule(C1RulesManager rulesManager) { // 条件付き書式ルールを適用するセル範囲を定義します var itemRange = new CustomItemRange(1, 15, new string[] { "SupplierID", "CategoryID" }); // 条件付き書式ルール式を定義します var expressionString = "= 3 <= [CurrentValue] And [CurrentValue] <= 5"; // 条件付き書式スタイルを定義します var style = new ItemStyle() { BackColor = Color.FromArgb(255, 199, 206), ForeColor = Color.FromArgb(156, 0, 6) }; // HighlightCellsルールを作成します var rule = new C1.Win.RulesManager.Rule() { Name = "Value between 3 and 5 on 'SupplierID', 'CategoryID'", Expression = expressionString, Style = style }; // セル範囲にルールを適用します rule.AppliesTo.Add(itemRange); // ルールをRulesManagerに追加します rulesManager.Rules.Add(rule); } |
|
Data bar rule
To create the data bar rule programmatically, use the following code. This example uses the same data source which is configured in Quick Start.
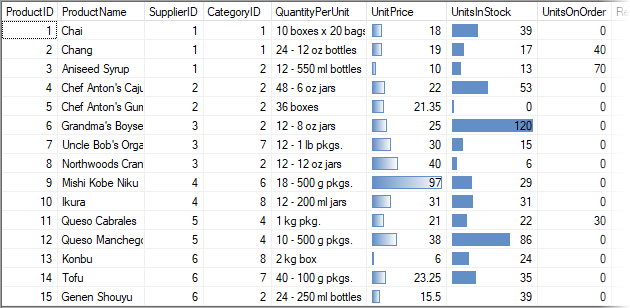
In the following example, two data bar rules are defined in RulesManager using the Name, Expression and Style properties of the Rule class. The first rule applies to the "UnitPrice" column where the data bars or histograms are added to the cells with gradient formatting style and the second rule applies to the "UnitsInStock" column where the data bars are added to the cells with solid colors formatting style. For both these rules, the conditional formatting style is defined by the gradient settings, such as HistogramColor and HistogramPoints properties of the GradientSettings class along with the gradient points which are set using the GradientPointType enumeration. The only difference in the first rule is that the IsGradientHistogram property is set to true to provide gradient effect to the histograms.

| C# |
コードのコピー
|
|---|---|
// DataBarsルールを作成します public void CreateApplyDataBarsRule(C1RulesManager rulesManager) { // 条件付き書式ルールを適用するセル範囲を定義します var itemRange1 = new CustomItemRange(1, 15, new string[] { "UnitPrice" }); // 条件付き書式ルール式を定義します var expressionString1 = "= true"; // 条件付き書式スタイルを定義します var gradientDataBarStyle = new ItemStyle() { Gradient = new GradientSettings() { HistogramColor = Color.FromArgb(99, 142, 198), HistogramPoints = new GradientPoint[] { new GradientPoint(GradientPointType.MinValue), new GradientPoint(GradientPointType.MaxValue) }, // このプロパティをtrueに設定して、グラデーションデータバーを取得します IsGradientHistogram = true } }; // グラデーションDataBarsルールを作成します var rule1 = new C1.Win.RulesManager.Rule() { Name = "Gradient DataBars on 'UnitPrice'", Expression = expressionString1, Style = gradientDataBarStyle }; // セル範囲にルールを適用します rule1.AppliesTo.Add(itemRange1); // ルールをRulesManagerに追加します rulesManager.Rules.Add(rule1); // 条件付き書式ルールを適用するセル範囲を定義します var itemRange2 = new CustomItemRange(0, 14, new string[] { "UnitsInStock" }); // 条件付き書式ルール式を定義します var expressionString2 = "= true"; // 条件付き書式スタイルを定義します var solidDataBarStyle = new ItemStyle() { Gradient = new GradientSettings() { HistogramColor = Color.FromArgb(99, 142, 198), HistogramPoints = new GradientPoint[] { new GradientPoint(GradientPointType.MinValue), new GradientPoint(GradientPointType.MaxValue) } } }; // DataBarsルールを作成します var rule2 = new C1.Win.RulesManager.Rule() { Name = "Solid DataBars on 'UnitsInStock'", Expression = expressionString2, Style = solidDataBarStyle }; // セル範囲にルールを適用します rule2.AppliesTo.Add(itemRange2); // ルールをRulesManagerに追加します rulesManager.Rules.Add(rule2); } |
|
Color scale rule
To create the color scale rule programmatically, use the following code. This example uses the same data source which is configured in Quick Start.
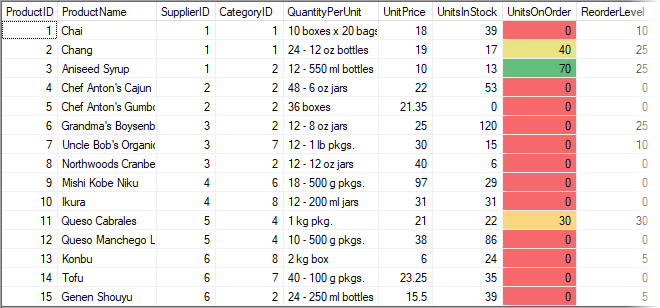
In the following example, the color scale rule is defined in RulesManager using the Name, Expression and Style properties of the Rule class. This rule applies to the "UnitsOnOrder" column where the cells are shaded with gradation of colors and the conditional formatting style is defined by the gradient settings, such as BackgroundPoints property of the GradientSettings class along with the gradient points which are set using the GradientPointType enumeration.

| C# |
コードのコピー
|
|---|---|
// ColorScalesルールを作成します public void CreateApplyColorScalesRule(C1RulesManager rulesManager) { // 条件付き書式ルールを適用するセル範囲を定義します var itemRange = new CustomItemRange(1, 15, new string[] { "UnitsOnOrder" }); // 条件付き書式ルール式を定義します var expressionString = "= true"; // 条件付き書式スタイルを定義します var style = new ItemStyle() { Gradient = new GradientSettings() { BackgroundPoints = new GradientPoint[] { new GradientPoint(GradientPointType.MinValue) { Color = Color.FromArgb(248, 105, 107) }, new GradientPoint(GradientPointType.Percent) { Color = Color.FromArgb(255, 235, 132), Value = 50.0f }, new GradientPoint(GradientPointType.MaxValue) { Color = Color.FromArgb(99, 190, 123) } } } }; // ColorScalesルールを作成します var rule = new C1.Win.RulesManager.Rule() { Name = "Color scale on 'UnitsOnOrder'", Expression = expressionString, Style = style }; // セル範囲にルールを適用します rule.AppliesTo.Add(itemRange); // ルールをRulesManagerに追加します rulesManager.Rules.Add(rule); } |
|
Icon set rule
To create the icon set rule programmatically, use the following code. This example uses the same data source which is configured in Quick Start.
In the following example, the icon set rule is defined in RulesManager using the Name, Expression and Style properties of the Rule class. This rule applies to the "ReOrederLevel" column where the icons are added to the cells and their conditional formatting style is defined by the gradient settings, such as IconList property which sets icons on the cell using the IconListKey enumeration, IconPoints property of the GradientSettings class and the gradient points which are set using the GradientPointType enumeration.
![]()
| C# |
コードのコピー
|
|---|---|
// IconSetsルールを作成します public void CreateApplyIconSetsRule(C1RulesManager rulesManager) { // 条件付き書式ルールを適用するセル範囲を定義します var itemRange = new CustomItemRange(1, 15, new string[] { "ReorderLevel" }); ; // 条件付き書式ルール式を定義します var expressionString = "= true"; // 条件付き書式スタイルを定義します var style = new ItemStyle() { Gradient = new GradientSettings() { IconList = IconListKey.Arrow3, IconPoints = new GradientPoint[] { new GradientPoint(GradientPointType.MinValue), new GradientPoint(GradientPointType.MaxValue) }, } }; // IconSetsルールを作成します var rule = new C1.Win.RulesManager.Rule() { Name = "IconSet on 'ReorderLevel'", Expression = expressionString, Style = style }; // セル範囲にルールを適用します rule.AppliesTo.Add(itemRange); // ルールをRulesManagerに追加します rulesManager.Rules.Add(rule); } |
|
Delete Rule
RulesManager also allows you to delete a rule programmatically and at runtime using the Remove method. To delete a rule programmatically, use the following code.
| C# |
コードのコピー
|
|---|---|
rulesManager.Rules.Remove(rule1); |
|
Additionally, you can also choose to delete a rule from a specified index or even delete all the rules using the RemoveAt method.