Microsoft の標準 PropertyGrid コントロールと同様に、WPFのPropertyGrid コントロールは SelectedObject プロパティに基づいて動作します。このプロパティを設定すると、コントロールにはオブジェクトのパブリックプロパティが表示され、それらをユーザーが編集できるようになります。このクイックスタートでは、PropertyGridをWPFアプリケーションに追加して、PropertyGridコントロールの情報を表示および編集するためのUIを作成します。
To bind an object with PropertyGrid, follow these steps:
アプリケーションの設定
- Visual Studio で新しい WPF プロジェクトを作成します。
- ソリューションエクスプローラーで、[依存関係]を右クリックし、[NuGetパッケージの管理]を選択します。
- NuGetパッケージマネージャーで、次の参照を検索してプロジェクトに追加します。
- C1.WPF.PropertyGrid
- Visual Studio のツールボックスに移動し、[Button]項目をダブルクリックして標準のボタンコントロールをアプリケーションに追加します。Now, from the Properties window, set its Name to "TestButton" and Content to "Button".
- XAMLビューで、次のコードを使用してC1PropertyGridコントロールを追加し、そのプロパティを設定します。
XAML コードのコピー<c1:C1PropertyGrid Margin="0,0,184,10" x:Name="propertyGrid"></c1:C1PropertyGrid>
Bind PropertyGrid with a Button
C1PropertyGrid コントロールをカスタマイズして Button コントロールに接続するには、次の手順に従います。
- XAML で C1PropertyGrid コントロールを Button コントロールに連結し、それらのコントロールをカスタマイズします。
- Set the object for PropertyGrid to display properties using SelectedObject property as shown the following code. In this example, the SelectedObject property determines the object for which the PropertyGrid control displays properties to edit.
XAML コードのコピー<c1:C1PropertyGrid Margin="0,0,184,10" x:Name="propertyGrid" PropertySort="CategorizedAlphabetical" AutoGenerateProperties="False" SelectedObject="{Binding ElementName=TextButton, Mode=OneWay}" EditorWidth="60" Grid.RowSpan="2"> <c1:C1PropertyGrid.PropertyAttributes> <c1:PropertyAttribute Category="Appearance" DisplayName="Background Color" MemberName="Background" /> <c1:PropertyAttribute Category="Appearance" DisplayName="Border Color" MemberName="BorderBrush"/> <c1:PropertyAttribute Category="Appearance" DisplayName="Visibility" MemberName="Visibility" /> <c1:PropertyAttribute Category="Size" DisplayName="Button Height" MemberName="Height" /> <c1:PropertyAttribute Category="Size" DisplayName="Button Width" MemberName="Width" /> <c1:PropertyAttribute Category="Text" DisplayName="Button Text" MemberName="Content" /> <c1:PropertyAttribute Category="Text" DisplayName="Text Color" MemberName="Foreground" /> <c1:PropertyAttribute Category="Text" DisplayName="Text Size" MemberName="FontSize" /> </c1:C1PropertyGrid.PropertyAttributes> </c1:C1PropertyGrid>
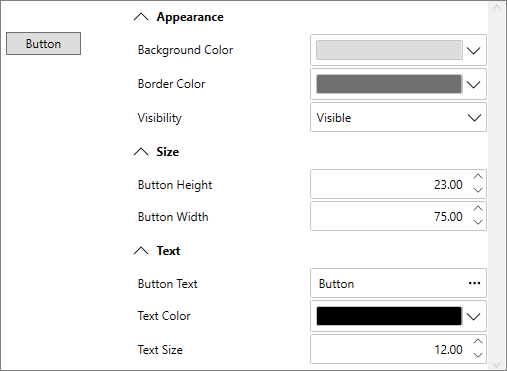
デザインビューを見ると、C1PropertyGrid コントロールにボタンのすべてのプロパティが反映されていることがわかります。
- [プロパティ]ウィンドウで、[データ]カテゴリにある[PropertyAttributes]コレクションを探し、その隣にある省略符ボタンをクリックします。 [コレクションエディター:PropertyAttributes]ダイアログボックスが表示されます。
- [コレクションエディター:PropertyAttributes]ダイアログボックスで、[追加]ボタンをクリックします。この手順をあと7回繰り返して、合計8個の PropertyAttribute 項目を作成します。
- 今追加した項目の右側の[プロパティ]ペインで、次のプロパティを設定します。
PropertyAttribute
Category
DisplayName
MemberName
[0] PropertyAttribute
外観
背景色
Background
[1] PropertyAttribute
外観
境界線の色
BorderBrush
[2] PropertyAttribute
外観
表示
Visibility
[3] PropertyAttribute
サイズ
ボタンの高さ
Height
[4] PropertyAttribute
サイズ
ボタンの幅
Width
[5] PropertyAttribute
テキスト
ボタンのテキスト
Content
[6] PropertyAttribute
テキスト
テキスト色
Foreground
[7] PropertyAttribute
テキスト
テキストサイズ
FontSize
Category は、項目が表示されるセクションを指定します。DisplayName は、項目に表示される名前を示します。MemberName は、メンバの実際の名前を示します。
- [OK]ボタンをクリックして、[コレクションエディター:PropertyAttributes]ダイアログボックスを閉じ、設定を変更します。
アプリケーションの実行
アプリケーションを実行して PropertyGridの実行時の動作を確認するには、次の手順に従います。
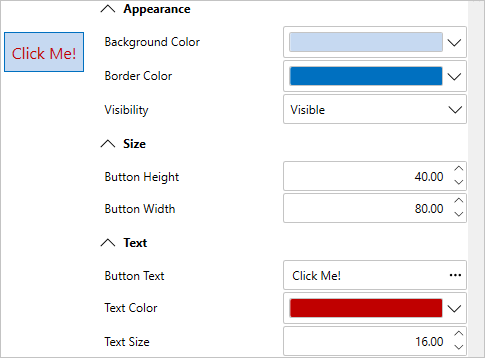
- [デバッグ]メニューから[デバッグ開始]を選択し、実行時にアプリケーションがどのように表示されるかを確認します。 アプリケーションは次の図のように表示されます。
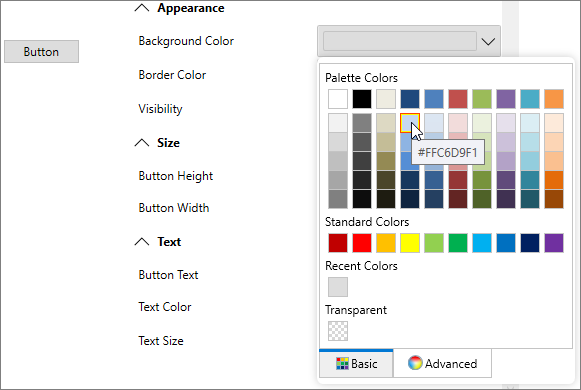
- 背景色 のドロップダウン矢印をクリックし、表示されるカラーピッカーからオレンジなどの色を選択します。ボタンの背景色が選択した色に変わります。
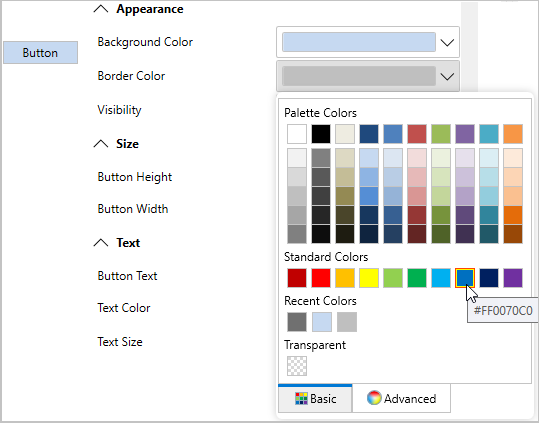
- 境界線の色 のドロップダウン矢印をクリックし、表示されるカラーピッカーから緑などの色を選択します。
- [ボタンの高さ]および[ボタンの幅]数値ボックスに値を入力してボタンのサイズを変更します。たとえば、高さには「40」、幅には「80」を入力します。
- [ボタンのテキスト]ボックスに「クリック!」などの文字列を入力します。
- テキスト色 のドロップダウン矢印をクリックし、表示されるカラーピッカーから紫などの色を選択します。
- テキストサイズ]の隣にある上向きまたは下向き矢印をクリックして、ボタンコントロールに表示されるテキストのサイズを変更します。たとえば、値を 18 に設定します。
To bind a class with PropertyGrid, follow these steps:
アプリケーションの設定
- Visual Studio で新しい WPF プロジェクトを作成します。
- ソリューションエクスプローラーで、[依存関係]を右クリックし、[NuGetパッケージの管理]を選択します。
- NuGetパッケージマネージャーで、次の参照を検索してプロジェクトに追加します。
- C1.WPF.PropertyGrid
- XAMLビューで、次のコードを使用してC1PropertyGridコントロールを追加し、そのプロパティを設定します。
XAML コードのコピー<c1:C1PropertyGrid Margin="130,12,30,12" x:Name="propertyGrid"></c1:C1PropertyGrid>
Bind PropertyGrid with a Class
To customize and connect the PropertyGrid control to the class, complete the following steps:
- Switch to the code view and create a class, say Customer, using the following code.
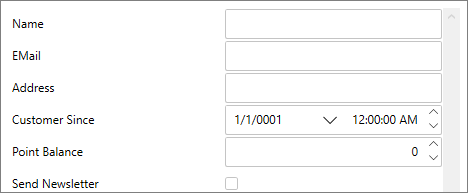
C# コードのコピーpublic class Customer { public string Name { get; set; } public string EMail { get; set; } public string Address { get; set; } public DateTime CustomerSince { get; set; } public int? PointBalance { get; set; } public bool SendNewsletter { get; set; } }
- Create an object of the Customer class and bind it to the PropertyGrid using SelectedObject property as shown the following code. In this example, the SelectedObject property determines the object of the class for which the PropertyGrid control displays properties to edit.
C# コードのコピー// 参照するオブジェクトを作成します。 var customer = new Customer(); // 顧客のプロパティを表示します。 propertyGrid.SelectedObject = customer;
アプリケーションの実行
アプリケーションは次のようになります。
