このセクションでは、FlexChart コントロールを Android アプリケーションに追加する方法、そこにデータを追加する方法について説明します。このトピックは 3 つの手順で構成されます。
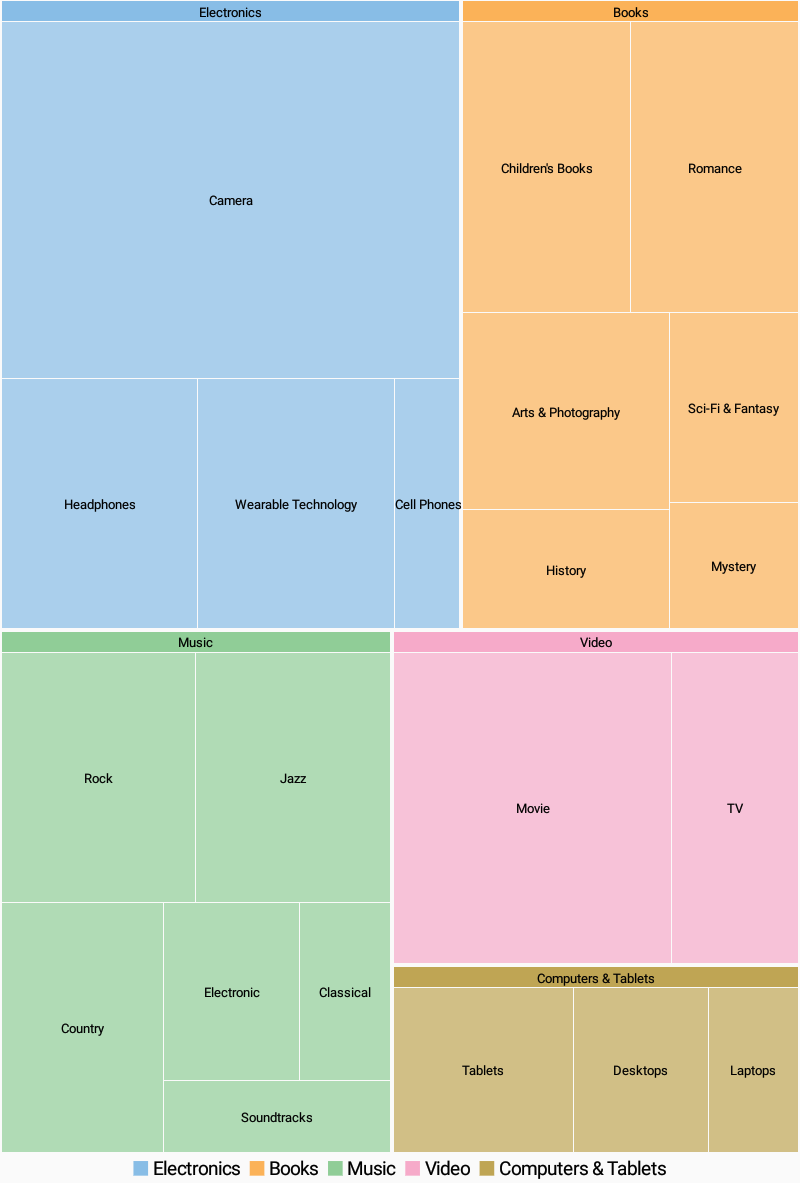
次の図は、上記の手順を実行した後の TreeMap を示しています。
手順 1:TreeMap のデータソースの作成
次のクラスは、TreeMap コントロールのデータソースとして機能します。
| C# |
コードのコピー
|
|---|---|
public class ThingSale { private static List<string> Categories = new List<string> { "Music", "Video", "Books", "Electronics", "Computers & Tablets" }; private static Dictionary<string, List<string>> AllCategories = new Dictionary<string, List<string>>(); public string Category { get; set; } public double? Sales { get; set; } public List<ThingSale> Items { get; set; } public static void EnsureInitAllCategories() { if (AllCategories.Count > 0) { return; } AllCategories.Add("Music", new List<string> { "Country", "Rock", "Classical", "Soundtracks", "Jazz", "Electronic" }); AllCategories.Add("Country", new List<string> { "Classic Country", "Cowboy Country", "Outlaw Country", "Western Swing", "Roadhouse Country" }); AllCategories.Add("Rock", new List<string> { "Hard Rock", "Blues Rock", "Funk Rock", "Rap Rock", "Guitar Rock", "Progressive Rock" }); AllCategories.Add("Classical", new List<string> { "Symphonies", "Chamber Music" }); AllCategories.Add("Soundtracks", new List<string> { "Movie Soundtracks", "Musical Soundtracks" }); AllCategories.Add("Jazz", new List<string> { "Smooth Jazz", "Vocal Jazz", "Jazz Fusion", "Swing Jazz", "Cool Jazz", "Traditional Jazz" }); AllCategories.Add("Electronic", new List<string> { "Electronica", "Disco", "House" }); AllCategories.Add("Video", new List<string> { "Movie", "TV" }); AllCategories.Add("Movie", new List<string> { "Kid & Family", "Action & Adventure", "Animation", "Comedy", "Drama", "Romance" }); AllCategories.Add("TV", new List<string> { "Science Fiction", "Documentary", "Fantasy", "Military & War", "Horror" }); AllCategories.Add("Books", new List<string> { "Arts & Photography", "Children's Books", "History", "Mystery", "Romance", "Sci-Fi & Fantasy" }); AllCategories.Add("Arts & Photography", new List<string> { "Architecture", "Graphic Design", "Drawing", "Photography", "Performing Arts" }); AllCategories.Add("Children's Books", new List<string> { "Beginning Readers", "Board Books", "Chapter Books", "Coloring Books", "Picture Books", "Sound Books" }); AllCategories.Add("History", new List<string> { "Ancient", "Medieval", "Renaissance" }); AllCategories.Add("Mystery", new List<string> { "Thriller & Suspense", "Mysteries" }); AllCategories.Add("Romance", new List<string> { "Action & Adventure", "Holidays", "Romantic Comedy", "Romantic Suspense", "Western", "Historical" }); AllCategories.Add("Sci-Fi & Fantasy", new List<string> { "Fantasy", "Gaming", "Science Fiction" }); AllCategories.Add("Electronics", new List<string> { "Camera", "Headphones", "Cell Phones", "Wearable Technology" }); AllCategories.Add("Camera", new List<string> { "Digital Cameras", "Film Photography", "Lenses", "Video", "Accessories" }); AllCategories.Add("Headphones", new List<string> { "Earbud headphones", "Over-ear headphones", "On-ear headphones", "Bluetooth headphones", "Noise-cancelling headphones", "Audiophile headphones" }); AllCategories.Add("Cell Phones", new List<string> { "Cell Phone", "Accessories" }); AllCategories.Add("Accessoriess", new List<string> { "Batteries", "Bluetooth Headsets", "Bluetooth Speakers", "Chargers", "Screen Protectors" }); AllCategories.Add("Wearable Technology", new List<string> { "Activity Trackers", "Smart Watches", "Sports & GPS Watches", "Virtual Reality Headsets", "Wearable Cameras", "Smart Glasses" }); AllCategories.Add("Computers & Tablets", new List<string> { "Desktops", "Laptops", "Tablets" }); AllCategories.Add("Desktops", new List<string> { "All-in-ones", "Minis", "Towers" }); AllCategories.Add("Laptops", new List<string> { "2 in 1 laptops", "Traditional laptops" }); AllCategories.Add("Tablets", new List<string> { "IOS", "Andriod", "Fire OS", "Windows" }); } public static IEnumerable<ThingSale> GetData() { EnsureInitAllCategories(); var result = new List<ThingSale>(); Categories.ForEach(cat => { result.Add(Create(cat)); }); return result; } private static ThingSale Create(string category) { var rand = new Random(0); var item = new ThingSale { Category = category }; if (!AllCategories.ContainsKey(category)) { item.Sales = rand.NextDouble() * 100; } else { item.Items = new List<ThingSale>(); AllCategories[category].ForEach(subCat => { item.Items.Add(Create(subCat)); }); } return item; } } |
|
手順 2:TreeMap コントロールの追加
TreeMap コントロールをレイアウトに追加するには、ソリューションエクスプローラからレイアウトフォルダー内に .axml ファイルを開き、そのコードを以下のコードで置き換えます。
| XML |
コードのコピー
|
|---|---|
<?xml version="1.0" encoding="utf-8"?> <LinearLayout xmlns:android="http://schemas.android.com/apk/res/android" android:orientation="vertical" android:layout_width="match_parent" android:layout_height="match_parent" > <C1.Android.Chart.C1TreeMap android:id="@+id/treeMap" android:layout_width="match_parent" android:layout_height="match_parent" /> </LinearLayout> |
|
FlexChart コントロールをツールボックス内のCustom controls タブからデザイナーモードでレイアウト表面にドラッグすることもできます。レイアウトを初期化するには、Activity 内の OnCreate メソッドに次のコードを追加します。
| C# |
コードのコピー
|
|---|---|
public class MainActivity : Activity { private C1TreeMap treeMap; protected override void OnCreate(Bundle bundle) { base.OnCreate(bundle); SetContentView(Resource.Layout.Main); treeMap = this.FindViewById<C1TreeMap>(Resource.Id.treeMap); treeMap.ChartType = C1.Android.Chart.TreeMapType.Squarified; treeMap.Binding = "Sales"; treeMap.BindingName = "Category"; treeMap.MaxDepth = 2; treeMap.ShowTooltip = true; treeMap.Palette = Palette.Zen; treeMap.ChildItemsPath = "Items"; treeMap.ItemsSource = ThingSale.GetData(); treeMap.DataLabel = new ChartDataLabel() { Content = "{name}{type}", Position = ChartLabelPosition.Center }; } } |
|
手順 3:プロジェクトの実行
[F5] キーを押してプロジェクトを実行します。