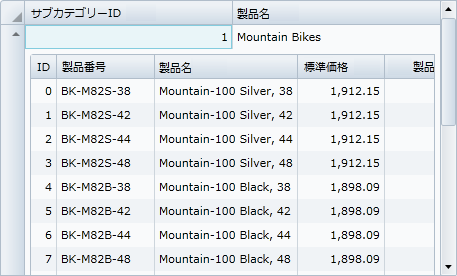
この手順では、グリッドの行の詳細セクションの設定を完成させます。RowDetailsTemplate を追加して詳細行の外観を設定し、詳細行の動作を設定するコードを追加します。
行の詳細を設定するには、次の手順に従います。
- 次の<c1:C1DataGrid.RowDetailsTemplate>を<c1:C1DataGrid></c1:C1DataGrid>タグの間に追加します。次のようになります。
このテンプレートは、行の詳細セクションの表示をカスタマイズします。
XAML コードのコピー<c1:C1DataGrid x:Name="c1DataGrid1" CanUserAddRows="False" Margin="5"> <c1:C1DataGrid.RowDetailsTemplate> <DataTemplate> <c1:C1DataGrid HeadersVisibility="Column" Margin="5" CanUserAddRows="False"/> </DataTemplate> </c1:C1DataGrid.RowDetailsTemplate> </c1:C1DataGrid>
- <c1:C1DataGrid>タグに LoadedRowDetailsPresenter="c1dg_LoadedRowDetailsPresenter" LoadingRow="c1dg_LoadingRow" を追加します。次のようになります。
後で、これらのイベントのハンドラをコードに追加します。
XAML コードのコピー<c1:C1DataGrid x:Name="c1DataGrid1" CanUserAddRows="False" LoadedRowDetailsPresenter="c1dg_LoadedRowDetailsPresenter" LoadingRow="c1dg_LoadingRow">
- ソリューションエクスプローラで、プロジェクトを右クリックして[参照の追加]を選択します。[参照の追加]ダイアログボックスで System.Xml.Linq と System.ComponentModel.DataAnnotations を見つけ、[OK]をクリックすると、参照が追加されます。
- ページを右クリックし、コンテキストメニューから[コードの表示]を選択して、コードエディタを開きます。
- コードエディタで、次の名前空間をインポートします。
C# コードのコピーusing System.Xml.Linq; using C1.Silverlight.DataGrid; using C1DataGrid;
-
MainPage コンストラクタに ItemsSource プロパティを設定するコードを追加します。
C# コードのコピーpublic MainPage() { InitializeComponent(); c1dg.ItemsSource = Data.GetSubCategories().Take(10); } -
MainPage クラスに c1dg_LoadedRowDetailsPresenter イベントのコードを追加します。
C# コードのコピーprivate void c1dg_LoadedRowDetailsPresenter(object sender, C1.Silverlight.DataGrid.DataGridRowDetailsEventArgs e) { if (e.Row.DetailsVisibility == Visibility.Visible) { C1.Silverlight.DataGrid.C1DataGrid detailGrid = e.DetailsElement as C1.Silverlight.DataGrid.C1DataGrid; if (detailGrid.ItemsSource == null) { int subcategory = (e.Row.DataItem as Subcategory).ProductSubcategoryID; detailGrid.ItemsSource = Data.GetProducts((product) => product.Element("ProductSubcategoryID") != null && product.Element("ProductSubcategoryID").Value != "" && int.Parse(product.Element("ProductSubcategoryID").Value) == subcategory).Take(10); } } }
-
c1dg_LoadingRow イベントのコードを MainPage クラスに追加して、最初の行について行の詳細の表示/非表示を設定します。
C# コードのコピーprivate void c1dg_LoadingRow(object sender, DataGridRowEventArgs e) { if (e.Row.Index == 0) { e.Row.DetailsVisibility = Visibility.Visible; } }
ここまでの成果
アプリケーションを保存して実行すると、グリッドに products.xml ファイルのデータが表示され、最初の行の詳細セクションが表示されていることを確認できます。

行の詳細セクションを折りたたんだり、別の行の詳細セクションを展開するには、行の行ヘッダーの矢印アイコンをクリックします。
![]()