ラベルは、予定に追加できる色分けされたマーカーです。ラベルを設定したユーザーおよび他のユーザーは、予定の詳細を表示することなく、その予定の種類を確認できます。
Scheduler for WPF には、12 個の定義済みラベルが用意されています。ラベルの色は、C1Scheduler コントロールのすべてのデータビューに表示されます。

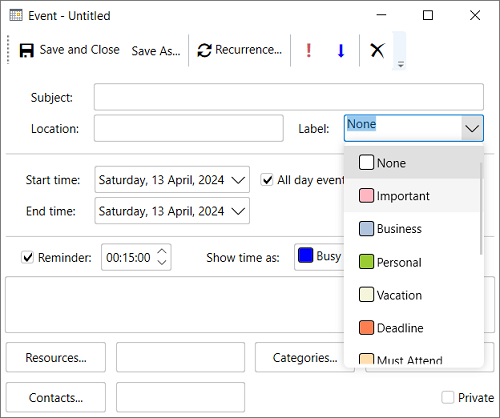
Labels can be set for any appointment at design time by selecting the desired label from the Label dropdown in the Appointment dialog as showcased in the image below.

定義済みのラベル
定義済みのラベルは次のとおりです。
| ラベル | 色 | インデックス |
|---|---|---|
| なし |  |
0 |
| 重要 |  |
1 |
| ビジネス |  |
2 |
| 個人用 |  |
3 |
| 休暇 |  |
4 |
| 締め切り |  |
5 |
| 要出席 |  |
6 |
| 出張 |  |
7 |
| 要準備 |  |
8 |
| 誕生日 |  |
9 |
| 記念日 |  |
10 |
| 電話連絡 |  |
11 |
To add a label associated to an appointment programmatically, you can use Label property of the Appointment class and set its index (from the above table) based on your requirements. For instance, the following code demonstrates how you can add "Important" label to an appointment:
| C# |
コードのコピー
|
|---|---|
//ラベルを表示します
// 「重要」ラベルを追加します
appointment.Label = scheduler.DataStorage.LabelStorage.Labels[1];
|
|
Custom Labels
Predefined labels are fixed categories that are already available within the Scheduler control. However, you can also create your own set of labels (or custom labels) to display specific information instead of predefined labels in the scheduler control.
With the Scheduler control, you can bind labels and availability statuses to your own custom collections easily. Custom labels override the predefined labels and appear in the Scheduler control on binding. To bind custom labels with the Scheduler control, you need to create a class that provides custom labels. Perform the following steps to create and bind your custom labels collection with the Scheduler control:
- Create a class with the name Label in the code-behind file and define the Text, Color and Index properties in it:
CS コードのコピーpublic class Label { public int Index { get; set; } public string Text { get; set; } public string Color { get; set; } }
- Initialize a collection with the name Labels of List datatype which holds instances of the Label class. The collection then adds a new Label object to this list with specific values of properties:
CS コードのコピーthis.Labels = new List<Label>(); this.Labels.Add(new Label { Text = "None", Color = "255,0,128,128", Index = 1 }); this.Labels.Add(new Label { Text = "Weekly meet", Color = "255,0,255,255", Index = 2 }); this.Labels.Add(new Label { Text = "Fortnight meet", Color = "255,0,255,128", Index = 3 }); this.Labels.Add(new Label { Text = "Monthly meet", Color = "255,0,0,255", Index = 4 }); this.Labels.Add(new Label { Text = "Semi-annual meet", Color = "255,255,0,0", Index = 5 }); this.Labels.Add(new Label { Text = "Annual meet", Color = "255,255,255,0", Index = 5 });
- In the XAML view, add four property setters with the name NestedPropertySetter within <c1:C1Scheduler></c1:C1Schedule> tags to bind and map the Labels collection with the C1Scheduler control.
XAML コードのコピー<c1:NestedPropertySetter PropertyName="DataStorage.LabelStorage.DataSource" Value="{Binding Path = Labels}" /> <c1:NestedPropertySetter PropertyName="DataStorage.LabelStorage.Mappings.TextMapping.MappingName" Value="Text"/> <c1:NestedPropertySetter PropertyName="DataStorage.LabelStorage.Mappings.ColorMapping.MappingName" Value="Color"/> <c1:NestedPropertySetter PropertyName="DataStorage.LabelStorage.Mappings.IndexMapping.MappingName" Value="Index"/>
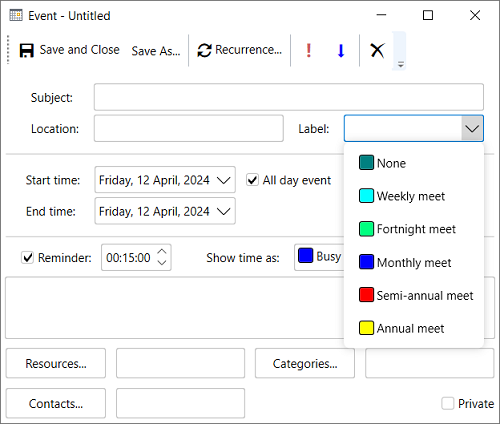
- Run the application and click the Label drop-down list to select a custom label, as shown in the following figure:
