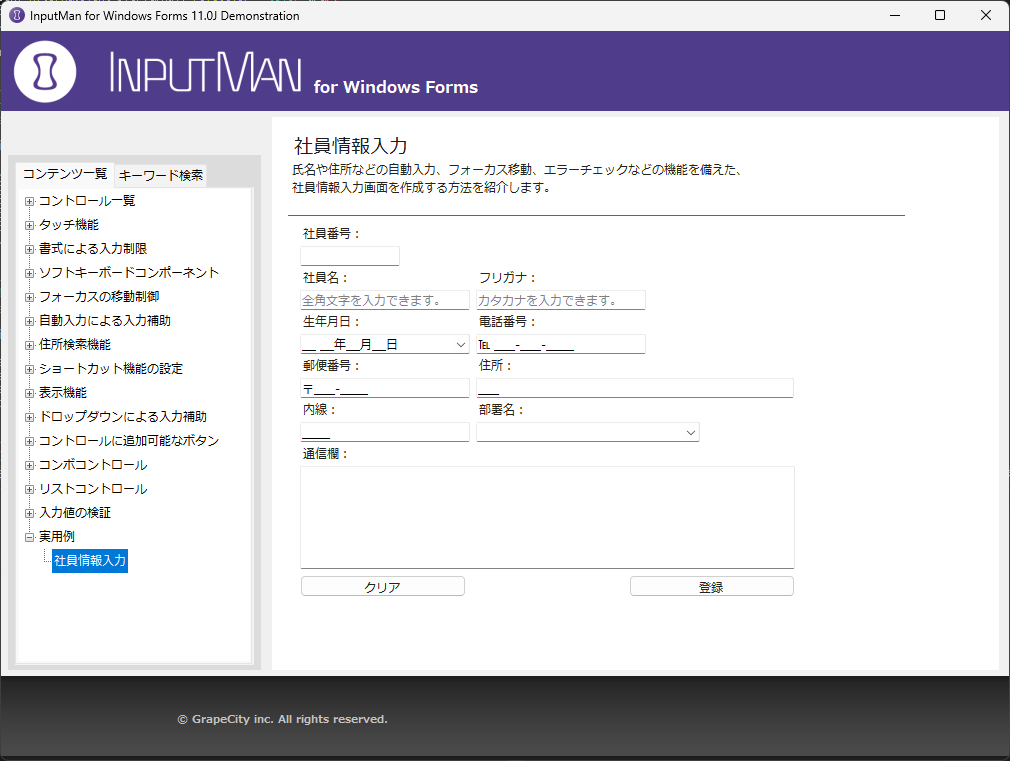
������Z���ȂǁA��{�I�ȃ��[�U�[���̓��͉�ʂɂ́A�������́A�t�H�[�J�X�ړ��A�G���[�`�F�b�N�Ȃǂ�InputMan�̋@�\�����p�ł��܂��B�����ł͐��i�T���v���Ɏ��^���Ă���u�Ј������́v��ʂ̎�����������܂��B

�\�[�X�R�[�h�͎����T���v���́u15_Sample.RegistEmployee�v���Q�Ƃ��������B
�K�v�ȃR���g���[�����c�[���{�b�N�X���z�u���܂��B���̃T���v���ł́A�ȉ��̃R���g���[����z�u���Ă��܂��B�R���g���[���z�u�̏ڍׂȕ��@�ɂ��Ắu�R���|�[�l���g���v���W�F�N�g�ɑg�ݍ����v�ʼn�����Ă��܂��B
| ���� | �R���g���[�� | ��ȑ��� |
|---|---|---|
| �Ј��ԍ� | ���l�R���g���[�� | 6���̐��l�̂ݓ��͂��� |
| �Ј��� | �e�L�X�g�R���g���[�� | �S�p60�����܂ł̑S�p��������͂��� |
| �t���K�i | �e�L�X�g�R���g���[�� | �����ɓ��͂��ꂽ�����̃t���K�i�������\������ |
| ���N���� | ���t�R���g���[�� | ���݂���ߋ��̔N������a����͂��� |
| �d�b�ԍ� | �}�X�N�R���g���[�� | �d�b�ԍ��̌`���ɉ��������͂����� |
| �X�֔ԍ� | �X�֔ԍ��R���g���[�� | ���݂���X�֔ԍ�����͂��� |
| �Z�� | �Z���R���g���[�� | �X�֔ԍ��ɓ��͂��ꂽ�X�֔ԍ��ɑΉ�����Z���������\������ |
| ���� | �}�X�N�R���g���[�� | �����̌`���ɉ��������͂����� |
| ������ | �R���{�R���g���[�� | ���݂��镔�ۂ�I������ |
| �ʐM�� | �e�L�X�g�R���g���[�� | 5�s�ȓ��ɂ܂Ƃ߂��K�v��������͂��� |
����̌����Ń[���p�f�B���O���s���ꍇ�́A�u�L�[���[�h�ɂ�鏑���ݒ��v��Fields�v���p�e�B��DisplayFields�v���p�e�B��ݒ肵�܂��B
�ȉ��̗�ł�6���̃[���p�f�B���O��ݒ肵�Ă��܂��B
GcNumber1.DisplayFields.Clear()
GcNumber1.Fields.SetFields("000000,,,,")
GcNumber1.DisplayFields.AddRange("000000,,,,")
GcNumber1.ContentAlignment = System.Drawing.ContentAlignment.MiddleLeft
gcNumber1.DisplayFields.Clear();
gcNumber1.Fields.SetFields("000000,,,,");
gcNumber1.DisplayFields.AddRange("000000,,,,");
gcNumber1.ContentAlignment = System.Drawing.ContentAlignment.MiddleLeft;
���͉\�������́u���͂̐����v���s���ꍇ�́AMaxLength�v���p�e�B��MaxLengthUnit�v���p�e�B��ݒ肵�܂��B�܂��A�S�p�̂ݓ��͂������ꍇ�Ȃǁu�����̐ݒ��v���s���ꍇ�́AFormat�v���p�e�B��ݒ肵�܂��B
�ȉ��̗�ł́A60�����̐����A���͂�S�p�݂̂ɐ����AAllowApace�v���p�e�B�ɂ��X�y�[�X�̓��͂��֎~�ɂ��Ă��܂��B
GcTextBox1.MaxLength = 60 GcTextBox1.MaxLengthUnit = GrapeCity.Win.Editors.LengthUnit.Char GcTextBox1.Format = "�y" GcTextBox1.AllowSpace = GrapeCity.Win.Editors.AllowSpace.None GcTextBox1.AlternateText.DisplayNull.Text = "�S�p��������͂ł��܂��B" GcTextBox1.AlternateText.DisplayNull.ForeColor = Drawing.Color.Gray GcIme1.SetInputScope(GcTextBox1, InputScopeNameValue.Hiragana)
gcTextBox1.MaxLength = 60; gcTextBox1.MaxLengthUnit = GrapeCity.Win.Editors.LengthUnit.Char; gcTextBox1.Format = "�y"; gcTextBox1.AllowSpace = GrapeCity.Win.Editors.AllowSpace.None; gcTextBox1.AlternateText.DisplayNull.Text = "�S�p��������͂ł��܂��B"; gcTextBox1.AlternateText.DisplayNull.ForeColor = Color.Gray; gcIme1.SetInputScope(gcTextBox1, InputScopeNameValue.Hiragana);
�Ј����œ��͂������e�́u�ӂ肪�Ȃ̎擾�v���s���ꍇ�́ASetReadingStringOutPut���\�b�h�𗘗p���܂��B
�ȉ��̗�ł́A�Ј����̓��͂���t���K�i�������ݒ肵�A���͂��J�^�J�i�ɐ������Ă��܂��B
GcTextBox2.Format = "�j" GcTextBox2.AlternateText.DisplayNull.Text = "�J�^�J�i����͂ł��܂��B" GcTextBox2.AlternateText.DisplayNull.ForeColor = Color.Gray GcTextBox2.AllowSpace = GrapeCity.Win.Editors.AllowSpace.None GcIme1.SetReadingStringOutput(GcTextBox1, New ReadingStringOutput(GcTextBox2, ReadingStringOutputMode.Append)) GcIme1.SetInputScope(GcTextBox2, InputScopeNameValue.KatakanaFullWidth)
gcTextBox2.Format = "�j"; gcTextBox2.AlternateText.DisplayNull.Text = "�J�^�J�i����͂ł��܂��B"; gcTextBox2.AlternateText.DisplayNull.ForeColor = Color.Gray; gcTextBox2.AllowSpace = GrapeCity.Win.Editors.AllowSpace.None; gcIme1.SetReadingStringOutput(gcTextBox1, new ReadingStringOutput(gcTextBox2, ReadingStringOutputMode.Append)); gcIme1.SetInputScope(gcTextBox2, InputScopeNameValue.KatakanaFullWidth);
�X�֔ԍ��̓��͂ɂ��X�֔ԍ��R���g���[����p���܂��B
�ȉ��̗�ł́A���C�A�E�g��Fields�v���p�e�B�Őݒ肵�ASplitAreaDetails�v���p�e�B��AutoCompleteMode�v���p�e�B�̗X�֔ԍ��̓��͕⏕�̋@�\��L���ɂ��Ă��܂��B
GcPostal1.Fields.ZipCodePrefix.Text = "��" GcPostal1.SplitAreaDetails = True GcPostal1.AutoCompleteMode = AutoCompleteMode.SuggestAppend
gcPostal1.Fields.ZipCodePrefix.Text = "��"; gcPostal1.SplitAreaDetails = true; gcPostal1.AutoCompleteMode = AutoCompleteMode.SuggestAppend;
�Z���̓��͂ɂ́u�Z���R���g���[���v��p���܂��B
�ȉ��̗�ł́A�Z���̎���͂̑��Ɂu�Z�������R���|�[�l���g�v�𗘗p���A�X�֔ԍ��̓��͂ɑΉ������Z�����̎擾���s���Ă��܂��B
GcAddressBox1.AutoFilter = True
Dim addressOutputSetting1 As AddressOutputSetting = New AddressOutputSetting With {
    .AddressOutput = GcAddressBox1
}
GcAddress1.SetAddressOutputSetting(GcPostal1, addressOutputSetting1)
gcAddressBox1.AutoFilter = true;
var addressOutputSetting1 = new AddressOutputSetting()
{
    AddressOutput = gcAddressBox1
};
gcAddress1.SetAddressOutputSetting(gcPostal1, addressOutputSetting1);
�d�b�ԍ�������̓��͕�������n�C�t���Ȃǂ̕\�����t�B�[���h�I�u�W�F�N�g�ɂ�鏑���ݒ���MaskLiteralField�v���p�e�B��MaskPatternField�v���p�e�B��ݒ肵�܂��B
�ȉ��̗�ł́A���͕������ɐ�����݂��A�n�C�t���Ȃǂ̃��e����������ݒ肵�Ă��܂��B
GcMask1.Fields.AddRange(New MaskField() { New MaskLiteralField("�� "), New MaskPatternField("\D", 3, 4), New MaskLiteralField("-"), New MaskPatternField("\D", 3, 4), New MaskLiteralField("-"), New MaskPatternField("\D", 4, 4)})
gcMask1.Fields.AddRange(new MaskField[] { new MaskLiteralField("�� ") , new MaskPatternField("\\D", 3, 4) , new MaskLiteralField("-") , new MaskPatternField("\\D", 3, 4) , new MaskLiteralField("-") , new MaskPatternField("\\D", 4, 4) });
�������̓��͂𐧌�����悤�����͔͈͂̎w�����s���ꍇ�́A���t���R���|�[�l���g��p���܂��BGcDateValidator.InvalidRange�N���X��MaxValue�v���p�e�B�����MinValue�v���p�e�B�ŁA�ő���t����эŏ����t���w�肵�܂��B
�ȉ��̗�ł́A�\���t�H�[�}�b�g�͘a��Ƃ��A�{���ȍ~����͂����ꍇ�̓G���[���b�Z�[�W��\������悤�ݒ肵�Ă��܂��B
GcDate1.Fields.AddRange(New DateField() { New DateEraField(), New DateLiteralField(), New DateEraYearField(), New DateLiteralField() With {.Text = "�N"}, New DateMonthField(), New DateLiteralField() With {.Text = "��"}, New DateDayField(), New DateLiteralField() With {.Text = "��"}}) GcDate1.DropDownCalendar.HeaderFormat = "ggg e�N M��" GcDate1.DropDownCalendar.UseHeaderFormat = True Dim gcDateInvalidRange1 As GcDateValidator.InvalidRange = New GcDateValidator.InvalidRange With { .MaxValue = DateTime.Today, .MinValue = New DateTime(1926, 1, 1), .InvalidMessage = "���a�P�N �` �{���͈̔͂̓��t����͂ł��܂��B" } GcDateValidator1.GetValidateItems(GcDate1).AddRange(New Object() {gcDateInvalidRange1}) GcDateValidator1.GetValidateActions(GcDate1).AddRange(New ValidateAction() {New IconNotify()}) GcCustomValidator1.SetValidatingMethod(GcDate1, Sub(context) If GcDate1.Value.HasValue Then Return context.IsValid = False context.EnableIconNotify = True context.IconNotify.IconTip = "���͕K�{���ڂł�" End Sub) GcCustomValidator1.SetSupportRealTimeValidating(GcDate1, True)
gcDate1.Fields.AddRange(new DateField[] { new DateEraField() , new DateLiteralField() , new DateEraYearField() , new DateLiteralField() { Text = "�N" } , new DateMonthField() , new DateLiteralField() { Text = "��" } , new DateDayField() , new DateLiteralField() { Text = "��" }}); gcDate1.DropDownCalendar.HeaderFormat = "ggg e�N M��"; gcDate1.DropDownCalendar.UseHeaderFormat = true; GcDateValidator.InvalidRange gcDateInvalidRange1 = new GcDateValidator.InvalidRange() { MaxValue = DateTime.Today, MinValue = new DateTime(1926, 1, 1), InvalidMessage = "���a�P�N �` �{���͈̔͂̓��t����͂ł��܂��B" }; gcDateValidator1.GetValidateItems(gcDate1).AddRange(new object[] { gcDateInvalidRange1 }); gcDateValidator1.GetValidateActions(gcDate1).AddRange(new ValidateAction[] { new IconNotify() }); gcCustomValidator1.SetValidatingMethod(gcDate1, (context) => { if (gcDate1.Value.HasValue) return; context.IsValid = false; context.EnableIconNotify = true; context.IconNotify.IconTip = "���͕K�{���ڂł�"; }); gcCustomValidator1.SetSupportRealTimeValidating(gcDate1, true);
����ۂƂ�����������̕\���ɂ́A�J�����̐ݒ���Add�܂���Addrange���\�b�h��p���Đݒ肵�܂��B
�ȉ��̗�ł́A��ɕ����Ɖۖ���\�����A���ۖ��ƕ��ۖ��R�[�h���\���ɐݒ肵�Ă��܂��B
GcComboBox1.ListColumns.AddRange(New ListColumn() { New ListColumn("����"), New ListColumn("�ۖ�"), New ListColumn("���ۖ�"), New ListColumn("���ۖ��R�[�h")}) GcComboBox1.TextSubItemIndex = 2 GcComboBox1.DropDownStyle = ComboBoxStyle.DropDown GcComboBox1.IsEditable = False GcComboBox1.ListColumns(0).AutoWidth = True GcComboBox1.ListColumns(1).AutoWidth = True GcComboBox1.ListColumns(2).Visible = False GcComboBox1.ListColumns(3).Visible = False Dim list As List(Of ListItem) = New List(Of ListItem)() For Each item As Department In GetData() list.Add(New ListItem(New SubItem() { New SubItem(item.DepartmentName), New SubItem(item.DivisionName), New SubItem(item.Name), New SubItem(item.Code)})) Next GcComboBox1.Items.AddRange(list.ToArray())
gcComboBox1.ListColumns.AddRange(new ListColumn[] { new ListColumn("����") , new ListColumn("�ۖ�") , new ListColumn("���ۖ�") , new ListColumn("���ۖ��R�[�h") }); gcComboBox1.TextSubItemIndex = 2; gcComboBox1.DropDownStyle = ComboBoxStyle.DropDown; gcComboBox1.IsEditable = false; gcComboBox1.ListColumns[0].AutoWidth = true; gcComboBox1.ListColumns[1].AutoWidth = true; gcComboBox1.ListColumns[2].Visible = false; gcComboBox1.ListColumns[3].Visible = false; var list = new List<ListItem>(); foreach (var item in GetData()) { list.Add(new ListItem(new SubItem[] { new SubItem(item.DepartmentName) , new SubItem(item.DivisionName) , new SubItem(item.Name) , new SubItem(item.Code) })); } gcComboBox1.Items.AddRange(list.ToArray());
�����s�e�L�X�g�̓��͂��s���ꍇ�́AMulti��ine�v���p�e�B��True�ɐݒ肵�܂��B�R���g���[���ɓ��͉\�ȍs���𐧌�����ꍇ��MaxLineCount�v���p�e�B���g�p���邱�Ƃŏ���̐ݒ肪�\�ł��B
�ȉ��̗�ł́A5�s�܂ł̓��͂ɐ������Ă���ق��A�܂�Ԃ���s�Ԃ̐ݒ���s���Ă��܂��B
GcTextBox3.Multiline = True
GcTextBox3.WrapMode = WrapMode.CharWrap
GcTextBox3.LineSpace = 2
GcTextBox3.MaxLineCount = 5
gcTextBox3.Multiline = true;
gcTextBox3.WrapMode = WrapMode.CharWrap;
gcTextBox3.LineSpace = 2;
gcTextBox3.MaxLineCount = 5;���͂ɂ��킹���t�H�[�J�X�ړ����s���ꍇ��ExitOnLastChar�v���p�e�B��ExitOnLeftRightKey�v���p�e�B��ݒ肵�܂��B
�ȉ��̗�ł́A�ŏI���͂ł̃t�H�[�J�X�ړ��Ɩ��L�[�ł̃t�H�[�J�X�ړ��A�G���^�[�L�[�ł̃t�H�[�J�X�ړ���ݒ肵�Ă��܂��B
GcTextBox1.ExitOnLastChar = true
GcTextBox1.ExitOnLeftRightKey = ExitOnLeftRightKey.Both
GcShortcut1.SetShortcuts(GcTextBox1, New ShortcutCollection(New Keys() {Keys.Enter, Keys.Enter Or Keys.Shift},
                         New Object() {GcShortcut1, GcShortcut1},
                         New String() {"NextControl", "PreviousControl"}))
gcTextBox1.ExitOnLastChar = true;
gcTextBox1.ExitOnLeftRightKey = ExitOnLeftRightKey.Both;
gcShortcut1.SetShortcuts(gcTextBox1, new ShortcutCollection(new Keys[] { Keys.Enter, Keys.Enter | Keys.Shift }
                        , new object[] { gcShortcut1, gcShortcut1 }
                        , new string[] { "NextControl", "PreviousControl" }));
�K�{���ڂ����͂���Ă��邩�̌����ėp���R���|�[�l���g��EmptyText�N���X�𗘗p���܂��B
�ȉ��̗�ł́A�ėp���R���|�[�l���g�ł̕K�{���ڂ̌��̑��A�}�X�N�R���g���[���p���J�X�^�����R���|�[�l���g�ł��K�{���ڂ̌������{���Ă��܂��B
���}�X�N�R���g���[���͔ėp���R���|�[�l���g�ł̕K�{���ڂ̌����ł��܂���B
''' <summary> ''' �ėp���i�K�{���́j�̐ݒ� ''' </summary> ''' <param name="control"></param> Private Sub SetCommonValidate(control As EditBase) GcCommonValidator1.GetValidateItems(control).AddRange(New Object() {New EmptyText With {.InvalidMessage = "���͕K�{���ڂł�"}}) GcCommonValidator1.GetValidateActions(control).AddRange(New ValidateAction() {New IconNotify()}) End Sub ''' <summary> ''' �J�X�^�����i�K�{���́j�̐ݒ� ''' </summary> ''' <param name="control"></param> Private Sub SetCustomValidate(ByVal control As GcMask) GcCustomValidator1.SetValidatingMethod(control, Sub(context) If String.IsNullOrEmpty(control.Value) Then context.IsValid = False context.EnableIconNotify = True context.IconNotify.IconTip = "���͕K�{���ڂł�" End If End Sub) GcCustomValidator1.SetSupportRealTimeValidating(control, True) End Sub
/// <summary> /// �ėp���i�K�{���́j�̐ݒ� /// </summary> /// <param name="control"></param> private void SetCommonValidate(EditBase control) { gcCommonValidator1.GetValidateItems(control).AddRange(new object[] { new EmptyText { InvalidMessage = "���͕K�{���ڂł�" } }); gcCommonValidator1.GetValidateActions(control).AddRange(new ValidateAction[] { new IconNotify() }); } /// <summary> /// �J�X�^�����i�K�{���́j�̐ݒ� /// </summary> /// <param name="control"></param> private void SetCustomValidate(GcMask control) { gcCustomValidator1.SetValidatingMethod(control, (context) => { if (string.IsNullOrEmpty(control.Value)) { context.IsValid = false; context.EnableIconNotify = true; context.IconNotify.IconTip = "���͕K�{���ڂł�"; } }); gcCustomValidator1.SetSupportRealTimeValidating(control, true); }