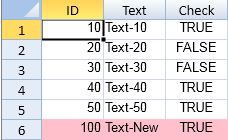
連結後に行を追加できます。

コードの使用
次のサンプルコードは、最後の行の後にいくつかの行を追加します。
| JavaScript |
コードのコピー
|
|---|---|
window.onload = function(){
          var spread = new GC.Spread.Sheets.Workbook(document.getElementById("ss"),{sheetCount:3});
           var activeSheet = spread.getActiveSheet();
// データテーブルを手動で作成します。
     var sampleTable = [
          {"ID":10, "Text":"Text-10", "Check":true},
          {"ID":20, "Text":"Text-20", "Check":false},
          {"ID":30, "Text":"Text-30", "Check":false},
          {"ID":40, "Text":"Text-40", "Check":true},
          {"ID":50, "Text":"Text-50", "Check":true}
      ];
      // このデータテーブルを連結します。
     spread.getActiveSheet().setDataSource(sampleTable);
     $("#button1").click(function(){
          console.log("The number of all rows in the datasource before addition:" + sampleTable.length);
          var activeSheet = spread.getActiveSheet();
          var row = activeSheet.getRowCount();
         //最後の行の後にいくつかの行を追加します。
         activeSheet.addRows(row, 1);
          //データを設定します。
         activeSheet.setValue(row, 0, 100);
          activeSheet.setValue(row, 1, "Text-New");
          activeSheet.setValue(row, 2, true);
          activeSheet.getCell(row, -1).backColor("pink");
          //データテーブルが更新されました。
         console.log("The number of all rows in the datasource after addition:" + sampleTable.length);
          console.log("The value of the Text field in the last row of the datasource: " + sampleTable[sampleTable.length - 1].Text);
      });
}
|
|
関連トピック