テーブルシートは、データ情報を視覚化したり、入力されるデータの型を制御したりする、さまざまなデータルールをサポートしています。
条件付き書式およびデータ検証
テーブルシートは、テーブルシートビューで条件付き書式とデータ検証に対応します。
ビューの列情報を定義する際、条件付き書式とデータ検証はそれぞれ、conditionalFormatプロパティとvalidatorプロパティで指定できます。これらのプロパティは、異なる種類のルールオプションを配列で設定できます。
次の条件付き書式とデータ検証の種類をサポートします。
| プロパティ | 種類 |
|---|---|
| 条件付き書式 |
AverageRule CellValueRule DataBarRule DateOccuringRule DuplicateRule FormulaRule IconSetRule SpecificTextRule ThreeScaleRule Top10Rule TwoScaleRule UniqueRule |
| データ検証 |
DateValidator FormulaListValidator FormulaValidator ListValidator NumberValidator TextLengthValidator TimeValidator |
次のサンプルコードは、テーブルシートで条件付き書式とデータ検証を適用する方法を示します。
| JavaScript |
コードのコピー
|
|---|---|
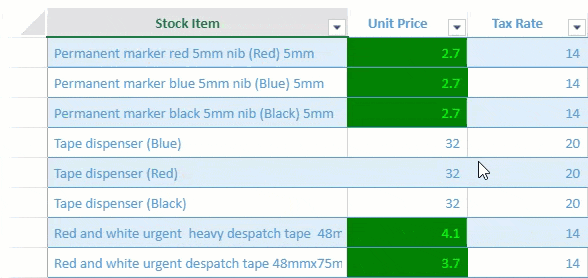
// 条件付き書式を適用する数式。 var formulaRule = { ruleType: "formulaRule", formula: "@<10", style: { backColor: "green", foreColor: "lime" } }; // データバリデーターを作成します。 var positiveNumberValidator = { type: "formula", formula: '@>0', inputTitle: 'Data validation:', inputMessage: 'UnitPrice cannot be less than 0.', highlightStyle: { type: 'icon', color: "red", position: 'outsideRight', } }; // テーブルシートにビューを連結します。 myTable.fetch().then(function () { var view = myTable.addView("myView", [ { value: "stockItem", width: 300, caption: "Stock Item" }, { value: "unitPrice", width: 120, caption: "Unit Price", conditionalFormats: [formulaRule], validator: positiveNumberValidator }, // apply conditional formating and data validation here { value: "taxRate", width: 120, caption: "Tax Rate" }, { value: "=([@unitPrice] * [@taxRate])/100 + [@unitPrice]", caption: "Total Price", width: 150 } ]); sheet.setDataView(view); }); |
|
スタイルルール
スタイルルールには、状態ルールおよび数式ルールがあり、これらのルールに応じてスタイルが適用されます。
- 状態ルール – 行や列の特定状態がトリガーされたときに適用されます。例えば、下の画像に示すように、マウスホバーされた行や、選択された列の背景色や文字色を強調表示します。

-
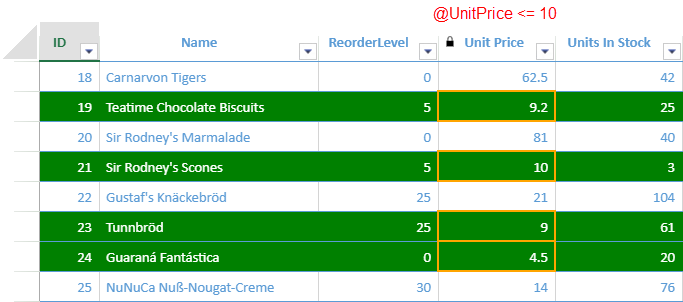
数式ルール – 特定の条件を満たす値のみにスタイルを適用します。例えば、製品の低価格を強調したい場合は、下の画像に示すように、「[@UnitPrice]<10」のに該当するセルの罫線を異なる色で設定します。
状態ルールと数式ルールを追加するには、テーブルシートのビュー生成時に、addViewメソッドのviewOptionsパラメータを使用するか、生成されたビューに対し、GC.Data.ViewクラスのaddStyleRuleメソッドを使用できます。
次のコードサンプルは、テーブルシートで状態ルールと数式ルールの両方を適用する方法を示しています。
| JavaScript |
コードのコピー
|
|---|---|
// 数式ルールを設定します。 var formulaRule = { ruleType: "formulaRule", formula: "@<=10", style: { borderLeft: { color: "orange", style: "medium" }, borderRight: { color: "orange", style: "medium" }, borderTop: { color: "orange", style: "medium" }, borderBottom: { color: "orange", style: "medium" } } }; // TableSheetにビューを連結します。 var myView = productTable.addView("myView", [ { value: "Id", caption: "ID" }, { value: "ProductName", caption: "Name", width: 400 }, { value: "ReorderLevel", caption: "ReorderLevel", width: 120}, { value: "UnitPrice", caption: "Unit Price", width: 100, readonly: true, conditionalFormats: [formulaRule] }, { value: "UnitsInStock", caption: "Units In Stock", width: 100 }, { value: "UnitsOnOrder", caption: "Units On Order", width: 100 } ]); // addStyleRuleメソッドを使用してルールを追加します。 myView.addStyleRule("lowPrice", { backColor: "green", foreColor: "white" }, { formula: "[@UnitPrice] <= 10" }); myView.addStyleRule("HoverStyle", { backColor: "gray", foreColor: "white" }, { direction: GC.Data.StateRuleDirection.row, state: GC.Data.RowColumnStates.hover }); myView.addStyleRule("SelectedStyle", { backColor: "yellow", foreColor: "red"}, { direction: GC.Data.StateRuleDirection.column, state: GC.Data.RowColumnStates.selected }) myView.fetch().then(function () { sheet.setDataView(myView); }); |
|