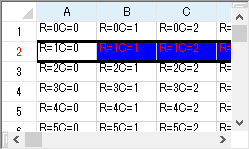
選択領域のデフォルトの外観は、コントロール、および選択領域のレンダラによって定義されます。 背景色、テキスト色、フォントなどを変更できます。 また、ShowRowSelectorプロパティを使用すると、行選択アイコンを表示できます。
デフォルトでは、選択領域のレンダラによって設定された外観が使用されます。何らかの領域が選択されると、選択領域の背景色がレンダラによって変更されます。この方法による描画を行わず、選択領域の背景色やテキスト色に対して任意の色を指定できます。レンダラによる外観と、独自に設定した色とを、両方組み合わせて使用することもできます。また、選択領域を強調表示するための外観を使用しないこともできます。
次の図では、選択されたセルを、デフォルトのレンダラスタイルを使用して表示します。次に、選択されたセルを指定の色で表示し、最後に、レンダラスタイルと指定色の両方を適用します。
| SelectionStyles.SelectionRenderer | SelectionStyles.SelectionColors | SelectionStyles.Both |
|---|---|---|
 |
 |
 |
選択領域の色を設定しない場合は、Color.FromArgb(100, 193, 224, 255) が使用されます。
選択されたセルの色表示は、SheetViewクラスの以下のプロパティによって決定されます。
| SheetViewのプロパティ | 説明 |
|---|---|
| SelectionBackColor | 選択領域の背景色を定義します。 |
| SelectionForeColor | 選択領域のテキスト色を定義します。 |
| SelectionStyle | 選択領域の描画スタイルを、指定色を使用するのか、カスタムレンダラを使用するのか、またはその両方を使用するのかを定義します。SelectionStyles列挙体を使用して設定します。 |
| SelectionFont | 選択されたテキストのフォントを定義します。 |
SelectionStyleプロパティを「SelectionColors」に設定している場合は、セルのForeColorおよびBackColorプロパティではなく、SelectionBackColorおよびSelectionForeColorの設定によってセルが描画されます。 SelectionStyleプロパティを「SelectionRenderer」に設定している場合は、セルのForeColorおよびBackColorプロパティの設定によってセルが描画されます。これで、セル上に半透明のレイヤが描画されます。この半透明のレイヤは、システムの強調表示色、およびアルファ値100を使用して描画されます。
 |
SelectionBackColorプロパティ、SelectionForeColorプロパティおよびSelectionFontプロパティを有効にするには、LegacyBehaviorsプロパティにStyleを含める必要があります。 |
サンプルコード
次のサンプルコードは、セルの選択範囲の描画に使用するISelectionRendererインタフェースを実装するレンダラクラスを作成します。シートのSelectionStyleプロパティを「SelectionRenderer」に設定し、コントロールのSelectionRendererプロパティに作成したレンダラクラスを設定します。
| C# |
コードのコピー
|
|---|---|
public class SelectionRenderer : FarPoint.Win.Spread.ISelectionRenderer { public void PaintSelection(Graphics g, int x, int y, int width, int height) { SolidBrush selectionBrush = new SolidBrush(Color.FromArgb(100, SystemColors.ControlDark)); g.FillRectangle(selectionBrush, x, y, width, height); selectionBrush.Dispose(); } } //コードビハインドでコントロールに設定します fpSpread1.Sheets[0].SelectionStyle = FarPoint.Win.Spread.SelectionStyles.SelectionRenderer; fpSpread1.SelectionRenderer = new SelectionRenderer(); |
|
| Visual Basic |
コードのコピー
|
|---|---|
Public Class SelectionRenderer Implements FarPoint.Win.Spread.ISelectionRenderer Public Sub PaintSelection(g As Graphics, x As Integer, y As Integer, width As Integer, height As Integer) Implements FarPoint.Win.Spread.ISelectionRenderer.PaintSelection Dim selectionBrush As New SolidBrush(Color.FromArgb(100, SystemColors.ControlDark)) g.FillRectangle(selectionBrush, x, y, width, height) selectionBrush.Dispose() End Sub End Class 'コードビハインドでコントロールに設定します FpSpread1.Sheets(0).SelectionStyle = FarPoint.Win.Spread.SelectionStyles.SelectionRenderer FpSpread1.SelectionRenderer = New SelectionRenderer() |
|
コントロールがフォーカスを失ったときに、選択されているセル範囲をハイライト表示のままにするかどうかを設定できます。詳しくは、FpSpreadクラスのRetainSelectionBlockプロパティを参照してください。
設定方法
- 選択領域を強調表示する方法を指定するには、SheetViewクラスのSelectionStyleプロパティを設定します。
- SelectionStyleプロパティを「SelectionColors」または「Both」に設定した場合、SheetViewクラスのSelectionBackColorおよびSelectionForeColorプロパティを使用して背景色とテキスト色を指定します。
サンプルコード
次のサンプル コードは、レンダラの設定値と指定色を使用して、選択領域を強調表示します。
| C# |
コードのコピー
|
|---|---|
// 選択領域のレンダラと指定色を使用します。 fpSpread1.Sheets[0].SelectionStyle = FarPoint.Win.Spread.SelectionStyles.Both; // 背景色とテキスト色を設定します。 fpSpread1.Sheets[0].SelectionBackColor = System.Drawing.Color.AliceBlue; fpSpread1.Sheets[0].SelectionForeColor = System.Drawing.Color.Navy; |
|
| Visual Basic |
コードのコピー
|
|---|---|
' 選択領域のレンダラと指定色を使用します。 FpSpread1.Sheets(0).SelectionStyle = FarPoint.Win.Spread.SelectionStyles.Both ' 背景色とテキスト色を設定します。 FpSpread1.Sheets(0).SelectionBackColor = System.Drawing.Color.AliceBlue FpSpread1.Sheets(0).SelectionForeColor = System.Drawing.Color.Navy |
|
SPREAD デザイナの使用
- 選択領域の外観を設定するシートのシート タブを選択します。
- プロパティ リストで SelectionStyle プロパティを設定します。
- SelectionStyle を「SelectionColors」または「Both」に設定した場合は、SelectionBackColor および SelectionForeColor プロパティを使用して、選択領域を強調表示するための背景色とテキスト色を指定します。
- [ファイル]メニューから[適用して終了]を選択し、変更をコンポーネントに適用して SPREAD デザイナを終了します。