SPREAD for WinForms では、ワークシート内の画像をカスタマイズすることができます。
以下に説明している各機能では拡張シェイプエンジンが使用されるため、EnhancedShapeEngine プロパティを true に設定する必要があります。 また、これらの機能は拡張シェイプエンジンのすべての機能を継承しているため、出力される画像を Excel 入出することに対応しています。
画像のトリミング
ワークシート内の画像をトリミングすることで、不要な外側の端部分を切り取ることができます。SPREAD for WinForms では、 コードを使用するか、実行時の UI トリミングハンドルを使用して画像のトリミングが行えます。
コードの使用
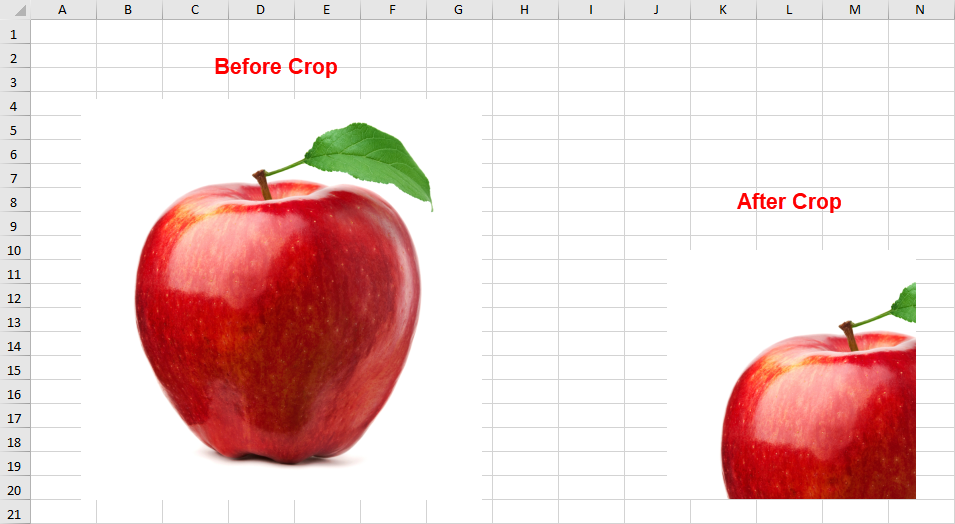
必要に応じて、画像の寸法を制御してトリミングするには、ICrop インタフェースのPictureOffsetX、ShapeTop、PictureWidth などのプロパティを使用します。
次の図は、コードにて画像のトリミング前とトリミング後の出力結果を示します。

| C# |
コードのコピー
|
|---|---|
// Cropping a picture using code fpSpread1.LegacyBehaviors = FarPoint.Win.Spread.LegacyBehaviors.None; fpSpread1.Features.EnhancedShapeEngine = true; GrapeCity.Spreadsheet.IWorksheet TestActiveSheet = fpSpread1.AsWorkbook().ActiveSheet; GrapeCity.Spreadsheet.Drawing.IShape picture1 = TestActiveSheet.Shapes.AddPicture(@"D:\apple.jpg", false, false, 50, 50, 400, 400); picture1.AutoShapeType = GrapeCity.Spreadsheet.Drawing.AutoShapeType.Rectangle; GrapeCity.Spreadsheet.Drawing.IShape picture2 = TestActiveSheet.Shapes.AddPicture(@"D:\apple.jpg", true, true, 200, 200, 400, 400); picture2.AutoShapeType = GrapeCity.Spreadsheet.Drawing.AutoShapeType.Rectangle; picture2.PictureFormat.Crop.PictureOffsetX = 100; picture2.PictureFormat.Crop.PictureOffsetY = 100; picture2.PictureFormat.Crop.ShapeLeft = 150; picture2.PictureFormat.Crop.ShapeTop = 150; |
|
| Visual Basic |
コードのコピー
|
|---|---|
' Cropping a picture using code FpSpread1.LegacyBehaviors = FarPoint.Win.Spread.LegacyBehaviors.None FpSpread1.Features.EnhancedShapeEngine = True Dim TestActiveSheet As GrapeCity.Spreadsheet.IWorksheet = FpSpread1.AsWorkbook().ActiveSheet Dim picture1 As GrapeCity.Spreadsheet.Drawing.IShape = TestActiveSheet.Shapes.AddPicture("D:\apple.jpg", False, False, 50, 50, 400, 400) picture1.AutoShapeType = GrapeCity.Spreadsheet.Drawing.AutoShapeType.Rectangle Dim picture2 As GrapeCity.Spreadsheet.Drawing.IShape = TestActiveSheet.Shapes.AddPicture("D:\apple.jpg", True, True, 200, 200, 400, 400) picture2.AutoShapeType = GrapeCity.Spreadsheet.Drawing.AutoShapeType.Rectangle picture2.PictureFormat.Crop.PictureOffsetX = 100 picture2.PictureFormat.Crop.PictureOffsetY = 100 picture2.PictureFormat.Crop.ShapeLeft = 150 picture2.PictureFormat.Crop.ShapeTop = 150 |
|
実行時の UI ハンドルの使用
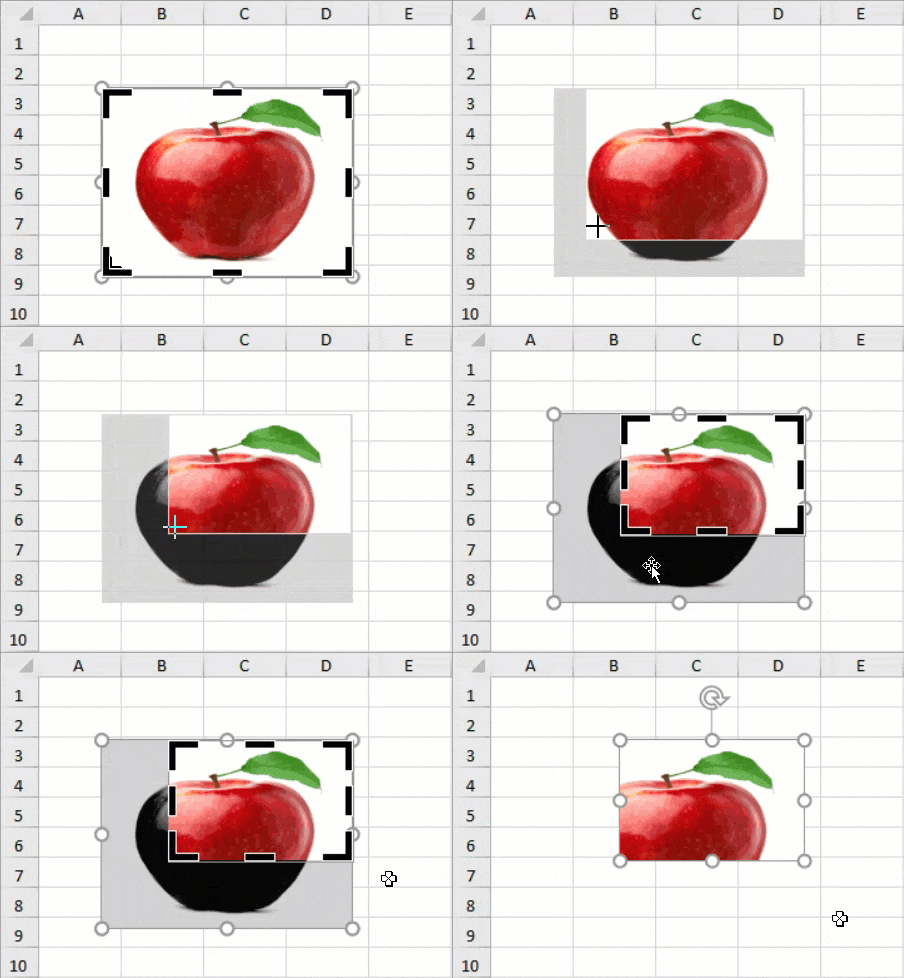
実行時に UI トリミング ハンドルを有効にして、ワークシート内の画像をトリミングできます。 FpSpread.StartCropping メソッドを使用すると、画像の端と角に黒いトリミング用のハンドルが表示されます。
また、トリミングハンドルを外側にドラッグすることで、画像の周囲に余白を追加することもできます。

画像のトリミングが完了したら、Esc キーを押すか、画像の外側をクリックします。
次のサンプルコードは、Spread ワークシートに実行時の UI トリミングを使用する方法を示します。
| C# |
コードのコピー
|
|---|---|
// Cropping a picture at runtime fpSpread1.LegacyBehaviors = FarPoint.Win.Spread.LegacyBehaviors.None; fpSpread1.Features.EnhancedShapeEngine = true; GrapeCity.Spreadsheet.IWorksheet TestActiveSheet = fpSpread1.AsWorkbook().ActiveSheet; GrapeCity.Spreadsheet.Drawing.IPicture pic1 = (GrapeCity.Spreadsheet.Drawing.IPicture)TestActiveSheet.Shapes.AddPicture(@"D:\apple.jpg", false, false, 50, 50, 200, 150); bool started = fpSpread1.StartCropping(pic1); |
|
| Visual Basic |
コードのコピー
|
|---|---|
'Cropping a picture at runtime FpSpread1.LegacyBehaviors = FarPoint.Win.Spread.LegacyBehaviors.None FpSpread1.Features.EnhancedShapeEngine = True Dim TestActiveSheet As GrapeCity.Spreadsheet.IWorksheet = FpSpread1.AsWorkbook().ActiveSheet Dim pic1 As GrapeCity.Spreadsheet.Drawing.IPicture = CType(TestActiveSheet.Shapes.AddPicture("D:\apple.jpg", False, False, 50, 50, 200, 150), GrapeCity.Spreadsheet.Drawing.IPicture) Dim started As Boolean = FpSpread1.StartCropping(pic1) |
|
画像の書式
SPREAD for Winforms で利用可能な画像の書式設定のオプションを使用して、必要に応じてワークシート内の画像を書式設定できます。
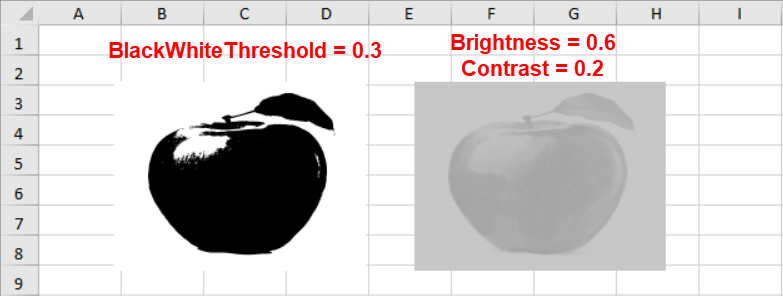
画像を補正するには、明るさ、コントラスト、白黒のしきい値、透明度などの書式設定オプションで構成される IPictureFormat インタフェースを使用します。
次のサンプルコードは、2 つの異なる補正オプションを使用してカスタマイズされた画像を示します。

| C# |
コードのコピー
|
|---|---|
fpSpread1.Features.EnhancedShapeEngine = true; IWorksheet TestActiveSheet = fpSpread1.AsWorkbook().ActiveSheet; GrapeCity.Spreadsheet.Drawing.IShape picture1 = TestActiveSheet.Shapes.AddPicture(@"D:\apple.jpg", false, false, 60, 45, 200, 150); picture1.PictureFormat.ColorType = GrapeCity.Spreadsheet.Drawing.PictureColorType.BlackAndWhite; picture1.PictureFormat.BlackWhiteThreshold = 0.3; GrapeCity.Spreadsheet.Drawing.IShape picture2 = TestActiveSheet.Shapes.AddPicture(@"D:\apple.jpg", false, false, 300, 45, 200, 150); picture2.PictureFormat.Brightness = 0.6; picture2.PictureFormat.Contrast = 0.2; |
|
| Visual Basic |
コードのコピー
|
|---|---|
' Cropping a picture using code FpSpread1.LegacyBehaviors = FarPoint.Win.Spread.LegacyBehaviors.None FpSpread1.Features.EnhancedShapeEngine = True Dim TestActiveSheet As GrapeCity.Spreadsheet.IWorksheet = FpSpread1.AsWorkbook().ActiveSheet Dim picture1 As GrapeCity.Spreadsheet.Drawing.IShape = TestActiveSheet.Shapes.AddPicture("D:\apple.jpg", False, False, 50, 50, 400, 400) picture1.AutoShapeType = GrapeCity.Spreadsheet.Drawing.AutoShapeType.Rectangle Dim picture2 As GrapeCity.Spreadsheet.Drawing.IShape = TestActiveSheet.Shapes.AddPicture("D:\apple.jpg", True, True, 200, 200, 400, 400) picture2.AutoShapeType = GrapeCity.Spreadsheet.Drawing.AutoShapeType.Rectangle picture2.PictureFormat.Crop.PictureOffsetX = 100 picture2.PictureFormat.Crop.PictureOffsetY = 100 picture2.PictureFormat.Crop.ShapeLeft = 150 picture2.PictureFormat.Crop.ShapeTop = 150 |
|
Spread ワークシートに指定したデータの画像を作成する方法については、「」を参照してください。
画像の調整
You can customize an image in a worksheet by adding various artistic effects, and transform any image into a sketch or a painting.
The following picture adjustments take effect for painting in Spread.
- Blur: Adds a blur effect.
- Brightness contrast: Adjusts the brightness and contrast of the image.
- Color tone: Adjusts the brightness and color temperature of the image.
- Film grain: Applies a grainy effect to the image.
- Glow edges: Adds a glowing texture to the image edges.
- Saturation: Adds saturation effect to the image.
- Sharpness soften: Sharpens and softens the image.
- Recolor: Changes the color of a picture.
The following table provides a comparison between the original image and images under different picture adjustments.
|
Original image |
Sharpness soften |
Brightness contrast |
|
|
|
|
|
Color tone |
Film grain |
Saturation |
|
|
|
|
|
Glow edges |
Blur |
Recolor |
|
|
|
|
The PictureEffectType enumeration provides various options for defining picture effects.
The following code shows how to apply an artistic effect using the PictureEffectType enumeration:
| C# |
コードのコピー
|
|---|---|
IWorksheet TestActiveSheet = fpSpread1.AsWorkbook().ActiveSheet; fpSpread1.AsWorkbook().WorkbookSet.CalculationEngine.CalcFeatures = GrapeCity.Spreadsheet.CalcFeatures.All; fpSpread1.Features.EnhancedShapeEngine = true; GrapeCity.Spreadsheet.Drawing.IShape picture1 = TestActiveSheet.Shapes.AddPicture(@"D:\logo.png", true, true, 40, 20, 150, 150); GrapeCity.Spreadsheet.Drawing.IShape picture2 = TestActiveSheet.Shapes.AddPicture(@"D:\logo.png", true, true, 300, 20, 150, 150); GrapeCity.Spreadsheet.Drawing.IPictureEffects pic = picture2.Fill.PictureEffects; // Add brightness contrast effect GrapeCity.Spreadsheet.Drawing.IPictureEffect pics2 = pic.Insert(GrapeCity.Spreadsheet.Drawing.PictureEffectType.BrightnessContrast); pics2.EffectParameters[0].Value = 0.2d; pics2.EffectParameters[1].Value = -0.9d; |
|
| VB |
コードのコピー
|
|---|---|
Dim TestActiveSheet As IWorksheet = fpSpread1.AsWorkbook().ActiveSheet fpSpread1.AsWorkbook().WorkbookSet.CalculationEngine.CalcFeatures = GrapeCity.Spreadsheet.CalcFeatures.All fpSpread1.Features.EnhancedShapeEngine = True Dim picture1 As GrapeCity.Spreadsheet.Drawing.IShape = TestActiveSheet.Shapes.AddPicture("D:\logo.png", True, True, 40, 20, 150, 150) Dim picture2 As GrapeCity.Spreadsheet.Drawing.IShape = TestActiveSheet.Shapes.AddPicture("D:\logo.png", True, True, 300, 20, 150, 150) Dim pic As GrapeCity.Spreadsheet.Drawing.IPictureEffects = picture2.Fill.PictureEffects Dim pics2 As GrapeCity.Spreadsheet.Drawing.IPictureEffect = pic.Insert(GrapeCity.Spreadsheet.Drawing.PictureEffectType.BrightnessContrast) pics2.EffectParameters(0).Value = 0.2R pics2.EffectParameters(1).Value = -0.9R |
|
You can also change the color of a picture in the worksheet using the Recolor method of the IPictureFormat interface.
| C# |
コードのコピー
|
|---|---|
fpSpread1.Features.EnhancedShapeEngine = true; IWorksheet TestActiveSheet = fpSpread1.AsWorkbook().ActiveSheet; fpSpread1.AsWorkbook().WorkbookSet.CalculationEngine.CalcFeatures = GrapeCity.Spreadsheet.CalcFeatures.All; fpSpread1.Features.EnhancedShapeEngine = true; GrapeCity.Spreadsheet.Drawing.IShape picture1 = TestActiveSheet.Shapes.AddPicture(@"D:\logo.png", true, true, 40, 20, 150, 150); GrapeCity.Spreadsheet.Drawing.IShape picture2 = TestActiveSheet.Shapes.AddPicture(@"D:\logo.png", true, true, 300, 20, 150, 150); picture1.PictureFormat.Recolor(GrapeCity.Core.SchemeColor.CreateArgbColor(0, 246, 243), true); |
|
| VB |
コードのコピー
|
|---|---|
fpSpread1.Features.EnhancedShapeEngine = True Dim TestActiveSheet As IWorksheet = fpSpread1.AsWorkbook().ActiveSheet fpSpread1.AsWorkbook().WorkbookSet.CalculationEngine.CalcFeatures = GrapeCity.Spreadsheet.CalcFeatures.All fpSpread1.Features.EnhancedShapeEngine = True Dim picture1 As GrapeCity.Spreadsheet.Drawing.IShape = TestActiveSheet.Shapes.AddPicture("D:\logo.png", True, True, 40, 20, 150, 150) Dim picture2 As GrapeCity.Spreadsheet.Drawing.IShape = TestActiveSheet.Shapes.AddPicture("D:\logo.png", True, True, 300, 20, 150, 150) picture1.PictureFormat.Recolor(GrapeCity.Core.SchemeColor.CreateArgbColor(0, 246, 243), True) |
|
You can also restore the original colors of a picture that was re-colored using the RestoreOriginalColors method.
 |
Note: As of now, Spread for WinForms only supports the above-mentioned picture effects. We will support more effects in the future releases. |


