SPREAD for WinForms では、ワークシート内の画像をカスタマイズすることができます。
以下に説明している各機能では拡張シェイプエンジンが使用されるため、EnhancedShapeEngine プロパティを true に設定する必要があります。 また、これらの機能は拡張シェイプエンジンのすべての機能を継承しているため、出力される画像が Excel I/O にも対応しています。
画像のトリミング
ワークシート内の画像をトリミングすることで、その画像の不要な外側の端部分を切り取ることができます。 コードを使用するか、実行時の UI トリミングハンドルを使用して画像のトリミングが行えます。
コードの使用
必要に応じて、画像の寸法を設定してトリミングするには、ICrop インタフェースのPictureOffsetX、ShapeTop、PictureWidth などのプロパティを使用します。
次の図は、コードにて画像のトリミング前とトリミング後の出力結果を示します。

| C# |
コードのコピー
|
|---|---|
// コードを使用して画像をトリミングします fpSpread1.LegacyBehaviors = FarPoint.Win.Spread.LegacyBehaviors.None; fpSpread1.Features.EnhancedShapeEngine = true; GrapeCity.Spreadsheet.IWorksheet TestActiveSheet = fpSpread1.AsWorkbook().ActiveSheet; GrapeCity.Spreadsheet.Drawing.IShape picture1 = TestActiveSheet.Shapes.AddPicture(@"D:\apple.jpg", false, false, 50, 50, 400, 400); picture1.AutoShapeType = GrapeCity.Spreadsheet.Drawing.AutoShapeType.Rectangle; GrapeCity.Spreadsheet.Drawing.IShape picture2 = TestActiveSheet.Shapes.AddPicture(@"D:\apple.jpg", true, true, 200, 200, 400, 400); picture2.AutoShapeType = GrapeCity.Spreadsheet.Drawing.AutoShapeType.Rectangle; picture2.PictureFormat.Crop.PictureOffsetX = 100; picture2.PictureFormat.Crop.PictureOffsetY = 100; picture2.PictureFormat.Crop.ShapeLeft = 150; picture2.PictureFormat.Crop.ShapeTop = 150; |
|
| Visual Basic |
コードのコピー
|
|---|---|
' コードを使用して画像をトリミングします FpSpread1.LegacyBehaviors = FarPoint.Win.Spread.LegacyBehaviors.None FpSpread1.Features.EnhancedShapeEngine = True Dim TestActiveSheet As GrapeCity.Spreadsheet.IWorksheet = FpSpread1.AsWorkbook().ActiveSheet Dim picture1 As GrapeCity.Spreadsheet.Drawing.IShape = TestActiveSheet.Shapes.AddPicture("D:\apple.jpg", False, False, 50, 50, 400, 400) picture1.AutoShapeType = GrapeCity.Spreadsheet.Drawing.AutoShapeType.Rectangle Dim picture2 As GrapeCity.Spreadsheet.Drawing.IShape = TestActiveSheet.Shapes.AddPicture("D:\apple.jpg", True, True, 200, 200, 400, 400) picture2.AutoShapeType = GrapeCity.Spreadsheet.Drawing.AutoShapeType.Rectangle picture2.PictureFormat.Crop.PictureOffsetX = 100 picture2.PictureFormat.Crop.PictureOffsetY = 100 picture2.PictureFormat.Crop.ShapeLeft = 150 picture2.PictureFormat.Crop.ShapeTop = 150 |
|
実行時の UI ハンドルの使用
実行時に UI トリミング ハンドルを有効にして、ワークシート内の画像をトリミングできます。 FpSpread.StartCropping メソッドを使用すると、画像の端と角に黒いトリミング ハンドルが表示されます。
また、トリミングハンドルを外側にドラッグすることで、画像の周囲に余白を追加することもできます。

トリミングが完了したら、Esc キーを押すか、シート内の画像の外側をクリックします。
次のサンプルコードは、Spread ワークシートに実行時の UI トリミングを使用する方法を示します。
| C# |
コードのコピー
|
|---|---|
// 実行時に画像をトリミングします fpSpread1.LegacyBehaviors = FarPoint.Win.Spread.LegacyBehaviors.None; fpSpread1.Features.EnhancedShapeEngine = true; GrapeCity.Spreadsheet.IWorksheet TestActiveSheet = fpSpread1.AsWorkbook().ActiveSheet; GrapeCity.Spreadsheet.Drawing.IPicture pic1 = (GrapeCity.Spreadsheet.Drawing.IPicture)TestActiveSheet.Shapes.AddPicture(@"D:\apple.jpg", false, false, 50, 50, 200, 150); bool started = fpSpread1.StartCropping(pic1); |
|
| Visual Basic |
コードのコピー
|
|---|---|
'実行時に画像をトリミングします FpSpread1.LegacyBehaviors = FarPoint.Win.Spread.LegacyBehaviors.None FpSpread1.Features.EnhancedShapeEngine = True Dim TestActiveSheet As GrapeCity.Spreadsheet.IWorksheet = FpSpread1.AsWorkbook().ActiveSheet Dim pic1 As GrapeCity.Spreadsheet.Drawing.IPicture = CType(TestActiveSheet.Shapes.AddPicture("D:\apple.jpg", False, False, 50, 50, 200, 150), GrapeCity.Spreadsheet.Drawing.IPicture) Dim started As Boolean = FpSpread1.StartCropping(pic1) |
|
画像の書式設定
SPREAD for Winforms にある画像の書式設定オプションを使用して、必要に応じてワークシート内の画像を書式設定できます。
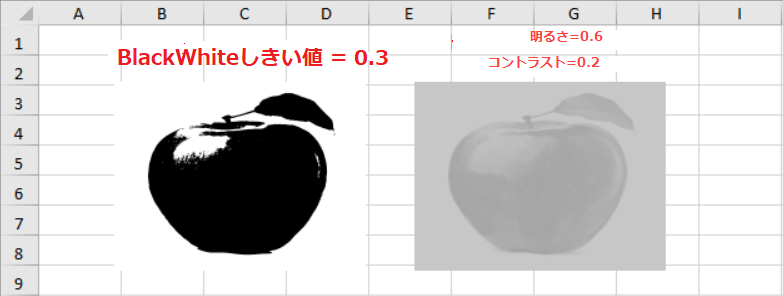
画像を補正するには、明るさ、コントラスト、白黒のしきい値、透明度などの書式設定オプションで構成される IPictureFormat インタフェースを使用します。
次のサンプルコードは、2 つの異なる補正オプションを使用してカスタマイズされた画像を示します。
| C# |
コードのコピー
|
|---|---|
fpSpread1.Features.EnhancedShapeEngine = true; IWorksheet TestActiveSheet = fpSpread1.AsWorkbook().ActiveSheet; GrapeCity.Spreadsheet.Drawing.IShape picture1 = TestActiveSheet.Shapes.AddPicture(@"D:\apple.jpg", false, false, 60, 45, 200, 150); picture1.PictureFormat.ColorType = GrapeCity.Spreadsheet.Drawing.PictureColorType.BlackAndWhite; picture1.PictureFormat.BlackWhiteThreshold = 0.3; GrapeCity.Spreadsheet.Drawing.IShape picture2 = TestActiveSheet.Shapes.AddPicture(@"D:\apple.jpg", false, false, 300, 45, 200, 150); picture2.PictureFormat.Brightness = 0.6; picture2.PictureFormat.Contrast = 0.2; |
|
| Visual Basic |
コードのコピー
|
|---|---|
' コードを使用して画像をトリミングします FpSpread1.LegacyBehaviors = FarPoint.Win.Spread.LegacyBehaviors.None FpSpread1.Features.EnhancedShapeEngine = True Dim TestActiveSheet As GrapeCity.Spreadsheet.IWorksheet = FpSpread1.AsWorkbook().ActiveSheet Dim picture1 As GrapeCity.Spreadsheet.Drawing.IShape = TestActiveSheet.Shapes.AddPicture("D:\apple.jpg", False, False, 50, 50, 400, 400) picture1.AutoShapeType = GrapeCity.Spreadsheet.Drawing.AutoShapeType.Rectangle Dim picture2 As GrapeCity.Spreadsheet.Drawing.IShape = TestActiveSheet.Shapes.AddPicture("D:\apple.jpg", True, True, 200, 200, 400, 400) picture2.AutoShapeType = GrapeCity.Spreadsheet.Drawing.AutoShapeType.Rectangle picture2.PictureFormat.Crop.PictureOffsetX = 100 picture2.PictureFormat.Crop.PictureOffsetY = 100 picture2.PictureFormat.Crop.ShapeLeft = 150 picture2.PictureFormat.Crop.ShapeTop = 150 |
|
Spread ワークシートに指定したデータの画像を作成する方法については、「画像ファイルへの保存」を参照してください。
画像の調整
ワークシート内の画像にさまざまなアート効果を追加して、スケッチまたは絵画に変換できます。
絵画に変換した場合、以下の画像調整が有効です。
- ぼかし: ぼかし効果を適用します。
- 明度/コントラスト: 画像の明るさ/コントラストを調整します。
- 色のトーン:画像の明るさと色温度を調整します。
- フィルム粒子: 画像に粒子の粗い効果を適用します。
- 光彩(輪郭): 画像の輪郭に光彩効果を適用します。
- 彩度: 画像に彩度効果を適用します。
- シャープネス: 画像の鮮明度を設定します。
- 色の変更: 画像の色を変更します。
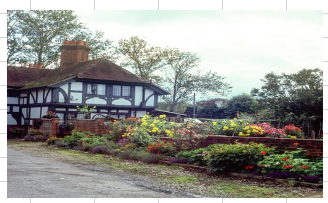
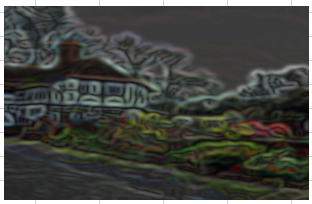
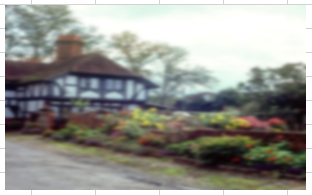
次の表は、元の画像とさまざまな画像調整を適用した画像との比較を示します。
|
元の画像 |
シャープネス |
明るさ/コントラスト |
|
|
|
|
|
色のトーン |
フィルム粒子 |
彩度 |
|
|
|
|
|
光彩(輪郭) |
ぼかし |
色の変更 |
|
|
|
|


PictureEffectType 列挙体には、画像に効果を適用できるさまざまなオプションを提供します。
次のサンプルコードは、PictureEffectType 列挙体を使用してアート効果を適用する方法を示します。
| C# |
コードのコピー
|
|---|---|
IWorksheet TestActiveSheet = fpSpread1.AsWorkbook().ActiveSheet; fpSpread1.AsWorkbook().WorkbookSet.CalculationEngine.CalcFeatures = GrapeCity.Spreadsheet.CalcFeatures.All; fpSpread1.Features.EnhancedShapeEngine = true; GrapeCity.Spreadsheet.Drawing.IShape picture1 = TestActiveSheet.Shapes.AddPicture(@"D:\logo.png", true, true, 40, 20, 150, 150); GrapeCity.Spreadsheet.Drawing.IShape picture2 = TestActiveSheet.Shapes.AddPicture(@"D:\logo.png", true, true, 300, 20, 150, 150); GrapeCity.Spreadsheet.Drawing.IPictureEffects pic = picture2.Fill.PictureEffects; // 明るさとコントラスト効果を追加します GrapeCity.Spreadsheet.Drawing.IPictureEffect pics2 = pic.Insert(GrapeCity.Spreadsheet.Drawing.PictureEffectType.BrightnessContrast); pics2.EffectParameters[0].Value = 0.2d; pics2.EffectParameters[1].Value = -0.9d; |
|
| VB |
コードのコピー
|
|---|---|
Dim TestActiveSheet As IWorksheet = fpSpread1.AsWorkbook().ActiveSheet fpSpread1.AsWorkbook().WorkbookSet.CalculationEngine.CalcFeatures = GrapeCity.Spreadsheet.CalcFeatures.All fpSpread1.Features.EnhancedShapeEngine = True Dim picture1 As GrapeCity.Spreadsheet.Drawing.IShape = TestActiveSheet.Shapes.AddPicture("D:\logo.png", True, True, 40, 20, 150, 150) Dim picture2 As GrapeCity.Spreadsheet.Drawing.IShape = TestActiveSheet.Shapes.AddPicture("D:\logo.png", True, True, 300, 20, 150, 150) Dim pic As GrapeCity.Spreadsheet.Drawing.IPictureEffects = picture2.Fill.PictureEffects Dim pics2 As GrapeCity.Spreadsheet.Drawing.IPictureEffect = pic.Insert(GrapeCity.Spreadsheet.Drawing.PictureEffectType.BrightnessContrast) pics2.EffectParameters(0).Value = 0.2R pics2.EffectParameters(1).Value = -0.9R |
|
ワークシート内の画像の色を変更するには、IPictureFormat インタフェースの Recolor メソッドを使用します。
| C# |
コードのコピー
|
|---|---|
fpSpread1.Features.EnhancedShapeEngine = true; IWorksheet TestActiveSheet = fpSpread1.AsWorkbook().ActiveSheet; fpSpread1.AsWorkbook().WorkbookSet.CalculationEngine.CalcFeatures = GrapeCity.Spreadsheet.CalcFeatures.All; fpSpread1.Features.EnhancedShapeEngine = true; GrapeCity.Spreadsheet.Drawing.IShape picture1 = TestActiveSheet.Shapes.AddPicture(@"D:\logo.png", true, true, 40, 20, 150, 150); GrapeCity.Spreadsheet.Drawing.IShape picture2 = TestActiveSheet.Shapes.AddPicture(@"D:\logo.png", true, true, 300, 20, 150, 150); picture1.PictureFormat.Recolor(GrapeCity.Core.SchemeColor.CreateArgbColor(0, 246, 243), true); |
|
| VB |
コードのコピー
|
|---|---|
fpSpread1.Features.EnhancedShapeEngine = True Dim TestActiveSheet As IWorksheet = fpSpread1.AsWorkbook().ActiveSheet fpSpread1.AsWorkbook().WorkbookSet.CalculationEngine.CalcFeatures = GrapeCity.Spreadsheet.CalcFeatures.All fpSpread1.Features.EnhancedShapeEngine = True Dim picture1 As GrapeCity.Spreadsheet.Drawing.IShape = TestActiveSheet.Shapes.AddPicture("D:\logo.png", True, True, 40, 20, 150, 150) Dim picture2 As GrapeCity.Spreadsheet.Drawing.IShape = TestActiveSheet.Shapes.AddPicture("D:\logo.png", True, True, 300, 20, 150, 150) picture1.PictureFormat.Recolor(GrapeCity.Core.SchemeColor.CreateArgbColor(0, 246, 243), True) |
|
色を変更した画像の元色を復元するには、RestoreOriginalColors メソッドを使用します。
 |
メモ:現在点で、SPREAD for WinForms には上記の画像効果のみがサポートされます。 将来のリリースで追加される可能性があります。 |