ドロップダウンカレンダーの主な機能は次のとおりです。ドロップダウンカレンダーのプロパティを設定する方法については「設定方法(ドロップダウンカレンダー)」を参照してください。
表示形式
ドロップダウンカレンダーには次の3つの表示形式があります。

左から順に Month、Year、Decade カレンダー
ユーザーは次の方法でドロップダウンカレンダーの表示形式を切り替えられます。
- ヘッダをクリックする
- [Ctrl] + 上下矢印キーを押す
初期表示時にどの形式を適用するかは GcDropDownCalendar クラスのStartDidsplayDate プロパティを設定します。また、表示形式の切り替えを抑止するには、StartDisplayDateとEndDisplayDateプロパティの値を同一に設定します。なお、ドロップダウンカレンダーのプロパティは、WPFのスタイル設定を使用します。
次のサンプルコードは、ドロップダウンカレンダーの表示をYear カレンダーに固定します。
| XAML |
コードのコピー |
|---|---|
<sg:GcSpreadGrid x:Name="gcSpreadGrid1"> <sg:GcSpreadGrid.Resources> <Style TargetType="sg:GcDropDownCalendar" x:Key="MyCalendarStyle"> <Setter Property="StartDisplayMode" Value="Year"/> <Setter Property="EndDisplayMode" Value="Year"/> </Style> </sg:GcSpreadGrid.Resources> <sg:GcSpreadGrid.Columns> <sg:Column> <sg:Column.CellType> <sg:DateTimeCellType DropDownCalendarStyle="{StaticResource MyCalendarStyle}"/> </sg:Column.CellType> </sg:Column> </sg:GcSpreadGrid.Columns> </sg:GcSpreadGrid> | |
開始曜日の設定
カレンダーの一番左に表示される週の開始曜日を変更するには、日付け型セルの FirstDayOfWeek プロパティを設定します。次のサンプルコードは、月曜から週を開始します。
| C# |
コードのコピー |
|---|---|
DateTimeCellType dt = new DateTimeCellType();
dt.FirstDayOfWeek = GrapeCity.Windows.SpreadGrid.Editors.DayOfWeek.Monday;
gcSpreadGrid1.Columns[0].CellType = dt; | |
| Visual Basic |
コードのコピー |
|---|---|
Dim dt As New DateTimeCellType() dt.FirstDayOfWeek = GrapeCity.Windows.SpreadGrid.Editors.DayOfWeek.Monday gcSpreadGrid1.Columns(3).CellType = dt | |
ヘッダテキスト
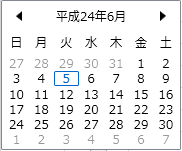
Month カレンダーの年月を表すヘッダテキストの書式は YearMonthFormat プロパティ、Year および Decade カレンダーの年を表すヘッダテキストの書式は YearFormat プロパティで設定します。

Month カレンダーのヘッダテキストを和暦で表示
次のサンプルコードは、Month カレンダーのヘッダテキストの書式を設定します。
| xaml |
コードのコピー |
|---|---|
<sg:GcSpreadGrid Name="gcSpreadGrid1"> <sg:GcSpreadGrid.Resources> <Style TargetType="sg:DropDownCalendarEditElement"> <Setter Property="YearMonthFormat" Value="ggge年M月"/> </Style> </sg:GcSpreadGrid.Resources> <sg:GcSpreadGrid.Columns> <sg:Column> <sg:Column.CellType> <sg:DateTimeCellType/> </sg:Column.CellType> </sg:Column> </sg:GcSpreadGrid.Columns> </sg:GcSpreadGrid> | |
隣接日
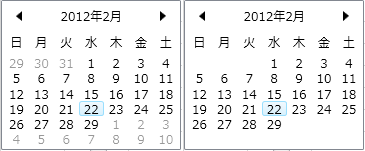
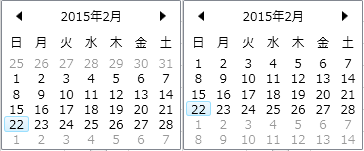
既定では、ドロップダウンカレンダーは隣接する月の一部を表示します。この表示内容は変更できます。

(左)隣接日を表示 (右)隣接日を非表示

(左)空白行から開始 (右)空白行をすべて最後に表示
隣接日を表示するかどうかは、ドロップダウンカレンダーの ShowTrailing プロパティで設定します。空白行を表示するかどうかは EmptyRow プロパティで設定します。
次のxamlはShowTrailing および EmptyRow プロパティを設定します。
| xaml |
コードのコピー |
|---|---|
<sg:GcSpreadGrid Name="gcSpreadGrid1"> <sg:GcSpreadGrid.Resources> <Style TargetType="sg:DropDownCalendarEditElement"> <Setter Property="ShowTrailing" Value="False"/> <Setter Property="EmptyRow" Value="AllAtEnd"/> </Style> </sg:GcSpreadGrid.Resources> <sg:GcSpreadGrid.Columns> <sg:Column> <sg:Column.CellType> <sg:DateTimeCellType/> </sg:Column.CellType> </sg:Column> </sg:GcSpreadGrid.Columns> </sg:GcSpreadGrid> | |
今日の日付
今日の日付をハイライト表示するかどうかは、日付時刻型セルの IsTodayHighlighted プロパティで設定します。
週番号
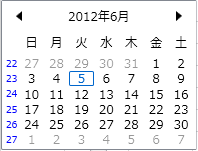
各週の左隣に週番号を表示できます。

週番号を表示するには、ドロップダウンカレンダーの WeekNumberStyle プロパティに週番号を表す WeekNumber のスタイルを設定します。
週番号を表示します。
| xaml |
コードのコピー |
|---|---|
<sg:GcSpreadGrid Name="gcSpreadGrid1"> <sg:GcSpreadGrid.Resources> <Style TargetType="sg:DropDownCalendarEditElement"> <Setter Property="WeekNumberStyle"> <Setter.Value> <Style TargetType="sg:WeekNumber"> <Setter Property="Visibility" Value="Visible"/> <Setter Property="Foreground" Value="Blue"/> <Setter Property="FontSize" Value="9"/> </Style> </Setter.Value> </Setter> </Style> </sg:GcSpreadGrid.Resources> <sg:GcSpreadGrid.Columns> <sg:Column> <sg:Column.CellType> <sg:DateTimeCellType/> </sg:Column.CellType> </sg:Column> </sg:GcSpreadGrid.Columns> </sg:GcSpreadGrid> | |