ActiveReportsのオブジェクトとコントロールは、実行時にも自由にアクセス可能です。各レポートセクションまたはコントロールのプロパティを変更して、レポートの見た目を動的に変化させることができます。Formatイベントを使用すると、レポートのセクションおよびコントロールの高さ、可視性などの外観に関するプロパティを変更できます。セクションの印刷領域を変更できるのは、Formatイベントのみです。このイベントが完了すると、セクションの高さなどに対する変更がレポート出力に反映されることはありません。
このチュートリアルでは、ユーザーの入力に基づいてレポートレイアウトを実行時に作成、変更する方法を紹介します。
このトピックでは、以下のタスクを行います。
- Visual StudioプロジェクトにActiveReportを追加する
- Windowsフォームにコントロールを追加して、フィールドとビューワを表示する
- Windowsフォームにデータセットを生成する
- レポートのレイアウトを作成するためにコードを追加する
- チェックリストをフィールドで読み込んでレポートを実行するためにコードを追加する
- Detailセクションで色を交互に入れ替えるためにコードを追加する
- constructReportメソッドを呼び出すためにReportStartイベントにコードを追加する
- 選択された値を取得してレポートを実行するためにボタンのClickイベントにコードを追加する
- フィールドが選択された時にボタンが有効になるようにコードを追加する
- fillCheckListメソッドを呼び出すためにForm_Loadイベントにコードを追加する
- レポートを表示する
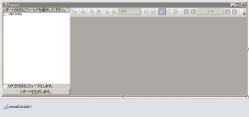
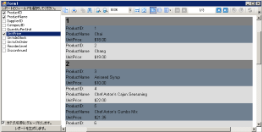
チュートリアルを完了すると、次のようなレポートが作成されます。
デザイン時のレイアウト(Windowsフォーム)
実行時のレイアウト
Visual StudioプロジェクトにActiveReportsを追加する
- Visual Studioで新規プロジェクトを開きます。
- [プロジェクト]メニューから[新しい項目の追加]を選択します。
- [新しい項目を追加]ダイアログから[ActiveReports 14.0 セクションレポート(コード)]を選択し、名前を「rptRunTime」に変更します。
- [追加]ボタンをクリックします。
詳細は、「クイックスタート」を参照してください。
Windowsフォームにコントロールを追加して、フィールドとビューワを表示する
- Windowsフォームのサイズを、多数のコントロールが配置できるように変更します。
- Visual Studioツールボックスから、[Panel]コントロールをWindowsフォーム上にドラッグし、[プロパティ]ウィンドウから以下のプロパティを設定します。
Panel
プロパティ名 プロパティの値 Dock Left Name Panel1 - Visual Studioツールボックスから、以下のコントロールを[Panel1]上にドラッグし、[プロパティ]ウィンドウから以下のプロパティを設定します。
Label
プロパティ名 プロパティの値 Dock Top Name lblSelectFields Text レポートのフィールドを選択してください。 CheckedListBox
プロパティ名 プロパティの値 Dock Fill Name clbFields Button
プロパティ名 プロパティの値 Dock Bottom Name btnGenRep Text レポートを生成します。 CheckBox
プロパティ名 プロパティの値 Dock Bottom Name chkGroup Text カテゴリID別にグループ化します。 - Visual Studioツールボックスから、[Viewer]コントロールをWindowsフォーム上にドラッグし、[プロパティ]ウィンドウから以下のプロパティを設定します。
Viewer
プロパティ名 プロパティの値 Dock Fill Name Viewer1
Windowsフォームにデータセットを生成する
- [プロジェクト]メニューから[新しい項目の追加]を選択します。
- [データセット]を選択し、ファイル名を「NWINDDataSet.xsd」に変更して、[追加]のボタンをクリックします。
- 表示されるデータセットデザイナで、[サーバーエクスプローラー]リンクをクリックします。
-
[サーバーエクスプローラー]で、データベースのローカルコピーのノードを展開し、テーブルノードを展開して[Products] テーブルをデータセットデザイナにドラッグします。
ヒント:Northwindデータベースのローカルコピーが表示されない場合は、サーバーエクスプローラーの上部にある[データベースへの接続]をクリックし、プロンプトに従ってください。
- Windowsフォームを開き、Visual Studioツールボックスから[DataSet]をWindowsフォーム上にドラッグします。
- [データセットの追加]ダイアログボックスから、[型指定されたデータセット]を選択し、[OK]をクリックします。
レポートのレイアウトを作成するためにコードを追加する
- rptRunTime の「デザイナ面」を右クリックして[コードの表示]を選択します。
- 以下の処理を行うために、レポートのクラス宣言内に次のコードを追加します。
- フィールドの配列を作成する
- グループ使用有無のオプションを作成する
- レポートのプロパティを設定する
- フィールドの配列に応じてレポートにTextBoxとLabelを追加する
- 例外をハンドルする
Visual Basic
Visual Basicコード (コードビューの先頭に貼り付けます) コードのコピーImports GrapeCity.ActiveReports.SectionReportModel
Visual Basicコード ( レポートのクラス宣言内に貼り付けます) コードのコピーPrivate m_arrayFields As ArrayList Private m_useGroups As Boolean 'ユーザーが選択したフィールドを格納する配列を作成する Public WriteOnly Property FieldsList() As ArrayList Set(ByVal Value As ArrayList) m_arrayFields = Value End Set End Property 'ユーザーが選択したグループ化情報を格納するプロパティを作成する Public WriteOnly Property UseGroups() As Boolean Set(ByVal Value As Boolean) m_useGroups = False m_useGroups = Value End Set End Property Private m_defaultHeight As Single = 0.2F Private m_defaultWidth As Single = 4.0F Private m_currentY As Single = 0.0F 'レポート書式を設定し、ユーザーが選択したフィールドを追加する Private Sub constructReport() Try Me.Detail1.CanGrow = True Me.Detail1.CanShrink = True Me.Detail1.KeepTogether = True If m_useGroups = True Then 'グループ化設定する場合は、グループヘッダとフッタを追加し、グループ化フィールドを設定する Me.Sections.InsertGroupHF() CType(Me.Sections("GroupHeader1"), GroupHeader).DataField = "CategoryID" Me.Sections("GroupHeader1").BackColor = System.Drawing.Color.Gray Me.Sections("GroupHeader1").CanGrow = True Me.Sections("GroupHeader1").CanShrink = True CType(Me.Sections("GroupHeader1"), GroupHeader).RepeatStyle = RepeatStyle.OnPageIncludeNoDetail 'グループのCategoryIDを表示するためにテキストボックスを追加する Dim txt As New TextBox txt.DataField = "CategoryID" txt.Location = New System.Drawing.PointF(0.0F, 0) txt.Width = 2.0F txt.Height = 0.3F txt.Style = "font-weight: bold; font-size: 16pt" Me.Sections("GroupHeader1").Controls.Add(txt) End If Dim i As Integer For i = 0 To m_arrayFields.Count - 1 'ユーザーに選択されたすべてのフィールド(CategoryID以外)のためのラベルとテキストボックスを作成する If m_arrayFields(i).ToString <> "CategoryID" Then Dim lbl As New Label '選択されたフィールドの名前を表示するためのラベルを設定する lbl.Text = m_arrayFields(i) + ":" '各ラベルの位置を設定する '(m_currentYは、各ループの際に追加されたコントロールの高さを取得する) lbl.Location() = New System.Drawing.PointF(0.0F, m_currentY) lbl.Width = 0.9F lbl.Height = m_defaultHeight Me.Detail1.Controls.Add(lbl) Dim txt As New TextBox 'データを表示するテキストボックスを設定する txt.DataField = m_arrayFields(i) 'テキストボックスの位置を設定する txt.Location = New System.Drawing.PointF(1.0F, m_currentY) txt.Width = m_defaultWidth txt.Height = m_defaultHeight Me.Detail1.Controls.Add(txt) 'フィールドが単価の場合テキストボックスの書式をcurrencyに設定する If m_arrayFields(i) = "UnitPrice" Then txt.OutputFormat = "$#.00" End If '追加したコントロールの高さを増やす m_currentY = m_currentY + m_defaultHeight End If Next Catch ex As Exception System.Windows.Forms.MessageBox.Show("Error in Report-constructReport: " + ex.Message, "Project Error", System.Windows.Forms.MessageBoxButtons.OK, System.Windows.Forms.MessageBoxIcon.Error) End Try End SubC#
C#コード (コードビューの先頭に貼り付けます) コードのコピーusing GrapeCity.ActiveReports.SectionReportModel;
C#コード ( レポートのクラス宣言内に貼り付けます) コードのコピーprivate ArrayList m_arrayFields; //ユーザーが選択したフィールドを格納する配列を作成する public ArrayList FieldsList { set{m_arrayFields = value;} } private bool m_useGroups = false; //ユーザーが選択したグループ化情報を格納するプロパティを作成する public bool UseGroups { set{m_useGroups = value;} } float m_defaultHeight = .2f; float m_defaultWidth = 4f; float m_currentY = 0f; //レポート書式を設定し、ユーザーが選択したフィールドを追加する private void constructReport() { try { this.detail.CanGrow = true; this.detail.CanShrink = true; this.detail.KeepTogether = true; if(m_useGroups) { //グループ化設定する場合は、グループヘッダとフッタを追加し、グループ化フィールドを設定する this.Sections.InsertGroupHF(); ((GroupHeader)this.Sections["GroupHeader1"]).DataField = "CategoryID"; this.Sections["GroupHeader1"].BackColor = System.Drawing.Color.Gray; this.Sections["GroupHeader1"].CanGrow = true; this.Sections["GroupHeader1"].CanShrink = true; ((GroupHeader)this.Sections["GroupHeader1"]).RepeatStyle = RepeatStyle.OnPageIncludeNoDetail; this.Sections["GroupFooter1"].Height = 0; //グループのCategoryIDを表示するためにテキストボックスを追加する TextBox txt = new TextBox(); txt.DataField = "CategoryID"; txt.Location = new System.Drawing.PointF(0f,0); txt.Width =2f; txt.Height = .3f; txt.Style = "font-weight: bold; font-size: 16pt;"; this.Sections["GroupHeader1"].Controls.Add(txt); } for(int i=0;i<m_arrayFields.Count;i++) { if(!m_useGroups || (m_useGroups && m_arrayFields[i].ToString() != "CategoryID")) //ユーザーに選択されたすべてのフィールド(CategoryID以外)のためのラベルとテキストボックスを作成する { Label lbl = new Label(); //選択されたフィールドの名前を表示するためのラベルを設定する lbl.Text = m_arrayFields[i].ToString() + ":"; //各ラベルの位置を設定する //(m_currentYは、各ループの際に追加されたコントロールの高さを取得する) lbl.Location = new System.Drawing.PointF(0f,m_currentY); lbl.Width =.9f; lbl.Height = m_defaultHeight; this.detail.Controls.Add(lbl); TextBox txt = new TextBox(); //データを表示するテキストボックスを設定する txt.DataField = m_arrayFields[i].ToString(); //テキストボックスの位置を設定する txt.Location = new System.Drawing.PointF(1f,m_currentY); txt.Width = m_defaultWidth; txt.Height = m_defaultHeight; this.detail.Controls.Add(txt); //フィールドが単価の場合テキストボックスの書式をcurrencyに設定する if (m_arrayFields[i].ToString().Equals("UnitPrice")) { txt.OutputFormat = "$#.00"; } //追加したコントロールの高さを増やす m_currentY = m_currentY + m_defaultHeight; } } } catch(Exception ex) { System.Windows.Forms.MessageBox.Show("Error in Report-constructReport: " + ex.Message,"Project Error",System.Windows.Forms.MessageBoxButtons.OK,System.Windows.Forms.MessageBoxIcon.Error); } }
チェックリストをフィールドで読み込んでレポートを実行するためにコードを追加する
- Windowsフォームを右クリックし、[コードの表示]を選択します。
- 以下の処理を行うために、フォームのクラス宣言内に次のコードを追加します。
- チェックリストをフィールドで読み込む
- レポートを実行する
Visual Basic
Visual Basicコード (フォームのクラス宣言内に貼り付けます) コードのコピーDim i As Integer Dim c As Integer Dim m_arrayField As New ArrayList() Private Sub fillCheckBox() For Me.i = 0 To Me.NwindDataSet1.Tables.Count - 1 For Me.c = 0 To Me.NwindDataSet1.Tables(i).Columns.Count - 1 Me.clbFields.Items.Add(Me.NwindDataSet1.Tables(i).Columns(c).ColumnName) Next Next End Sub Private Sub launchReport() Dim rpt As New rptRunTime() Dim dataAdapter As New NWINDDataSetTableAdapters.ProductsTableAdapter Try rpt.FieldsList = m_arrayField rpt.UseGroups = chkGroup.Checked dataAdapter.Fill(NwindDataSet1.Products) rpt.DataSource = Me.NwindDataSet1.Products Viewer1.Document = rpt.Document rpt.Run() Catch ex As Exception System.Windows.Forms.MessageBox.Show(Me, "Error in launchReport: " + ex.Message, "Project Error", MessageBoxButtons.OK, MessageBoxIcon.Error) End Try End SubC#
C#コード (フォームのクラス宣言内に貼り付けます) コードのコピーSystem.Collections.ArrayList m_arrayField = new System.Collections.ArrayList(); private void fillCheckBox() { for(int i = 0; i < this.nwindDataSet1.Tables.Count; i++) { for(int c = 0; c < this.nwindDataSet1.Tables[i].Columns.Count; c++) { this.clbFields.Items.Add(this.nwindDataSet1.Tables[i].Columns[c].ColumnName); } } } private void launchReport() { try { rptRunTime rpt = new rptRunTime(); rpt.FieldsList = m_arrayField; rpt.UseGroups = chkGroup.Checked; NWINDDataSetTableAdapters.ProductsTableAdapter dataAdapter = new NWINDDataSetTableAdapters.ProductsTableAdapter(); dataAdapter.Fill(this.nwindDataSet1.Products); rpt.DataSource = this.nwindDataSet1.Products; this.Viewer1.Document = rpt.Document; rpt.Run(); } catch(Exception ex) { MessageBox.Show(this,"Error in launchReport: " + ex.Message,"Project Error",MessageBoxButtons.OK,MessageBoxIcon.Error); } }
Detailセクションで色を交互に入れ替えるためにコードを追加する
- rptRunTimeのDetailセクションをダブルクリックします。rptRunTimeのDetail_Formatイベントのイベント処理メソッドを作成します。
- 隔行で色を変更するために、ハンドラに次のコードを追加します。
Visual Basic
Visual Basicコード (Detail_Formatイベントの上に貼り付けます) コードのコピーDim m_count As Integer Visual Basicコード (Detail_Formatイベント内に貼り付けます) コードのコピーIf m_count Mod 2 = 0 Then Me.Detail1.BackColor = System.Drawing.Color.SlateGray Else Me.Detail1.BackColor = System.Drawing.Color.Gainsboro End If m_count = m_count + 1
C#
C#コード (Detail Formatイベントの上に貼り付けます) コードのコピーint m_count; C#コード (Detail Formatイベント内に貼り付けます) コードのコピーif(m_count % 2 == 0) { this.detail.BackColor = System.Drawing.Color.SlateGray; } else { this.detail.BackColor = System.Drawing.Color.Gainsboro; } m_count++;
constructReportメソッドを呼び出すためにReportStartイベントにコードを追加する
- rptRunTimeの「デザイナ面」のグレーの領域をダブルクリックし、rptRunTimeのReportStartイベントのイベント処理メソッドを作成します。
- constructReportメソッドを呼び出すために次のコードを追加します。
Visual Basic
Visual Basicコード (ReportStartイベント内に貼り付けます) コードのコピーconstructReport()
C#
C#コード (ReportStartイベント内に貼り付けます) コードのコピーconstructReport();
選択された値を取得してレポートを実行するためにbutton Clickイベントにコードを追加する
- btnGenRep をダブルクリックし、button Clickイベントのイベント処理メソッドを作成します。
- 選択された値を取得してレポートを実行するために、ハンドラに次のコードを追加します。
Visual Basic
Visual Basicコード (button clickイベント内に貼り付けます) コードのコピーMe.m_arrayField.Clear() For Me.i = 0 To Me.clbFields.CheckedItems.Count - 1 m_arrayField.Add(Me.clbFields.CheckedItems(i).ToString) Next launchReport()
C#
C#コード (button clickイベント内に貼り付けます) コードのコピーthis.m_arrayField.Clear(); for(int i = 0; i < this.clbFields.CheckedItems.Count; i++) { m_arrayField.Add(this.clbFields.CheckedItems[i].ToString()); } launchReport();
フィールドが選択された時にボタンが有効になるようにコードを追加する
- CheckedListBox(clbFields)を選択し、[プロパティ]ウィンドウに移動します。
- [プロパティ]ウィンドウの[イベント]アイコンをクリックします。
- SelectedIndexChangedイベントをダブルクリックし、clbFields_SelectedIndexChangedイベントのイベント処理メソッドを作成します。
- フィールドが選択された時に、ボタンが有効になるようにハンドラに次のコードを追加します。
Visual Basic
Visual Basicコード (SelectedIndexChangedイベント内に貼り付けます) コードのコピーIf Me.clbFields.CheckedItems.Count < 0 Then Me.btnGenRep.Enabled = False Else Me.btnGenRep.Enabled = True End IfC#
C#コード (SelectedIndexChangedイベント内に貼り付けます) コードのコピーif(this.clbFields.CheckedItems.Count>0) { this.btnGenRep.Enabled = true; } else { this.btnGenRep.Enabled = false; }
fillCheckListメソッドを呼び出すためにForm_Loadイベントにコードを追加する
- Windowsフォームのタイトルバーをダブルクリックし、Form_Loadイベントのイベント処理メソッドを作成します。
- fillCheckBoxメソッドを呼び出すために以下のコードを追加し、clbFieldsをフィールド値で読み込んで例外をハンドルします。
Visual Basic
Visual Basicコード (Form Loadイベント内に貼り付けます) コードのコピーTry fillCheckBox() Catch ex As Exception System.Windows.Forms.MessageBox.Show(Me, "Error in Form1_Load: " + ex.Message, "Project Error", MessageBoxButtons.OK, MessageBoxIcon.Error) End Try
C#
C#コード (Form Loadイベント内に貼り付けます) コードのコピーtry { fillCheckBox(); } catch(Exception ex) { MessageBox.Show(this,"Error in Form1_Load: " + ex.Message,"Project Error", MessageBoxButtons.OK,MessageBoxIcon.Error); }
レポートを表示する


