This topic guides you through the steps of creating a WebAPI over Salesforce data.
Create a Web API project
- Open Visual Studio, select Create a new project.
- From the available list of project templates, choose the ASP.NET Core Web API template and click Next.
- In the Configure your new project window, set the project name to SalesforceAPI, assign an appropriate location and click Next.
- In the Additional Information dialog, select the framework from Target Framework, set it to .NET Core 3.1 and click Create.
Install NuGet Packages
After successfully creating the project, add the required NuGet packages for working with Salesforce data using DataConnectors, specifically with Salesforce .Net DataConnector.
To get started we must install the following NuGet Packages in the Web API project from NuGet:
- C1.AdoNet.Salesforce
- C1.EntityFrameworkCore.Salesforce
- Microsoft.EntityFrameworkCore.Tools
Add a Model Class and a Database Context
Now, let's generate the model class and database context for each table that we are looking forward to interact with, via WebAPI. ComponentOne DataConnectors support Scaffolding to generate the model and database context classes, as described in Scaffolding.
Here, we are using the same scaffolding approach to automatically generate the Model and database context class for Customer__c table. The following steps guide you on how to generate and register the model and database context classes:
-
In Solution Explorer, right-click the project. Select Add | New Folder. Name the new folder Models and execute the following scaffold command to generate the Model and Context classes in the Models folder. Please note the command below does not specify the actual values for the connection string attributes, you must replace the placeholders with the true values.
Command コードのコピーScaffold-DbContext "Username = *****; Password = *****; Security Token = *****; OAuth Client Id = *****; OAuth Client Secret = *****; OAuth Token Endpoint = https://ap16.salesforce.com/services/oauth2/token; Url=https://ap16.salesforce.com/services/data/v42.0; Use Cache = 'true'; Cache provider = 'Microsoft.Data.SqlClient'; Cache connection = 'Server=*****;Database=*****;User Id=*****;Password=*****;'" C1.EntityFrameworkCore.Salesforce -OutputDir "Models" -Context CustomerContext -Tables Customer__c
In the above command, we are connecting to the database using SQL Server Cache to further enhance the DataConnector performance. For details on Salesforce DataConnector caching refer to Salesforce caching.
-
Register the database context in Startup.cs file by adding the following code in ConfigureServices method:
Startup.cs コードのコピーpublic void ConfigureServices(IServiceCollection services) { services.AddControllers(); string connectionString = @"Username = ******; Password = ******; Security Token = ******; OAuth Client Id = ******; OAuth Client Secret = ******; OAuth Token Endpoint = https://ap16.salesforce.com/services/oauth2/token; Url=https://ap16.salesforce.com/services/data/v42.0; Use Cache = 'true'; Cache provider = 'Microsoft.Data.SqlClient'; Cache connection = 'Server=******;Database=******;User Id=******;Password=******;'"; services.AddDbContext<CustomerContext>(opt => opt.UseSalesforce(connectionString)); }
Scaffold a Controller with CRUD Methods
Define the CRUD methods in an API controller using the standard VS scaffolder. The following steps guide you with the same:
-
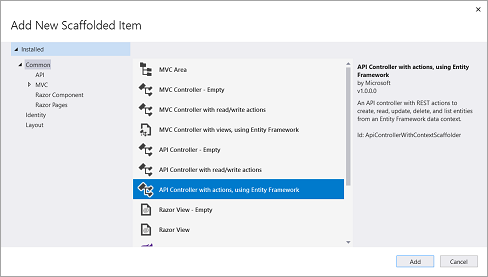
Right-click the Controllers folder and select Add | New Scaffolded Item.
-
Select API Controller with actions, using Entity Framework, and then select Add.

- In the Add API Controller with actions, using Entity Framework dialog, select CustomerC (SalesforceAPI.Models) in the Model class and CustomerContext (SalesforceAPI.Models) in the Data context class.
- Click Add button to add the controller and automatically generate all the CRUD methods to work on Salesforce data. The code snippet below depicts the generated controller:
Controller コードのコピーusing System; using System.Collections.Generic; using System.Linq; using System.Threading.Tasks; using Microsoft.AspNetCore.Http; using Microsoft.AspNetCore.Mvc; using Microsoft.EntityFrameworkCore; using SalesforceAPI.Models; namespace SalesforceAPI.Controllers { [Route("api/[controller]")] [ApiController] public class CustomerCsController : ControllerBase { private readonly CustomerContext _context; public CustomerCsController(CustomerContext context) { _context = context; } // GET: api/CustomerCs [HttpGet] public async Task<ActionResult<IEnumerable<CustomerC>>> GetCustomerC() { return await _context.CustomerC.ToListAsync(); } // GET: api/CustomerCs/5 [HttpGet("{id}")] public async Task<ActionResult<CustomerC>> GetCustomerC(string id) { var customerC = await _context.CustomerC.FindAsync(id); if (customerC == null) { return NotFound(); } return customerC; } // PUT: api/CustomerCs/5 // オーバーポスト攻撃から保護するには、バインドする特定のプロパティを有効にします。 // 詳細については、https://go.microsoft.com/fwlink/?linkid=2123754 を参照してください。 [HttpPut("{id}")] public async Task<IActionResult> PutCustomerC(string id, CustomerC customerC) { if (id != customerC.Id) { return BadRequest(); } _context.Entry(customerC).State = EntityState.Modified; try { await _context.SaveChangesAsync(); } catch (DbUpdateConcurrencyException) { if (!CustomerCExists(id)) { return NotFound(); } else { throw; } } return NoContent(); } // POST: api/CustomerCs // オーバーポスト攻撃から保護するには、バインドする特定のプロパティを有効にします。 // 詳細については、https://go.microsoft.com/fwlink/?linkid=2123754 を参照してください。 [HttpPost] public async Task<ActionResult<CustomerC>> PostCustomerC(CustomerC customerC) { _context.CustomerC.Add(customerC); await _context.SaveChangesAsync(); return CreatedAtAction("GetCustomerC", new { id=customerC.Id }, customerC); } // DELETE: api/CustomerCs/5 [HttpDelete("{id}")] public async Task<ActionResult<CustomerC>> DeleteCustomerC(string id) { var customerC = await _context.CustomerC.FindAsync(id); if (customerC == null) { return NotFound(); } _context.CustomerC.Remove(customerC); await _context.SaveChangesAsync(); return customerC; } private bool CustomerCExists(string id) { return _context.CustomerC.Any(e => e.Id == id); } } }
The controller implements the GET, GET(ID), PUT, POST and DELETE methods to perform the Read, Update, Create and Delete operations over the Salesforce data respectively.
This completes the creation of a WebAPI over Salesforce. In the next step, we set the startup path of the application to execute and test the working of this API.
Update the launchUrl
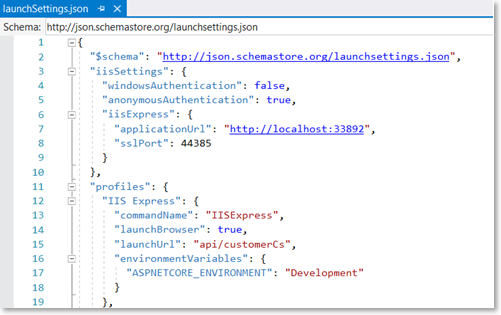
To launch the WebAPI on project execution, update launchUrl from "weatherforecast" to "api/CustomerCs" in Properties | launchSettings.json file as depicted in the screenshot below:

The WebAPI project is now ready to compile and execute.
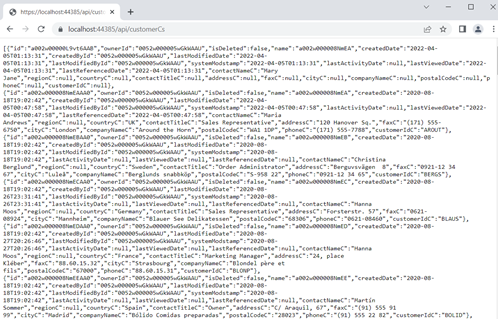
On project execution, the READ method from the controller which is equivalent to invoking the GET method of API is invoked. It returns all the records from the Customer__c table as depicted in the screenshot below:

Similarly, you can invoke the GET(id) method by passing the id column value of a particular row as a parameter in the browser request. Refer to the screenshot below which depicts the same:

All the other methods of the API i.e. PUT, POST and DELETE cannot be executed directly in the browser. Either use an API platform to test the methods in the browser or create a JS application to invoke the methods and display the results.
The sections ahead describes both these approaches of consuming an API in detail.