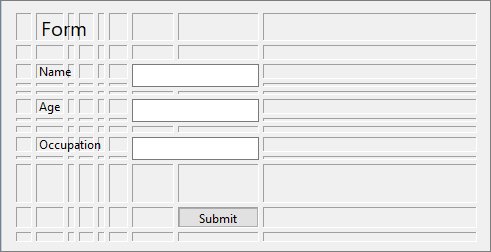
The Sizer panel has a grid layout which consists of row and column bands. These bands are automatically recalculated when the Sizer control is resized, and the contained controls are relocated to their new places. You can set up bands at design time and through, and configure them to act as splitters or keep their size constant when the control is resized.
Add Bands
Sizer allows various ways to add row and column bands using the RowCollection and ColumnCollection classes. It provides the Insert method to add a band at a specific location by specifying the positions where the bands are to be inserted as showcased in the following code.
| C# |
コードのコピー
|
|---|---|
Type your example code here. It will be automatically colorized when you switch to Preview or build the help system.
|
|
Alternatively, you can increment the value of the Count property to add a new band to the Sizer control as shown in the following code snippet.
| C# |
コードのコピー
|
|---|---|
Type your example code here. It will be automatically colorized when you switch to Preview or build the help system.
|
|
In addition, you can create bands at design time using the C1Sizer Grid Editor. For more information, see C1Sizer Grid Editor.
Delete Bands
To delete a particular row or a column band from the grid, you can use Remove method of the RowCollection or ColumnCollection class, respectively. The Remove method takes the index of the column/row band as its parameter and deletes the specified band.
The following code shows how bands can be deleted from the Sizer control.
| C# |
コードのコピー
|
|---|---|
Type your example code here. It will be automatically colorized when you switch to Preview or build the help system.
|
|
Besides, you can also delete the bands using the C1Sizer Grid Editor. For more information, see C1Sizer Grid Editor.
Delete Unused Bands
Getting rid of unused bands from the grid layout can be a tedious task. But, Sizer makes it easier by providing the AutoGrid option. This option clears any bands that do not have any controls attached to them. To use this option to clear unused bands from the grid, right-click the Sizer control and select AutoGrid from the context menu.
The following image shows the appearance of the Sizer control after removing the unused bands.

Set Band Size
Sizer allows you to set the size of the row and column bands by using Size property of the Row and Column classes, respectively. Here, the size represents the row height (in pixels) for a row band, and column width (in pixels) for a column band.
The following code snippet shows how to set the size of a row and a column band in Sizer.
| C# |
コードのコピー
|
|---|---|
Type your example code here. It will be automatically colorized when you switch to Preview or build the help system.
|
|
You can also set the size of the bands at design time using the C1Sizer Grid Editor. For more information, see C1Sizer Grid Editor.
Fixed-Size Band
You can designate certain bands as fixed size, so they do not resized. For example, you might want to allow only the text box placed in the first band to be resized vertically, and keep the height of all others constant by setting IsFixedSize property of the Band class to true.
The following code snippet shows how to create fixed-size row and column bands in Sizer control.
| C# |
コードのコピー
|
|---|---|
Type your example code here. It will be automatically colorized when you switch to Preview or build the help system.
|
|
Alternatively, you can also use the C1Sizer Grid Editor to create fixed-size bands at the design time. For more information, see C1Sizer Grid Editor.
Create Splitter Band
Splitter bands are the row and column bands that can be resized at run time using the mouse. Each band (row or column) on the grid can be configured to act as a splitter. You can create a splitter band by setting IsSplitter property of the Band class to True. Additionally, you can set the width of the splitter band by using SplitterWidth property of the C1Sizer class in case the controls are too close to each other or too far apart.
The following code snippet demonstrates how to create a splitter band in Sizer.
| C# |
コードのコピー
|
|---|---|
Type your example code here. It will be automatically colorized when you switch to Preview or build the help system.
|
|