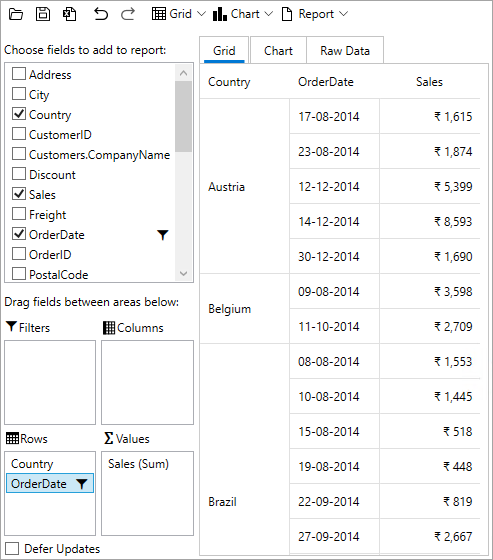
FlexPivot allows you to filter and display data in a specified range. When you apply the range filter, it allows you to filter data based on some condition(s). For example, let's say a user wants to view the sales of the products in different countries in the complete year 2014. For this, the user needs to slice the Country field in the database using range filters.
The image given below shows a FlexPivotGrid displaying the sales of all the products ordered in the year 2014.
Apply Range Filter at Runtime
Complete the following steps to implement range filtering in the FlexPivotGrid control. This implementation uses the sample created in Quick Start topic.
- Add OrderDate field in the Rows list.
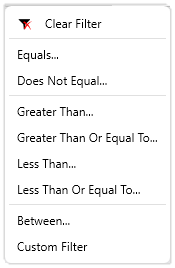
- Right-click the OrderDate field in the Rows list and click Field Settings option once to open the Field Settings dialog.
- Click the Date/Time Filter once and then click Custom Filter to apply conditions.
- Set the condition in the Custom Filter dialog as illustrated below.
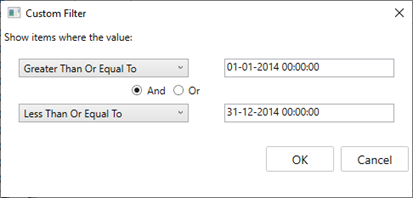
- Click OK to see that the FlexPivotGrid control displays relevant data.
Apply Value Filter Programmatically
To apply the range filter programmatically for the above discussed scenario using the C1FlexPivotFilter class, use the following code:
| C# |
コードのコピー
|
|---|---|
//一部の日付のみを表示するには、範囲フィルタを適用します C1.FlexPivot.C1FlexPivotFilter rangefilter = fpEngine.Fields["OrderDate"].Filter; rangefilter.Clear(); rangefilter.Condition1.Operator = C1.FlexPivot.ConditionOperator.GreaterThanOrEqualTo; rangefilter.Condition1.Parameter = new DateTime(2014, 1, 1); rangefilter.Condition2.Operator = C1.FlexPivot.ConditionOperator.LessThanOrEqualTo; rangefilter.Condition2.Parameter = new DateTime(2014, 12, 31); rangefilter.AndConditions = true; |
|