このセクションでは、移植可能なアプリまたは共有アプリに FlexGrid コントロールを追加し、そこにデータを追加する方法について説明します。C# または XAML で Xuni コンポーネントを追加する方法については、「C# による Xuni コンポーネントの追加」または「XAML による Xuni コンポーネントの追加」を参照してください。
このトピックは 3 つの手順で構成されます。
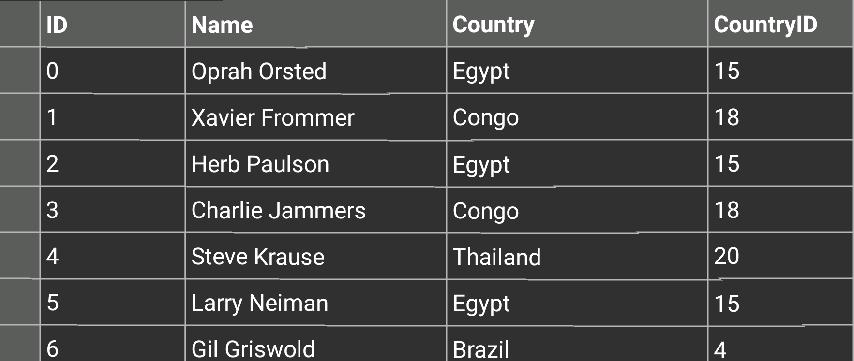
次の図は、上記の手順を実行した後の FlexGrid を示しています。
手順 1:FlexGrid のデータソースの作成
次のクラスは、FlexGrid コントロールのデータソースとして機能します。
 |
以下のように System および using System.Collections.ObjectModel 参照を含めます。
using System; using System.Collections.ObjectModel; |
| C# |
コードのコピー
|
|---|---|
public class Customer { int _id, _countryID; string _first, _last; bool _active; double _weight; DateTime _hired; static Random _rnd = new Random(); static string[] _firstNames = "Andy|Ben|Charlie|Dan|Ed|Fred|Gil|Herb|Jack|Karl|Larry|Mark|Noah|Oprah|Paul|Quince|Rich|Steve|Ted|Ulrich|Vic|Xavier|Zeb".Split('|'); static string[] _lastNames = "Ambers|Bishop|Cole|Danson|Evers|Frommer|Griswold|Heath|Jammers|Krause|Lehman|Myers|Neiman|Orsted|Paulson|Quaid|Richards|Stevens|Trask|Ulam".Split('|'); static string[] _countries = "China|India|United States|Indonesia|Brazil|Pakistan|Bangladesh|Nigeria|Russia|Japan|Mexico|Philippines|Vietnam|Germany|Ethiopia|Egypt|Iran|Turkey|Congo|France|Thailand|United Kingdom|Italy|Myanmar".Split('|'); public Customer() : this(_rnd.Next(10000)) { } public Customer(int id) { ID = id; First = GetString(_firstNames); Last = GetString(_lastNames); CountryID = _rnd.Next() % _countries.Length; Active = _rnd.NextDouble() >= .5; Hired = DateTime.Today.AddDays(-_rnd.Next(1, 365)); Weight = 50 + _rnd.NextDouble() * 50; } public int ID { get { return _id; } set { _id = value;} } public string Name { get { return string.Format("{0} {1}", First, Last); } } public string Country { get { return _countries[_countryID]; } } public int CountryID { get { return _countryID; } set {_countryID = value; } } public bool Active { get { return _active; } set { _active = value;} } public string First { get { return _first; } set {_first = value; } } public string Last { get { return _last; } set {_last = value; } } public DateTime Hired { get { return _hired; } set { _hired = value;} } public double Weight { get { return _weight; } set {_weight = value; } } static string GetString(string[] arr) { return arr[_rnd.Next(arr.Length)]; } static string GetName() { return string.Format("{0} {1}", GetString(_firstNames), GetString(_lastNames)); } // 静的な一覧を指定します。 public static ObservableCollection<Customer> GetCustomerList(int count) { var list = new ObservableCollection<Customer>(); for (int i = 0; i < count; i++) { list.Add(new Customer(i)); } return list; } //静的な値のメンバーを指定します。 public static string[] GetCountries() { return _countries; } public static string[] GetFirstNames() { return _firstNames; } public static string[] GetLastNames() { return _lastNames; } } |
|
手順 2:FlexGrid コントロールの追加
C# または XAML で FlexGrid コントロールを初期化するには、次の手順を実行します。
C# のコード
- 新しいクラス(たとえば
QuickStart.cs)を Portable または Shared プロジェクトに追加し、以下のように Xuni FlexGrid および Xamarin 参照を含めます。C# コードのコピーusing Xamarin.Forms; using Xuni.Forms.FlexGrid;
- FlexGrid コントロールを新しいメソッド
GetGridControl()でインスタンス化します。C# コードのコピーpublic static FlexGrid GetGridControl() { //コントロールのインスタンスを作成し、そのプロパティを設定します。 FlexGrid grid = new FlexGrid(); grid.ItemsSource = Customer.GetCustomerList(10); return grid; };
XAML のコード
- 次に示すように、Portable または Shared プロジェクトに新しい Forms XAML ページ(例:
QuickStart.xaml)を追加し、<ContentPage>タグを変更して Xuni 参照を追加します。XAML コードのコピー<ContentPage xmlns="http://xamarin.com/schemas/2014/forms" xmlns:x="http://schemas.microsoft.com/winfx/2009/xaml" x:Class="Appl.QuickStart" xmlns:xuni="clr-namespace:Xuni.Forms.FlexGrid;assembly=Xuni.Forms.FlexGrid" >
- FlexGrid コントロールを初期化します。それには、
<ContentPage></ContentPage>タグ間の<StackLayout></StackLayout>タグ内で、次のようにマークアップを追加します。XAML コードのコピー<StackLayout> <Grid VerticalOptions="FillAndExpand"> <xuni:FlexGrid x:Name="grid"/> </Grid> </StackLayout>
- ソリューションエクスプローラーで、
QuickStart.xamlノードを展開し、QuickStart.xaml.csを開いて、C# コードビハインドを開きます。 -
QuickStart()クラスコンストラクタで、FlexGrid のItemsSourceを設定します。次のコードは、上の手順を実行した後の
QuickStart()クラスコンストラクタを示します。C# コードのコピーpublic QuickStart() { InitializeComponent(); grid.ItemsSource = Customer.GetCustomerList(10); }
手順 3:アプリケーションの実行
- ソリューションエクスプローラーで、
App.csをダブルクリックして開きます。 - FlexGrid コントロールを表示するには、次の手順を実行します。
-
C# クラスを返すには、次の手順を実行します。クラスコンストラクタ
App()で、新しいContentPageをMainPageとして設定し、コントロールをContentPageのに割り当てます。それには、メソッドGetGridControl()を呼び出します(前の手順「手順 2:FlexGrid コントロールの追加」で定義済み)。次のコードは、上記の手順を実行した後のクラスコンストラクタ App
()を示します。C# コードのコピーpublic App() { // アプリケーションのルートページ MainPage = new ContentPage { Content = QuickStart.GetGridControl() }; }
-
Forms XAML Page ページを返すには、次の手順を実行します。クラスコンストラクタ
App()で、Forms XAML ページQuickStartをMainPageとして設定します。次のコードは、この手順を実行した後のクラスコンストラクタ
App()を示します。C# コードのコピーpublic App() { // アプリケーションのルートページ MainPage = new QuickStart(); }
-
C# クラスを返すには、次の手順を実行します。クラスコンストラクタ
- iOS および WinPhone アプリを実行するには、いくつかの追加手順が必要です。
-
iOS アプリ:
- ソリューションエクスプローラーで、YourAppName.iOS プロジェクト内の
AppDelegate.csをダブルクリックして開きます。 -
FinishedLaunching()メソッドに次のコードを追加します。C# コードのコピーXuni.Forms.FlexGrid.Platform.iOS.Forms.Init();
- ソリューションエクスプローラーで、YourAppName.iOS プロジェクト内の
-
Windows Phone アプリ:
- ソリューションエクスプローラーで、
MainPage.xmlを展開します。 MainPage.xml.csをダブルクリックして開きます。- 次のコードをクラスコンストラクタに追加します。
C# コードのコピーXuni.Forms.FlexGrid.Platform.WinPhone.FlexGridRenderer.Init();
- ソリューションエクスプローラーで、
-
iOS アプリ:
- [F5]キーを押してプロジェクトを実行します。