このトピックでは、ドロップダウンカレンダーコントロールのスタイル設定について解説します。
ドロップダウンカレンダーコントロールを構成する各要素(日付領域、ヘッダ領域など)には、それぞれ描画スタイルを設定するためのプロパティが用意されており、これらのプロパティを使用することで、色やフォントサイズなどのレイアウトを要素ごとに細かく設定することができます。これらのスタイルは Style 型となっており、コントロール単位で設定したり、リソースディクショナリのリソースとして宣言したりすることができます。
 |
テーマテンプレートと併用した場合は、各要素で設定した個別のスタイル設定が優先されます。 |
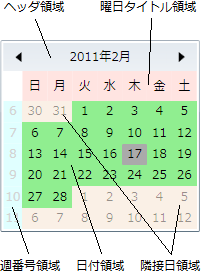
それぞれの要素に対応するスタイルプロパティ、およびそのスタイルプロパティで設定できるターゲットの型は以下のとおりです。
| 要素 | スタイルプロパティの名前 | ターゲットの型 |
|---|---|---|
| コントロール | Style | GcDropDownCalendar |
| ヘッダ領域 | CalendarHeaderButtonStyle | CalendarHeaderButton |
| 曜日タイトル領域 | WeekTitleStyleSelector | WeekTitle |
| 日付領域、隣接日領域 | CalendarDayButtonStyleSelector | CalendarDayButton |
| 週番号領域 | WeekNumberStyle | WeekNumber |

(図):カレンダーの構成要素
また、以下の要素については、条件によって描画スタイルを選択できるセレクター機能を備えています。
- 曜日タイトル領域(WeekTitleStyleSelector プロパティ)
- 日付領域(CalendarDayButtonStyleSelector プロパティ)
例えば、日付領域と隣接日領域はどちらも CalendarDayButton として定義されており、CalendarDayButtonStyle を使用してスタイルを設定することから、どちらか一方のみのスタイルを設定するといった用途には使用できません。そのため、隣接日領域のスタイルのみを設定する場合は、CalendarDayButtonStyleSelector プロパティを使用して、条件として IsTrailing プロパティが True である日付要素に対するスタイルとして定義します。
スタイルを設定する場合は、一般的な Style オブジェクトの使用方法に沿ってコードを記述します。
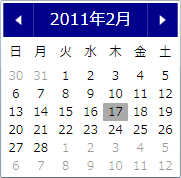
以下のサンプルコードは、ヘッダ領域の背景色を濃い青に、前景色を白に、フォントサイズを 16 に設定します。
Imports GrapeCity.Windows.InputMan.Primitives

' 新規スタイルオブジェクトを作成します。
Dim style As New Style(GetType(CalendarHeaderButton))

' ヘッダ領域の背景色を濃い青に、前景色を白に、フォントサイズを 16 に設定します。
Style.Setters.Add(New Setter(CalendarHeaderButton.BackgroundProperty, New SolidColorBrush(Colors.DarkBlue)))
Style.Setters.Add(New Setter(CalendarHeaderButton.ForegroundProperty, New SolidColorBrush(Colors.White)))
Style.Setters.Add(New Setter(CalendarHeaderButton.FontSizeProperty, 16.0))

' ヘッダ領域にスタイルを割り当てます。
GcDropDownCalendar1.CalendarHeaderButtonStyle = Style
using GrapeCity.Windows.InputMan.Primitives;

// 新規スタイルオブジェクトを作成します。
var style = new Style(typeof(CalendarHeaderButton));

// ヘッダ領域の背景色を濃い青に、前景色を白に、フォントサイズを 16 に設定します。
style.Setters.Add(new Setter(CalendarHeaderButton.BackgroundProperty, new SolidColorBrush(Colors.DarkBlue)));
style.Setters.Add(new Setter(CalendarHeaderButton.ForegroundProperty, new SolidColorBrush(Colors.DarkBlue)));
style.Setters.Add(new Setter(CalendarHeaderButton.FontSizeProperty, 16.0));

// ヘッダ領域にスタイルを割り当てます。
GcDropDownCalendar1.CalendarHeaderButtonStyle = style;
<im:GcDropDownCalendar >
  <im:GcDropDownCalendar.CalendarHeaderButtonStyle>
    <Style TargetType="im:CalendarHeaderButton">
      <Setter Property="Background"  Value="DarkBlue" />
      <Setter Property="Foreground" Value="White" />
      <Setter Property="FontSize"  Value="16" />
    </Style>
  </im:GcDropDownCalendar.CalendarHeaderButtonStyle>
</im:GcDropDownCalendar>

(図):上記サンプルコードの実行結果
また、リソースディクショナリのリソースとして宣言することにより、複数のコントロールで同じスタイル設定を共有することができます。複数のスタイルを定義しておき、キー値を使用してコントロール側で使用するスタイルを指定することも可能です。以下のサンプルコードは、UserControl コントロールの Resources プロパティを使用して、上記サンプルのスタイル設定をリソースディクショナリに追加した場合の例です。
<UserControl.Resources>
  <Style x:Key="CustomHeader" TargetType="im:CalendarHeaderButton">
    <Setter Property="Background"  Value="DarkBlue" />
    <Setter Property="Foreground" Value="White" />
    <Setter Property="FontSize"  Value="16" />
  </Style>
</UserControl.Resources>
以下のサンプルコードは、リソースのキーを使用して、ドロップダウンカレンダーコントロールに上記の例で定義したスタイルを割り当てます。
GcDropDownCalendar1.CalendarHeaderButtonStyle = Me.Resources("CustomHeader")
GcDropDownCalendar1.CalendarHeaderButtonStyle = (Style)this.Resources["CustomHeader"];
<im:GcDropDownCalendar CalendarHeaderButtonStyle="{StaticResource CustomHeader}" />
曜日タイトル領域と日付領域では、条件によって適用するスタイルを選択することができます。これにより、土曜日だけを青色で表示したり、自分の誕生日を強調表示したりするなど、特定の条件に一意した要素のみに対してスタイルを適用することができます。
条件を設定するには、以下の2つのオブジェクトのいずれかを使用します。
| オブジェクト | 説明 |
|---|---|
| DayOfWeekCondition | 要素が特定の曜日に一致しているかどうかを適用条件とします。毎週のほか、月初めから何週目の曜日かといった指定もできます。 |
| PropertyCondition | 特定のプロパティ値が指定した値に一致しているかどうかを適用条件とします。条件として指定できるプロパティは、曜日タイトル領域の場合は WeekTitleInfo クラス、日付領域および隣接日領域の場合は DayInfo クラスのプロパティに準拠します。 |
 |
条件は複数定義することができますが、条件は指定された順番で適用されます。例えば、DayOfWeekCondition を使用して毎週土曜日の日付を青色にするスタイルを定義し、次に PropertyCondition を使用して隣接日の日付を赤色にするスタイルを定義した場合、隣接日かつ土曜日の日付は赤色で表示されます。 |
以下のサンプルコードは、2010/09/01 の日付を紫色で表示します。この日付が隣接日領域に表示されている場合でも紫色で描画されていることに注目してください。
Imports GrapeCity.Windows.InputMan

' 前景色を紫色にする新規 SelectorSetter オブジェクトを作成します。
Dim setter As New SelectorSetter() With {.Property = "Foreground", .Value = "Magenta"}

' 対象の日付を2010/09/01とする条件を示す新規 PropertyCondition オブジェクトを作成し、前述の SelectorSetter オブジェクトを追加ます。
Dim condition As New PropertyCondition() With {.Property = "Date", .Value = "2010/09/01"}
condition.Setters.Add(setter)

' 新規 CalendarDayButtonStyleSelector オブジェクトを作成し、前述の PropertyCondition オブジェクトを追加ます。
Dim selector As New CalendarDayButtonStyleSelector()
selector.Conditions.Add(condition)

' ドロップダウンカレンダーコントロールの CalendarDayButtonStyleSelector に、前述の CalendarDayButtonStyleSelector オブジェクトを設定します。
GcDropDownCalendar1.CalendarDayButtonStyleSelector = selector
using GrapeCity.Windows.InputMan;

// 前景色を紫色にする新規 SelectorSetter オブジェクトを作成します。
SelectorSetter setter = new SelectorSetter() { Property = "Foreground", Value = "Magenta" };

// 対象の日付を2010/09/01とする条件を示す新規 PropertyCondition オブジェクトを作成し、前述の SelectorSetter オブジェクトを追加ます。
PropertyCondition condition = new PropertyCondition() { Property = "Date", Value = "2010/09/01" };
condition.Setters.Add(setter);

//  新規 CalendarDayButtonStyleSelector オブジェクトを作成し、前述の PropertyCondition オブジェクトを追加ます。
CalendarDayButtonStyleSelector selector = new CalendarDayButtonStyleSelector();
selector.Conditions.Add(condition);

// ドロップダウンカレンダーコントロールの CalendarDayButtonStyleSelector に、前述の CalendarDayButtonStyleSelector オブジェクトを設定します。
GcDropDownCalendar1.CalendarDayButtonStyleSelector = selector;
<im:GcDropDownCalendar>
  <im:GcDropDownCalendar.CalendarDayButtonStyleSelector>
    <im:CalendarDayButtonStyleSelector>
      <im:PropertyCondition Property="Date" Value="2010/09/01">
        <im:SelectorSetter Property="Foreground" Value="Magenta"/>
      </im:PropertyCondition>
    </im:CalendarDayButtonStyleSelector>
  </im:GcDropDownCalendar.CalendarDayButtonStyleSelector>
</im:GcDropDownCalendar>