カレンダーの構成要素
GcCalendarCellは、下図の要素から構成されています。
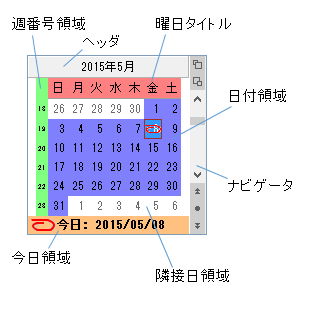
(図)カレンダーの構成

(図)カレンダーの構成
表示する月数の設定
CalendarDimensionsプロパティは、GcCalendarCellに表示する月数を設定します。1から12までの数の月を1つのGcCalendarCellに表示できます。行と列の月数を掛け合わせた数が12を超えることはできません。12を超えた場合は、エラーが発生します。
Imports GrapeCity.Win.MultiRow
Imports PlusPakCell = GrapeCity.Win.MultiRow.PlusPak

Dim GcCalendarCell1 = New PlusPakCell.GcCalendarCell()
' 2ヶ月分のカレンダーを表示します。
GcCalendarCell1.CalendarDimensions = New Size(2, 1)
GcCalendarCell1.Size = New Size(360, 180)

GcMultiRow1.Template = Template.CreateGridTemplate(New Cell() {GcCalendarCell1})
GcMultiRow1.RowCount = 10
using GrapeCity.Win.MultiRow;
using PlusPakCell = GrapeCity.Win.MultiRow.PlusPak;

PlusPakCell.GcCalendarCell gcCalendarCell1 = new PlusPakCell.GcCalendarCell();
// 2ヶ月分のカレンダーを表示します。
gcCalendarCell1.CalendarDimensions = new Size(2, 1);
gcCalendarCell1.Size = new Size(360, 180);

gcMultiRow1.Template = Template.CreateGridTemplate(new Cell[] { gcCalendarCell1 });
gcMultiRow1.RowCount = 10;
カレンダータイプ
カレンダーは、日付を選択するMonthDayカレンダーと月を選択するYearMonthカレンダーの2つのタイプがあります。既定値はMonthDayカレンダーです。
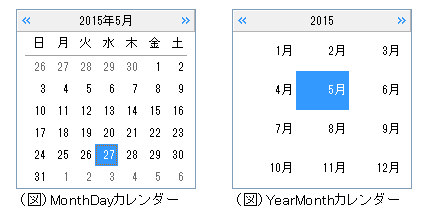
カレンダーのタイプはCalendarTypeプロパティで設定します。
また、ズームイン/ズームアウトの2つのアイコンによって、カレンダーのタイプを実行時に切り替えることができます。これらのアイコンを表示するには、ShowZoomButtonプロパティをTrueに設定する必要があります。ズームイン/ズームアウトの2つのアイコンは、カレンダーのヘッダに表示されます。

(図) ヘッダにアイコンを表示

カレンダーのタイプはCalendarTypeプロパティで設定します。
また、ズームイン/ズームアウトの2つのアイコンによって、カレンダーのタイプを実行時に切り替えることができます。これらのアイコンを表示するには、ShowZoomButtonプロパティをTrueに設定する必要があります。ズームイン/ズームアウトの2つのアイコンは、カレンダーのヘッダに表示されます。

(図) ヘッダにアイコンを表示
六曜のレイアウト
日付領域に表示する六曜の位置はRokuyouAlignmentプロパティで設定します。
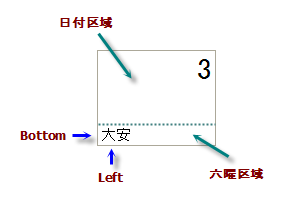
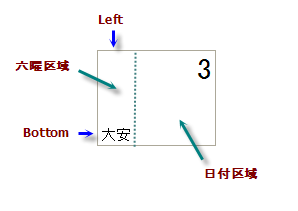
カレンダーに六曜を表示するときは、指定したRokuyouAlignmentの値によって、まず日付の上下左右のいずれに六曜の表示区域を仕切ります。その区域の中に六曜の配置を行います。日付は、六曜区域以外の区域内で描画し、ItemStyleのTextHAlignとTextVAlignプロパティの設定によって配置します。そのため、例えRokuyouAlignmentがBottomLeftとLeftBottomで六曜の位置が変わらなくても、日付の描画できる区域が変わります。
日付と六曜の相対位置と同じ方向(例えば、左右配置のときは水平方向)にセルをリサイズするとき、日付と六曜全体を表示できなくなる場合、日付を優先的に表示し、六曜は最初に隠れます。六曜が表示されなくなった後、日付が隠れます。
 ←左方向にリサイズ
次のサンプルコードは、日付の左下に六曜を表示する方法を示します。
カレンダーに六曜を表示するときは、指定したRokuyouAlignmentの値によって、まず日付の上下左右のいずれに六曜の表示区域を仕切ります。その区域の中に六曜の配置を行います。日付は、六曜区域以外の区域内で描画し、ItemStyleのTextHAlignとTextVAlignプロパティの設定によって配置します。そのため、例えRokuyouAlignmentがBottomLeftとLeftBottomで六曜の位置が変わらなくても、日付の描画できる区域が変わります。
| RokuyouAlignment = BottomLeft | RokuyouAlignment = LeftBottom |
|---|---|
 |
 |
日付と六曜の相対位置と同じ方向(例えば、左右配置のときは水平方向)にセルをリサイズするとき、日付と六曜全体を表示できなくなる場合、日付を優先的に表示し、六曜は最初に隠れます。六曜が表示されなくなった後、日付が隠れます。
 ←左方向にリサイズ
次のサンプルコードは、日付の左下に六曜を表示する方法を示します。
Imports GrapeCity.Win.MultiRow
Imports GrapeCity.Win.Calendar
Imports PlusPakCell = GrapeCity.Win.MultiRow.PlusPak

Dim GcCalendarCell1 = New PlusPakCell.GcCalendarCell()

' "先勝"と"大安"の日を表示します。
GcCalendarCell1.ShowRokuyou = Rokuyous.Senshou Or Rokuyous.Taian

' 六曜を日付領域の左下に設定します。
GcCalendarCell1.RokuyouAlignment = RokuyouAlignment.BottomLeft

GcMultiRow1.Template = Template.CreateGridTemplate(New Cell() {GcCalendarCell1})
GcMultiRow1.RowCount = 10
using GrapeCity.Win.MultiRow;
using GrapeCity.Win.Calendar;
using PlusPakCell = GrapeCity.Win.MultiRow.PlusPak;

PlusPakCell.GcCalendarCell gcCalendarCell1 = new PlusPakCell.GcCalendarCell();

// "先勝"と"大安"の日を表示します。
gcCalendarCell1.ShowRokuyou = Rokuyous.Senshou | Rokuyous.Taian;

// 六曜を日付領域の左下に設定します。
gcCalendarCell1.RokuyouAlignment = RokuyouAlignment.BottomLeft;

gcMultiRow1.Template = Template.CreateGridTemplate(new Cell[] { gcCalendarCell1 });
gcMultiRow1.RowCount = 10;
マージンの設定
GcCalendarCellでは、3種類のマージンを設定できます。
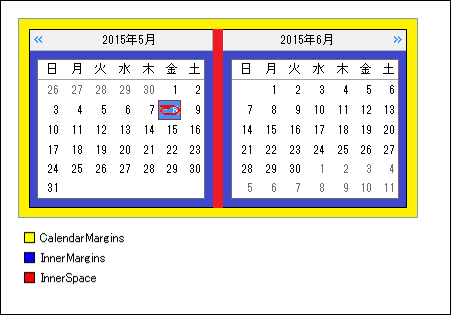
CalendarMarginsプロパティは、構成要素を表示する領域とセルの境界枠との間の上下左右のマージンを設定します。
InnerMarginsプロパティは、表示領域の境界と日付領域(YearMonthカレンダーの場合は月表示領域)の間(左右と下)、およびヘッダと曜日タイトルの間(上)のマージンを設定します。
InnerSpaceプロパティは、GcCalendarCellに複数の月を表示する場合に、月と月の間(YearMonthカレンダーの場合は年と年の間)の垂直および水平の間隔を設定します。
次のサンプルコードは、縦横それぞれ2か月分のカレンダーを表示し、表示領域と日付領域の各マージン、および月と月の間隔を設定する方法を示します。
- 表示領域のマージン
- 日付領域のマージン(YearMonthカレンダーの場合は月表示領域)
- 月と月の間隔(YearMonthカレンダーの場合は年と年の間)

CalendarMarginsプロパティは、構成要素を表示する領域とセルの境界枠との間の上下左右のマージンを設定します。
InnerMarginsプロパティは、表示領域の境界と日付領域(YearMonthカレンダーの場合は月表示領域)の間(左右と下)、およびヘッダと曜日タイトルの間(上)のマージンを設定します。
InnerSpaceプロパティは、GcCalendarCellに複数の月を表示する場合に、月と月の間(YearMonthカレンダーの場合は年と年の間)の垂直および水平の間隔を設定します。
次のサンプルコードは、縦横それぞれ2か月分のカレンダーを表示し、表示領域と日付領域の各マージン、および月と月の間隔を設定する方法を示します。
Imports GrapeCity.Win.MultiRow
Imports PlusPakCell = GrapeCity.Win.MultiRow.PlusPak

Dim GcCalendarCell1 = New PlusPakCell.GcCalendarCell()

' 縦横2か月分、合計4か月のカレンダーを表示します。
GcCalendarCell1.CalendarDimensions = New Size(2, 2)
' 表示領域のマージンを設定します。
GcCalendarCell1.CalendarMargins = New Padding(3)
' 日付領域のマージンを設定します。
GcCalendarCell1.InnerMargins = New Padding(3)
' 月と月の間隔(縦方向と横方向)を設定します。
GcCalendarCell1.InnerSpace = New Size(2, 2)

GcMultiRow1.Template = Template.CreateGridTemplate(New Cell() {GcCalendarCell1})
GcMultiRow1.RowCount = 10
using GrapeCity.Win.MultiRow;
using PlusPakCell = GrapeCity.Win.MultiRow.PlusPak;

PlusPakCell.GcCalendarCell gcCalendarCell1 = new PlusPakCell.GcCalendarCell();

// 縦横2か月分、合計4か月のカレンダーを表示します。
gcCalendarCell1.CalendarDimensions = new Size(2, 2);
// 表示領域のマージンを設定します。
gcCalendarCell1.CalendarMargins = new Padding(3);
// 日付領域のマージンを設定します。
gcCalendarCell1.InnerMargins = new Padding(3);
// 月と月の間隔(縦方向と横方向)を設定します。
gcCalendarCell1.InnerSpace = new Size(2, 2);

gcMultiRow1.Template = Template.CreateGridTemplate(new Cell[] { gcCalendarCell1 });
gcMultiRow1.RowCount = 10;
ヘッダ
カレンダーの対象年月を表示するヘッダ部では、次の項目を設定できます。
- 表示と非表示(ShowHeaderプロパティ)
- 年月の表示書式(HeaderFormatプロパティ)
- ヘッダの高さ(HeaderHeightプロパティ)
Imports GrapeCity.Win.MultiRow
Imports GrapeCity.Win.Calendar
Imports GrapeCity.Win.Common
Imports PlusPakCell = GrapeCity.Win.MultiRow.PlusPak

Dim GcCalendarCell1 = New PlusPakCell.GcCalendarCell()

' ヘッダを表示します。
GcCalendarCell1.ShowHeader = True
' ヘッダの高さを25ピクセルに設定します。
GcCalendarCell1.HeaderHeight = 25
' 年月を和暦で表示します。
GcCalendarCell1.HeaderFormat = "ggg e年 M月"
' ヘッダのスタイルを設定します。
GcCalendarCell1.HeaderStyle.BackColor = Color.Thistle
GcCalendarCell1.HeaderStyle.ForeColor = Color.Blue
GcCalendarCell1.HeaderStyle.Font = New Font("MS ゴシック", 9)
GcCalendarCell1.HeaderStyle.TextEffect = GrapeCity.Win.Common.TextEffect.RaisedLite
GcCalendarCell1.HeaderStyle.Bevel = New Bevel(Color.Purple, 2, 35, -35)
GcCalendarCell1.HeaderStyle.BorderColor = Color.Purple
GcCalendarCell1.HeaderStyle.BorderStyle = BorderStyle.FixedSingle
GcCalendarCell1.HeaderStyle.TextHAlign = AlignHorizontal.Center
GcCalendarCell1.HeaderStyle.TextVAlign = AlignVertical.Middle

GcMultiRow1.Template = Template.CreateGridTemplate(New Cell() {GcCalendarCell1})
GcMultiRow1.RowCount = 10
using GrapeCity.Win.MultiRow;
using GrapeCity.Win.Calendar;
using GrapeCity.Win.Common;
using PlusPakCell = GrapeCity.Win.MultiRow.PlusPak;

PlusPakCell.GcCalendarCell gcCalendarCell1 = new PlusPakCell.GcCalendarCell();

// ヘッダを表示します。
gcCalendarCell1.ShowHeader = true;
// ヘッダの高さを25ピクセルに設定します。
gcCalendarCell1.HeaderHeight = 25;
// 年月を和暦で表示します。
gcCalendarCell1.HeaderFormat = "ggg e年 M月";
// ヘッダのスタイルを設定します。
gcCalendarCell1.HeaderStyle.BackColor = Color.Thistle;
gcCalendarCell1.HeaderStyle.ForeColor = Color.Blue;
gcCalendarCell1.HeaderStyle.Font = new Font("MS ゴシック", 9);
gcCalendarCell1.HeaderStyle.TextEffect = GrapeCity.Win.Common.TextEffect.RaisedLite;
gcCalendarCell1.HeaderStyle.Bevel = new Bevel(Color.Purple, 2, 35, -35);
gcCalendarCell1.HeaderStyle.BorderColor = Color.Purple;
gcCalendarCell1.HeaderStyle.BorderStyle = BorderStyle.FixedSingle;
gcCalendarCell1.HeaderStyle.TextHAlign = AlignHorizontal.Center;
gcCalendarCell1.HeaderStyle.TextVAlign = AlignVertical.Middle;

gcMultiRow1.Template = Template.CreateGridTemplate(new Cell[] { gcCalendarCell1 });
gcMultiRow1.RowCount = 10;
会計年度表示
CalendarYearプロパティをCalendarYear.Fiscalに設定すると、FirstFiscalMonthプロパティの設定に基づいた会計年度表示が有効になります。
会計年度が有効になると、ヘッダの年度表示が会計年度を基準に表示されます。たとえば、FirstFiscalMonthプロパティをMonths.Aprilに設定し、2015年3月を表示すると、ヘッダの年表示は「2014」となります。
会計年度が有効になると、ヘッダの年度表示が会計年度を基準に表示されます。たとえば、FirstFiscalMonthプロパティをMonths.Aprilに設定し、2015年3月を表示すると、ヘッダの年表示は「2014」となります。
ナビゲータ
カレンダー上で年月を移動するために用意されているナビゲータでは、次の項目を設定できます。
次のサンプルコードは、ナビゲータにOutlookを設定する方法を示します。
- ナビゲータの種類(ShowNavigatorプロパティ)
次のサンプルコードは、ナビゲータにOutlookを設定する方法を示します。
Imports GrapeCity.Win.MultiRow
Imports PlusPakCell = GrapeCity.Win.MultiRow.PlusPak

Dim GcCalendarCell1 = New PlusPakCell.GcCalendarCell()
GcCalendarCell1.ShowNavigator = PlusPak.CalendarNavigators.Outlook

GcMultiRow1.Template = Template.CreateGridTemplate(New Cell() {GcCalendarCell1})
GcMultiRow1.RowCount = 10
using GrapeCity.Win.MultiRow;
using PlusPakCell = GrapeCity.Win.MultiRow.PlusPak;

PlusPakCell.GcCalendarCell gcCalendarCell1 = new PlusPakCell.GcCalendarCell();
gcCalendarCell1.ShowNavigator = PlusPakCell.CalendarNavigators.Outlook;

gcMultiRow1.Template = Template.CreateGridTemplate(new Cell[] { gcCalendarCell1 });
gcMultiRow1.RowCount = 10;
隣接日
対象年月の前後のスペースについて、次の項目を設定できます。

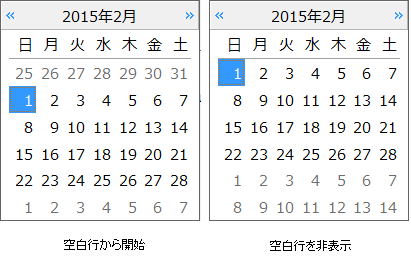
隣接日の表示スタイルは、TrailingStyleプロパティが参照するSubStyleオブジェクトで設定することができます。
- 隣接日の表示と非表示(ShowTrailingプロパティ)
- 空白行の表示と非表示(EmptyRowsプロパティ)


隣接日の表示スタイルは、TrailingStyleプロパティが参照するSubStyleオブジェクトで設定することができます。
今日の日付
カレンダーの下側の領域に今日の日付を表示することができます。表示した今日の日付をマウスでクリックすることで今日の日付を選択することができます。今日の日付を表示する場合は、ShowTodayプロパティをTrueに設定します。
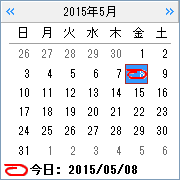
今日領域の表示スタイルは、LegendStyleプロパティが参照するStyleオブジェクトで設定することができます。また、今日領域および日付領域の今日を示す画像は、TodayImageプロパティで設定することができます。

今日領域の表示スタイルは、LegendStyleプロパティが参照するStyleオブジェクトで設定することができます。また、今日領域および日付領域の今日を示す画像は、TodayImageプロパティで設定することができます。
週番号
カレンダーの各月の左側に、通年で第何週に相当するか(週番号)を示すことができます。週番号を表示する場合は、ShowWeekNumberプロパティをTrueに設定します。
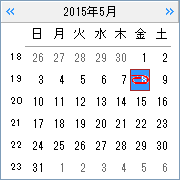
週番号領域の表示スタイルは、WeekNumberStyleプロパティが参照するStyleオブジェクトで設定することができます。

週番号領域の表示スタイルは、WeekNumberStyleプロパティが参照するStyleオブジェクトで設定することができます。