文字色を変更する検証アクション
次のコードは、検証エラー時に文字色を赤色に変更する検証アクションです。
次のコードは、ユーザー定義のCustomActionの使用例です。
Imports GrapeCity.Win.MultiRow

Public Class CustomAction
    Inherits CellValidateAction
    Protected Overrides Sub DoAction(context As ValidateActionContext)

        If Not context.IsValid Then
            context.GcMultiRow.CurrentCell.Style.ForeColor = Me.ForeColor
        Else
            context.GcMultiRow.CurrentCell.Style.ForeColor = Color.Empty
        End If
    End Sub

    Public ForeColor As Color

    Public Overrides Function Clone() As CellValidateAction
        Dim action As CustomAction = TryCast(MyBase.Clone(), CustomAction)
        action.ForeColor = Me.ForeColor
        Return action
    End Function
End Class
using GrapeCity.Win.MultiRow;

public class CustomAction : CellValidateAction
{
    protected override void DoAction(ValidateActionContext context)
    {
        if (!context.IsValid)
        {
            context.GcMultiRow.CurrentCell.Style.ForeColor = this.ForeColor;
        }
        else
        {
            context.GcMultiRow.CurrentCell.Style.ForeColor = Color.Empty;
        }
    }

    public Color ForeColor { get; set; }

    public override CellValidateAction Clone()
    {
        CustomAction action = base.Clone() as CustomAction;
        action.ForeColor = this.ForeColor;
        return action;
    }
}
Imports GrapeCity.Win.MultiRow

Dim RangeValidator1 As New RangeValidator()
RangeValidator1.MaxValue = 10
RangeValidator1.MinValue = 0
Dim customAction1 As New CustomAction()
customAction1.ForeColor = Color.Red
RangeValidator1.Actions.Add(customAction1)

Dim NumericUpDownCell1 As New NumericUpDownCell()
NumericUpDownCell1.Name = "NumericUpDownCell1"
NumericUpDownCell1.Validators.Add(RangeValidator1)

Dim cells As Cell() = {NumericUpDownCell1}
GcMultiRow1.Template = Template.CreateGridTemplate(cells)
GcMultiRow1.RowCount = 10
using GrapeCity.Win.MultiRow;

RangeValidator rangeValidator1 = new RangeValidator();
rangeValidator1.MaxValue = 10;
rangeValidator1.MinValue = 0;
CustomAction customAction1 = new CustomAction();
customAction1.ForeColor = Color.Red;
rangeValidator1.Actions.Add(customAction1);

NumericUpDownCell numericUpDownCell1 = new NumericUpDownCell();
numericUpDownCell1.Name = "numericUpDownCell1";
numericUpDownCell1.Validators.Add(rangeValidator1);

Cell[] cells = { numericUpDownCell1 };
gcMultiRow1.Template = Template.CreateGridTemplate(cells);
gcMultiRow1.RowCount = 10;
デザイナとユーザー定義の検証アクション
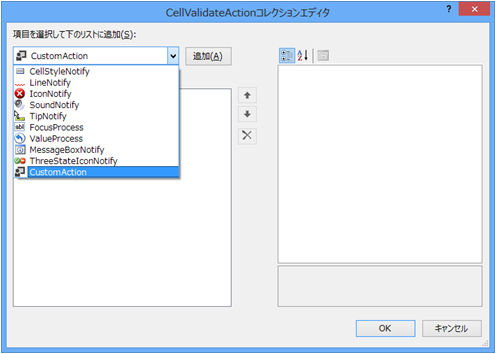
デザイナのCellValidateActionコレクションエディタを使用してユーザー定義の検証アクションを追加できます。

上記のCustomActionを追加するには、次の手順を実行します。

上記のCustomActionを追加するには、次の手順を実行します。
- CellValidateActionクラスを継承したユーザー定義の検証アクションを作成し、プロジェクトに追加する。
- プロジェクトをビルドする。
- 値を検証するセルを選択する。(例: numericUpDownCell1)
- プロパティウィンドウでValidatorsプロパティを選択し、[...]ボタンをクリックする。
- 表示されたCellValidatorコレクションエディタで左上のコンボボックスから「RangeValidator」を選択し、[追加]をクリックする。
- [メンバ]リストでRangeValidatorが選択されていることを確認する。
- 画面右のプロパティグリッドでMaxValueプロパティを選択し、「10」を入力する。
- 画面右のプロパティグリッドでMinValueプロパティを選択し、「0」を入力する。
- 画面右のプロパティグリッドでActionsプロパティを選択し、[...]ボタンをクリックする。
- 表示されたCellValidateActionコレクションエディタでCustomActionを追加する。
- 画面右のプロパティグリッドでForeColorプロパティにRedを設定する。
- [OK]ボタンをクリックしてCellValidateActionコレクションエディタを閉じる。
- [OK]ボタンをクリックしてCellValidatorコレクションエディタを閉じる。