ドロップダウンカレンダーのレイアウトについて解説します。
ドロップダウンカレンダーは、下図の要素から構成されています。
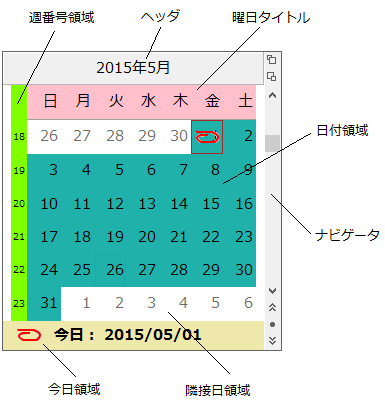
カレンダーの最初の列に表示する曜日は、FirstDayOfWeekプロパティで設定します。通常のカレンダーでは、日曜日または月曜日が最初の列に表示されます。なお、デフォルトでは、週の開始曜日はシステムから取得されます。
カレンダーに表示する日付の最小値と最大値は、MinDateプロパティとMaxDateプロパティで設定します。この最小値と最大値を超える日付には、フォーカスを移動することはできません。
CalendarDimensionsプロパティは、ドロップダウンカレンダーに表示する月数を設定します。1から12までの数の月を1つのドロップダウンカレンダーに表示できます。行と列の月数を掛け合わせた数が12を超えることはできません。12を超えた場合は、エラーが発生します。
12か月分のカレンダーを表示している場合に、左上に配置する最初の月は、FirstMonthInViewプロパティで設定します。FirstMonthInViewプロパティをMonths.Default以外に設定すると、指定した月が左上に表示されます。 ナビゲータのスキップボタンをクリックするか、またはマウスでドラッグすると、ScrollRateプロパティの設定にかかわらず、常に1回の操作につき1年分のカレンダーがスクロールされます。コントロール内に表示される最初の月はどんな場合にも変更されません。
次のサンプルコードは、横に2か月分のカレンダーを表示し、サイズを自動調節する方法を示します。
Imports GrapeCity.Win.MultiRow
Imports InputManCell = GrapeCity.Win.MultiRow.InputMan

Dim GcDateTimeCell1 As New InputManCell.GcDateTimeCell()
GcDateTimeCell1.Name = "GcDateTimeCell1"
GcDateTimeCell1.DropDownCalendar.CalendarDimensions = New Size(2, 1)

GcMultiRow1.Template = Template.CreateGridTemplate(New Cell() {GcDateTimeCell1})
using GrapeCity.Win.MultiRow;
using InputManCell = GrapeCity.Win.MultiRow.InputMan;

InputManCell.GcDateTimeCell gcDateTimeCell1 = new InputManCell.GcDateTimeCell();
gcDateTimeCell1.Name = "gcDateTimeCell1";
gcDateTimeCell1.DropDownCalendar.CalendarDimensions = new Size(2, 1);

gcMultiRow1.Template = Template.CreateGridTemplate(new Cell[] { gcDateTimeCell1 });
ドロップダウンカレンダーでは、3種類のマージンを設定できます。
- 表示領域のマージン
- 日付領域のマージン (YearMonthカレンダーの場合は月表示領域)
- 月と月の間隔 (YearMonthカレンダーの場合は年と年の間)
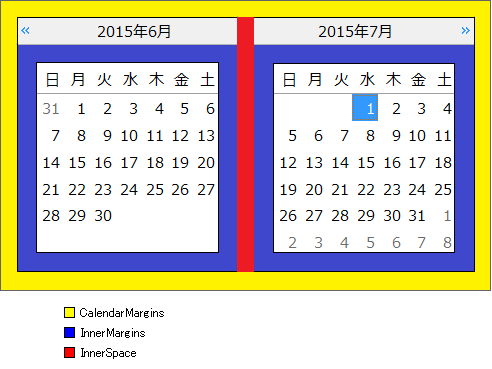
CalendarMarginsプロパティは、構成要素を表示する領域とコントロールの境界枠との間の上下左右のマージンを設定します。
InnerMarginsプロパティは、表示領域の境界と日付領域((YearMonthカレンダーの場合は月表示領域))の間(左右と下)、およびヘッダと曜日タイトルの間(上)のマージンを設定します。
InnerSpaceプロパティは、ドロップダウンカレンダーに複数の月を表示する場合に、月と月の間((YearMonthカレンダーの場合は年と年の間))の垂直および水平の間隔を設定します。
次のサンプルコードは、縦横それぞれ2か月分のカレンダーを表示し、表示領域と日付領域の各マージン、および月と月の間隔を設定する方法を示します。
Imports GrapeCity.Win.MultiRow
Imports InputManCell = GrapeCity.Win.MultiRow.InputMan

Dim GcDateTimeCell1 As New InputManCell.GcDateTimeCell()
GcDateTimeCell1.Name = "GcDateTimeCell1"

' 縦横2か月分、合計4か月のカレンダーを表示します。
GcDateTimeCell1.DropDownCalendar.CalendarDimensions = New Size(2, 2)
' 表示領域のマージンを設定します。
GcDateTimeCell1.DropDownCalendar.CalendarMargins = New Padding(3, 3, 3, 3)
' 日付領域のマージンを設定します。
GcDateTimeCell1.DropDownCalendar.InnerMargins = New Padding(3, 3, 3, 3)
' 月と月の間隔(縦方向と横方向)を設定します。
GcDateTimeCell1.DropDownCalendar.InnerSpace = New Size(2, 2)

GcMultiRow1.Template = Template.CreateGridTemplate(New Cell() {GcDateTimeCell1})
using GrapeCity.Win.MultiRow;
using InputManCell = GrapeCity.Win.MultiRow.InputMan;

InputManCell.GcDateTimeCell gcDateTimeCell1 = new InputManCell.GcDateTimeCell();
gcDateTimeCell1.Name = "gcDateTimeCell1";

// 縦横2か月分、合計4か月のカレンダーを表示します。
gcDateTimeCell1.DropDownCalendar.CalendarDimensions = new Size(2, 2);
// 表示領域のマージンを設定します。
gcDateTimeCell1.DropDownCalendar.CalendarMargins = new Padding(3, 3, 3, 3);
// 日付領域のマージンを設定します。
gcDateTimeCell1.DropDownCalendar.InnerMargins = new Padding(3, 3, 3, 3);
// 月と月の間隔(縦方向と横方向)を設定します。
gcDateTimeCell1.DropDownCalendar.InnerSpace = new Size(2, 2);

gcMultiRow1.Template = Template.CreateGridTemplate(new Cell[] { gcDateTimeCell1 });
カレンダーの対象年月を表示するヘッダ部では、次の項目を設定できます。
- 表示と非表示(ShowHeaderプロパティ)
- 年月の表示書式(HeaderFormatプロパティ)
- ヘッダの高さ(HeaderHeightプロパティ)
ヘッダの描画スタイルを設定するには、HeaderStyleプロパティを使用します。詳細は「スタイルの設定−描画スタイル」を、ヘッダの表示書式については「ヘッダの書式設定」を参照してください。
次のサンプルコードは、月-日カレンダーのヘッダを設定する方法を示します。
Imports GrapeCity.Win.MultiRow
Imports InputManCell = GrapeCity.Win.MultiRow.InputMan

Dim GcDateTimeCell1 As New InputManCell.GcDateTimeCell()
GcDateTimeCell1.Name = "GcDateTimeCell1"

' ヘッダを表示します。
GcDateTimeCell1.DropDownCalendar.ShowHeader = True
' ヘッダの高さを23ピクセルに設定します。
GcDateTimeCell1.DropDownCalendar.HeaderHeight = 23
' 年月を和暦で表示します。
GcDateTimeCell1.DropDownCalendar.HeaderFormat = "ggg e年 M月"
' ヘッダのスタイルを設定します。
GcDateTimeCell1.DropDownCalendar.HeaderStyle.BackColor = Color.Thistle
GcDateTimeCell1.DropDownCalendar.HeaderStyle.ForeColor = Color.Blue
GcDateTimeCell1.DropDownCalendar.HeaderStyle.Font = New Font("MS ゴシック", 9)
GcDateTimeCell1.DropDownCalendar.HeaderStyle.TextEffect = GrapeCity.Win.Editors.TextEffect.RaisedLite
GcDateTimeCell1.DropDownCalendar.HeaderStyle.Bevel = New GrapeCity.Win.Editors.Bevel(Color.Purple, 2, 35, -35)
GcDateTimeCell1.DropDownCalendar.HeaderStyle.BorderColor = Color.Purple
GcDateTimeCell1.DropDownCalendar.HeaderStyle.BorderStyle = BorderStyle.FixedSingle
GcDateTimeCell1.DropDownCalendar.HeaderStyle.ContentAlignment = ContentAlignment.MiddleCenter

GcMultiRow1.Template = Template.CreateGridTemplate(New Cell() {GcDateTimeCell1})
using GrapeCity.Win.MultiRow;
using InputManCell = GrapeCity.Win.MultiRow.InputMan;

InputManCell.GcDateTimeCell gcDateTimeCell1 = new InputManCell.GcDateTimeCell();
gcDateTimeCell1.Name = "gcDateTimeCell1";

// ヘッダを表示します。
gcDateTimeCell1.DropDownCalendar.ShowHeader = true;
// ヘッダの高さを23ピクセルに設定します。
gcDateTimeCell1.DropDownCalendar.HeaderHeight = 23;
// 年月を和暦で表示します。
gcDateTimeCell1.DropDownCalendar.HeaderFormat = "ggg e年 M月";
// ヘッダのスタイルを設定します。
gcDateTimeCell1.DropDownCalendar.HeaderStyle.BackColor = Color.Thistle;
gcDateTimeCell1.DropDownCalendar.HeaderStyle.ForeColor = Color.Blue;
gcDateTimeCell1.DropDownCalendar.HeaderStyle.Font = new Font("MS ゴシック", 9);
gcDateTimeCell1.DropDownCalendar.HeaderStyle.TextEffect = GrapeCity.Win.Editors.TextEffect.RaisedLite;
gcDateTimeCell1.DropDownCalendar.HeaderStyle.Bevel = new GrapeCity.Win.Editors.Bevel(Color.Purple, 2, 35, -35);
gcDateTimeCell1.DropDownCalendar.HeaderStyle.BorderColor = Color.Purple;
gcDateTimeCell1.DropDownCalendar.HeaderStyle.BorderStyle = BorderStyle.FixedSingle;
gcDateTimeCell1.DropDownCalendar.HeaderStyle.ContentAlignment = ContentAlignment.MiddleCenter;

gcMultiRow1.Template = Template.CreateGridTemplate(new Cell[] { gcDateTimeCell1 });
カレンダー上で年月を移動するために用意されているナビゲータでは、次の項目を設定できます。
- ナビゲータの種類(ShowNavigatorプロパティ)
- ナビゲータの表示位置(NavigatorOrientationプロパティ)
対象年月の前後のスペースについて、次の項目を設定できます。
- 隣接日の表示と非表示(ShowTrailingプロパティ)
- 空白行の表示と非表示(EmptyRowsプロパティ)
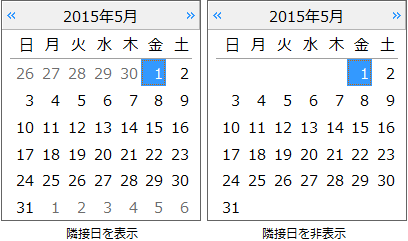
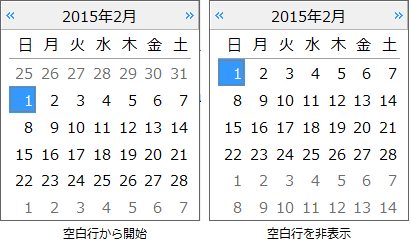
隣接日の表示スタイルは、TrailingStyleプロパティが参照するSubStyleオブジェクトで設定することができます。詳細は「スタイルの設定−日付スタイル」を参照してください。
カレンダーの下側の領域に今日の日付を表示することができます。表示した今日の日付をマウスでクリックすることで今日の日付を選択することができます。今日の日付を表示する場合は、ShowTodayプロパティをTrueに設定します。
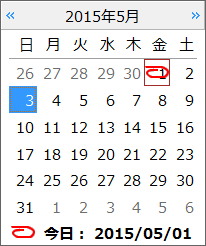
今日領域の表示スタイルは、LegendStyleプロパティが参照するStyleオブジェクトで設定することができます。詳細は「スタイルの設定−描画スタイル」を参照してください。
また、今日領域および日付領域の今日を示す画像は、TodayImageプロパティで設定することができます。
カレンダーの各月の左側に、通年で第何週に相当するか(週番号)を示すことができます。週番号を表示する場合は、ShowWeekNumberプロパティをTrueに設定します。
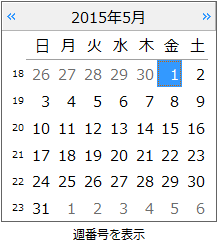
週番号領域の表示スタイルは、WeekNumberStyleプロパティが参照するStyleオブジェクトで設定することができます。詳細は「スタイルの設定−描画スタイル」を参照してください。