Spread.Sheetsでは、ユーザーは数式を使用して、組み込みシェイプまたはカスタムシェイプをワークシートに追加できます。これにより、シェイプモデルの修正が可能になります。
データ駆動型シェイプのメリット
この機能を使用すると、スプレッドシート内の数式、別のシェイプ、またはデータソースを使用してプロパティを評価できる動的なシェイプを作成できます。これらの数式を使用して、データをシェイプに連結できます。
この機能は、ユーザーが下記の操作を実行したい場合に役立ちます。
- スプレッドシートの数式に基づいて動的に更新できるフローチャートを作成します。
- 同じ役職の従業員に対して同じシェイプを持つ階層組織図を表示します。
- スプレッドシートで値が更新されるたびに、シェイプで売上高を更新します。
数式によってシェイプを追加するには、以下の手順を実行します。
数式による組み込みシェイプの追加
ユーザーは、数式を使用して組み込みシェイプをワークシートに追加できます。次の例は、組み込みの数式を使用して作成したシェイプを示します。

コードの使用
次のサンプルコードは、組み込みの数式を使用してワークシートにシェイプを追加する方法を示します。
| JavaScript |
コードのコピー
|
|---|---|
|
// 組み込みの数式を使用してシェイプを追加します。 window.onload = function () { sheet.name("BuiltInShape"); GC.Spread.Sheets.Shapes.AutoShapeType.oval, 100, 50, 100, 150); }; |
|
ユーザーは、シェイプの任意の属性に対して定義された数式と、その特定の属性の数式によって参照される値を取得できます。たとえば、上記の組み込みシェイプでは、シェイプの高さの式は「=BuiltInShape!B4」と定義されていますが、高さの値はセルB4で160と定義されています。
コードの使用
次のサンプルコードは、getFormulaメソッドを使用して数式を取得し、組み込みシェイプの属性の値を取得する方法を示します。
| JavaScript |
コードのコピー
|
|---|---|
// アクティブシートを取得します。 var activeSheet = spread.getSheet(0); activeSheet.setArray(0, 0, [ ["x", 10], ["y", 200], ["width", 300], ["height", 140], ["angle", 0], ["background color and tranparency", "red", 0.5], ["border color and width", "blue", 5], ["shape text", "これはデモテキストです。"], ["text font", "15px Georgia"], ["text color", "Yellow"], ]); var shape1 = activeSheet.shapes.add("shape1", GC.Spread.Sheets.Shapes.AutoShapeType.cloud, 50, 200, 100, 150); var shapeStyle = shape1.style(); shapeStyle.fill.color = '=Sheet1!B6'; shape1.style(shapeStyle); // setFormulaメソッドを使用して、シェイプの幅と高さを設定します。 shape1.setFormula("x", "=Sheet1!B1"); shape1.setFormula("y", "=Sheet1!B2"); shape1.setFormula("width", "=Sheet1!B3"); shape1.setFormula("height", "=Sheet1!B4"); shape1.setFormula("rotate", "=Sheet1!B5"); shape1.setFormula("text", "=Sheet1!B8"); shape1.setFormula("style.fill.color", "=Sheet1!B6"); shape1.setFormula("style.fill.transparency", "=Sheet1!C6"); shape1.setFormula("style.line.color", "=Sheet1!B7"); shape1.setFormula("style.line.width", "=Sheet1!C7"); shape1.setFormula("style.textEffect.font", "=Sheet1!B9"); shape1.setFormula("style.textEffect.color", "=Sheet1!B10"); // getFormulaメソッドを使用して、シェイプの幅と高さを設定するために使用される数式を返します。 console.log("幅の数式 : " + shape1.getFormula("width")); console.log("高さの数式 : " + shape1.getFormula("height")); // シェイプの幅と高さの値を返すためにシェイプの属性を使用します。 console.log("幅の値: ", shape1.width()); console.log("高さの値: ", shape1.height()); activeSheet.setColumnWidth(0, 280); activeSheet.setColumnWidth(1, 100); for (var i = 2; i < 8; i++) activeSheet.setColumnWidth(i, 70); |
|
数式によるカスタムシェイプの追加
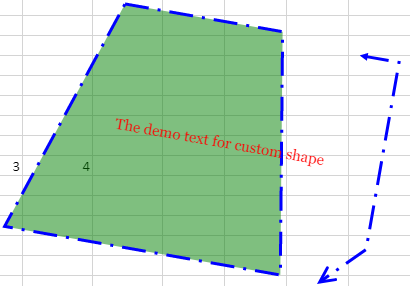
ユーザーは、数式を使用してカスタムシェイプをワークシートに追加できます。次の例は、カスタム数式を使用して作成したシェイプを示します。

コードの使用
次のサンプルコードは、カスタム数式を使用してワークシートにシェイプを追加する方法を示します。
| JavaScript |
コードのコピー
|
|---|---|
|
// カスタム数式を使用してシェイプを追加します。 window.onload = function () { sheet.name("CustomShape"); ["background color and tranparency", "green", 0.5], ["border color and width", "blue", 0], ["shape text", "これはカスタムシェイプのデモテキストです。"], createComboCellType(GC.Spread.Sheets.HorizontalAlign, 2)); createComboCellType(GC.Spread.Sheets.Shapes.PresetLineDashStyle)); createComboCellType(GC.Spread.Sheets.Shapes.LineJoinStyle)); createComboCellType(GC.Spread.Sheets.Shapes.ArrowheadStyle)); createComboCellType(GC.Spread.Sheets.Shapes.ArrowheadStyle)); createComboCellType(GC.Spread.Sheets.Shapes.ArrowheadLength)); createComboCellType(GC.Spread.Sheets.Shapes.ArrowheadLength)); createComboCellType(GC.Spread.Sheets.Shapes.ArrowheadWidth)); createComboCellType(GC.Spread.Sheets.Shapes.ArrowheadWidth)); var model = { { "=CustomShape!C19", lengthType: "=CustomShape!D19" "=CustomShape!F19", lengthType: "=CustomShape!G19" } { { { { { "=CustomShape!B13", // (0: top, 1: center, 2: bottom) "=CustomShape!B12", // (0: left, 1: center, 2: right) "=CustomShape!B14", //f "vertical", "rotate90", "rotate270" { left: "=controls.0.x", top: 20, bottom: "=height - 20", right: "=width - variables.xOffset" }}; }; function createComboCellType(enumType, max) { { { ({ |
|
注意:シェイプAPIセットは、数式や値をカスタマイズオプションと同様に受け取りますが、常に対応する値を返します。範囲参照は「sheetName!A10」「A1」形式とする必要があり、「ROW(Sheet1!B30)」など、コンテキスト依存の数式がサポートされます。
ユーザーは、シェイプの任意の属性に対して定義された数式と、その特定の属性の数式によって参照される値を取得できます。たとえば、上記のカスタムシェイプでは、シェイプの高さの数式は=CustomShape!B4」と定義されていますが、高さの値はセルB4で240と定義されています。
コードの使用
次のサンプルコードは、getFormulaメソッドを使用して数式を取得し、組み込みシェイプの属性の値を取得する方法を示します。
| JavaScript |
コードのコピー
|
|---|---|
// アクティブシートを取得します。 var activeSheet = spread.getSheet(0); activeSheet.name("CustomShape"); // データを設定します。 activeSheet.setArray(0, 0, [ ["left", 480], ["top", 60], ["width", 300], ["height", 240], ["angle"], ["background color and tranparency", "green", 0.5], ["border color and width", "blue", 0], ["shape text", "これはカスタムシェイプのデモテキストです。"], ["text font", "15px Georgia"], ["text color", "red"], ["margins", 1, 2, 3, 4], ["horizontalAlignment", 1], ["verticalAlignment", 1], ["textDirection", "horizontal"], ["allowTextToOverflowShape", false], ["wrapTextInShape", true], ["line width", 3], ["line style", 5, "capType", 2, "joinType", 1], ["endPoints", 1, 1, 1, 5, 2, 2], ]); activeSheet.setFormula(4, 1, "=ROW(CustomShape!B10)"); var model = { left: "=CustomShape!B1", top: "=CustomShape!B2", width: "=CustomShape!B3", height: "=CustomShape!B4", angle: "=CustomShape!B5", options: { endPoints: { beginArrow: { type: "=CustomShape!B19", widthType: "=CustomShape!C19", lengthType: "=CustomShape!D19" }, endArrow: { type: "=CustomShape!E19", widthType: "=CustomShape!F19", lengthType: "=CustomShape!G19" } }, fill: { type: 1, // 単色による塗りつぶしです(現時点では単色塗りつぶしのみがサポートされます)。 color: "=CustomShape!B6", transparency: "=CustomShape!C6" }, stroke: { type: 1, // 単色による塗りつぶしです(現時点では単色塗りつぶしのみがサポートされます)。 color: "=CustomShape!B7", transparency: "=CustomShape!C7", width: "=CustomShape!B17", lineStyle: "=CustomShape!B18", capType: "=CustomShape!D18", joinType: "=CustomShape!F18" }, textFormatOptions: { text: "=CustomShape!B8", // "シェイプのテキスト", font: "=CustomShape!B9", // "bold 15px Georgia", // CSSではフォントとズームに関連するコードを更新します。 fill: { type: 1, // 単色による塗りつぶしです(現時点では単色塗りつぶしのみがサポートされます)。 color: "=CustomShape!B10" }, margins: { left: "=CustomShape!B11", top: "=CustomShape!C11", right: "=CustomShape!D11", bottom: "=CustomShape!E11" }, verticalAlignment: "=CustomShape!B13", // (0: top, 1: center, 2: bottom) horizontalAlignment: "=CustomShape!B12", // (0: left, 1: center, 2: right) textDirection: "=CustomShape!B14", //f "vertical", "rotate90", "rotate270" allowTextToOverflowShape: "=CustomShape!B15", wrapTextInShape: "=CustomShape!B16" } }, variables: { xOffset: 40, yOffset: 10 }, path: [[ ["M", "=controls.0.x", 0], // M: move to (x, y) ["L", "=width - controls.0.x", 0], // L: line to (x, y) ["L", "=width - 2 * variables.xOffset", "=height"], ["L", "=variables.xOffset", "=height"], ["Z"]], // Z: close path [ ["M", "=width - variables.xOffset", "=variables.yOffset"], ["L", "=width", "=variables.yOffset"], ["L", "=width", "=height - 4 * variables.yOffset"], ["L", "=width - variables.xOffset", "=height"] ] ], controls: [ { // 位置と範囲の制限を指定するための数式。デフォルトの位置はここでは (0, 0.2 * width) であり、 // y 範囲は 0 から 0.5*width までとなります。 x: "=BOUND(0.3*width, 0, false, 0, 0.5*width)", y: 0, xBehavior: 0, // x(水平方向)に調整する場合は0、それ以外の場合は1 yBehavior: 1 // y(垂直方向)に調整する場合は0、それ以外の場合は1 } ], connectionPoints: [ { x: "=0.5*width", y: 0 }, { x: "=0.5*controls.0.x", y: "=0.5*height" }, { x: "=0.5*width", y: "=1*height" }, { x: "=width-0.5*controls.0.x", y: "=0.5*height" } ], textRect: { left: "=controls.0.x", top: 20, bottom: "=height - 20", right: "=width - variables.xOffset" } }; var shape2 = activeSheet.shapes.add('shape2', model); // getFormulaメソッドを使用して、カスタムシェイプの幅と高さを設定するために使用される数式を返します。 console.log("幅の数式: " + shape2.getFormula("width")); console.log("高さの数式: " + shape2.getFormula("height")); // シェイプの幅と高さの値を返すためにシェイプの属性を使用します。 console.log("幅の値 ", shape2.width()); console.log("高さの値 ", shape2.height()); // 列幅を設定します。 activeSheet.setColumnWidth(0, 210); activeSheet.setColumnWidth(1, 60); for (var i = 2; i < 6; i++) { activeSheet.setColumnWidth(i, 50); } |
|