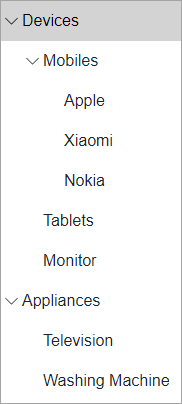
このクイックスタートガイドは、TreeViewを初めて使用するユーザーのために用意されています。このクイックスタートでは、新しいアプリケーションを作成して、TreeViewコントロールをアプリケーションに追加し、子ノードとリーフノードをツリービューに追加します。

Create a Blazor App
- In Visual Studio, select Create a new project from the Get started pane.
- In the Create a new project dialog, select Blazor App and click Next.
- In the Configure your new project dialog, provide name of the project you want to create in the Project name field and location for the project in the Location field. Click Create.
-
In the Create a new Blazor app dialog, select Blazor WebAssembly App template and click Create. A new client-side Blazor app is created. Alternatively, you can also create a Blazor server-side app.
Note: Blazor Server App or server-side app can be created using the Blazor Server App template. For more details, see Blazor サーバー topic under Blazor Project Types.
Configure References
- [ソリューションエクスプローラー]にて[依存関係]を右クリックし、[NuGetパッケージの管理]を選択します。
- 表示される [NuGetパッケージマネージャー]の[パッケージソース]にて、[nuget.org]を選択します。
-
表示されるパッケージの中から次のパッケージを検索して、[インストール]をクリックします。
- C1.Blazor.TreeView
- C1.Blazor.Core
- Navigate to the wwwroot, open index.html file.
-
Register the client resources by adding the following lines of code to the <head> tag.
Example Title コードのコピー<link rel="stylesheet" href="/_content/C1.Blazor.Core/styles.css" /> <link rel="stylesheet" href="~/_content/C1.Blazor.TreeView/styles.css" />
-
Add the following code to the <body> tag.
HTML コードのコピー<script src="/_content/C1.Blazor.Core/scripts.js"></script> <script src="~/_content/C1.Blazor.TreeView/scripts.js"></script>
Configure the TreeView control
Display the TreeView with child and leaf nodes by binding the TreeView control with unbound data. In this example, we have used the TreeViewItem class as a data source object class to add nodes to the TreeView as shown in the following code:
| C# |
コードのコピー
|
|---|---|
@using C1.Blazor.TreeView

<C1TreeView>
    <TreeViewItem Header="Devices">
        <TreeViewItem Header="Mobiles">
            <TreeViewItem Header="Apple" />
            <TreeViewItem Header="Xiaomi" />
            <TreeViewItem Header="Nokia" />
        </TreeViewItem>
        <TreeViewItem Header="Tablets" />
        <TreeViewItem Header="Monitor" />
    </TreeViewItem>
    <TreeViewItem Header="Appliances">
        <TreeViewItem Header="Television" />
        <TreeViewItem Header="Washing Machine" />
    </TreeViewItem>
</C1TreeView>
|
|
You can also bind the TreeView control with bound data. To know more about data binding in TreeView, see Data Binding topic.
プロジェクトをビルドして実行する
- プロジェクトをビルドするには、メニューバーにて[ビルド]>[ソリューションのビルド]を選択します。
- [F5]キーを押してプロジェクトを実行します。